|
Hey guys school just started today for term 4 so I will only be posting once a week. Every second Sunday I will post a tips or story and every other Sunday I will post diys and step by step tutorials. Today it is about create this petal model dress design, not sure what to call it. 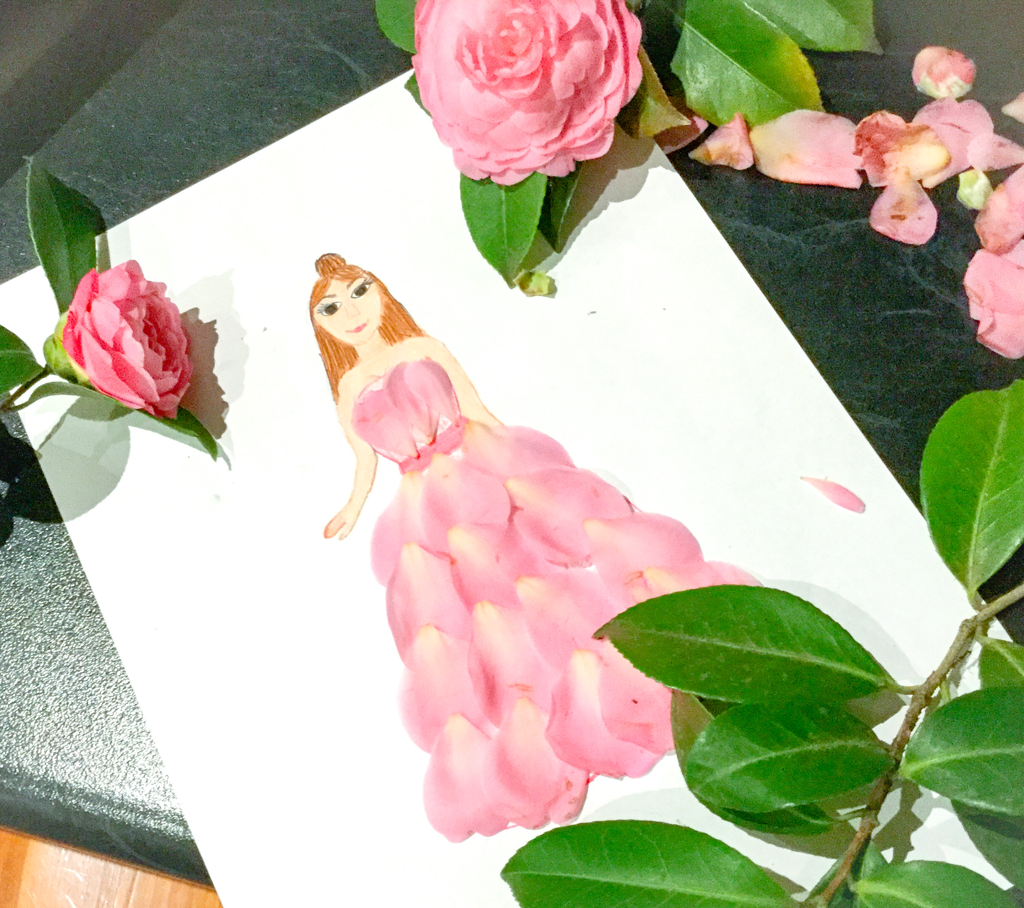 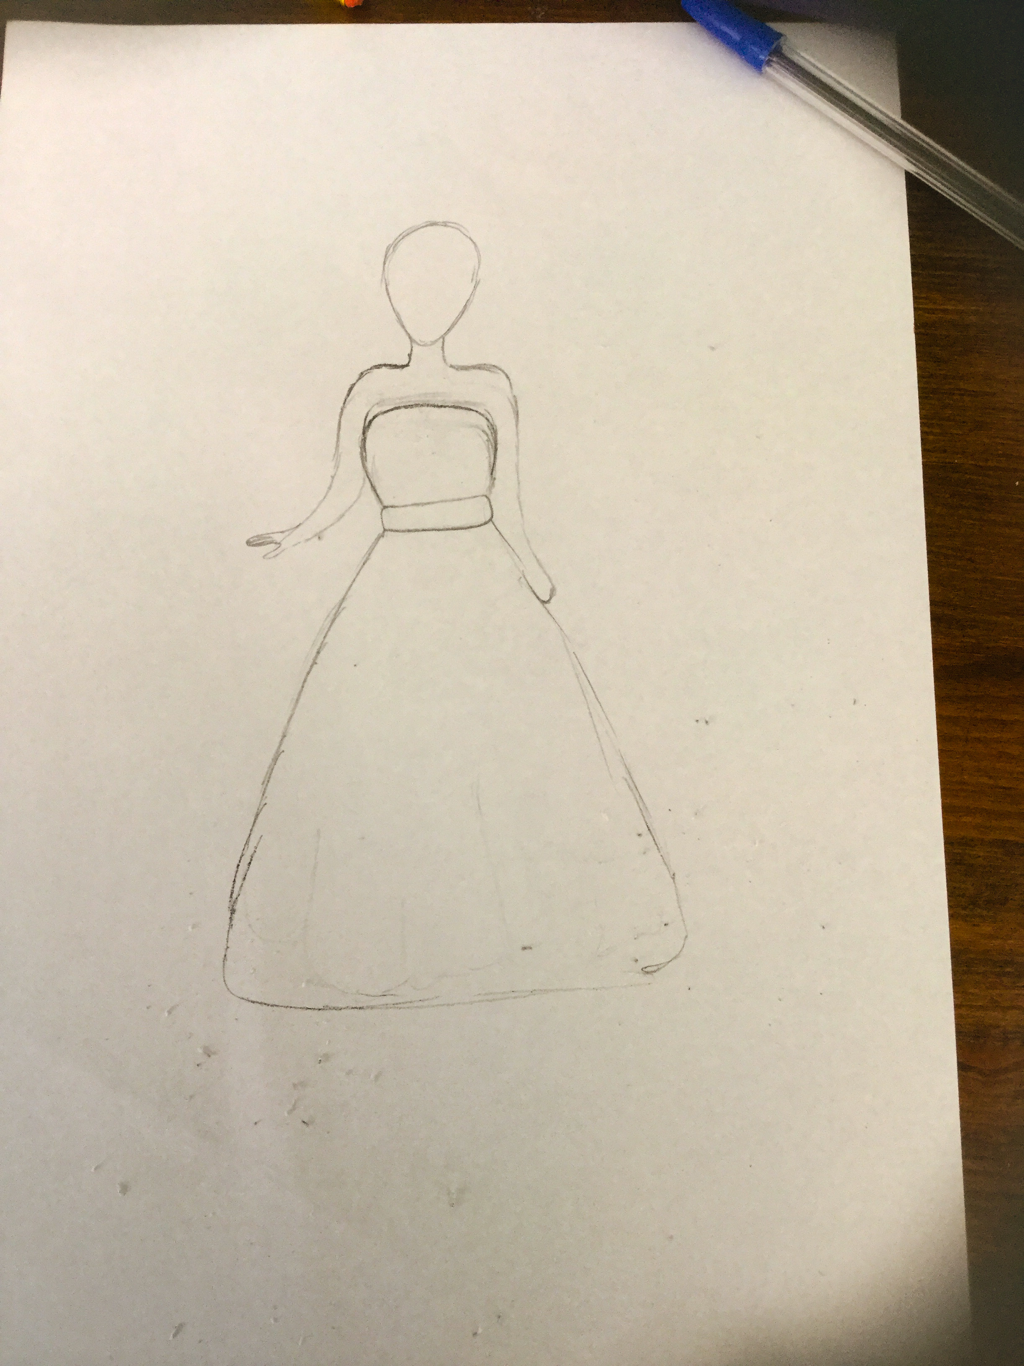 1. First draw an outline or trace a body and dress design you like. 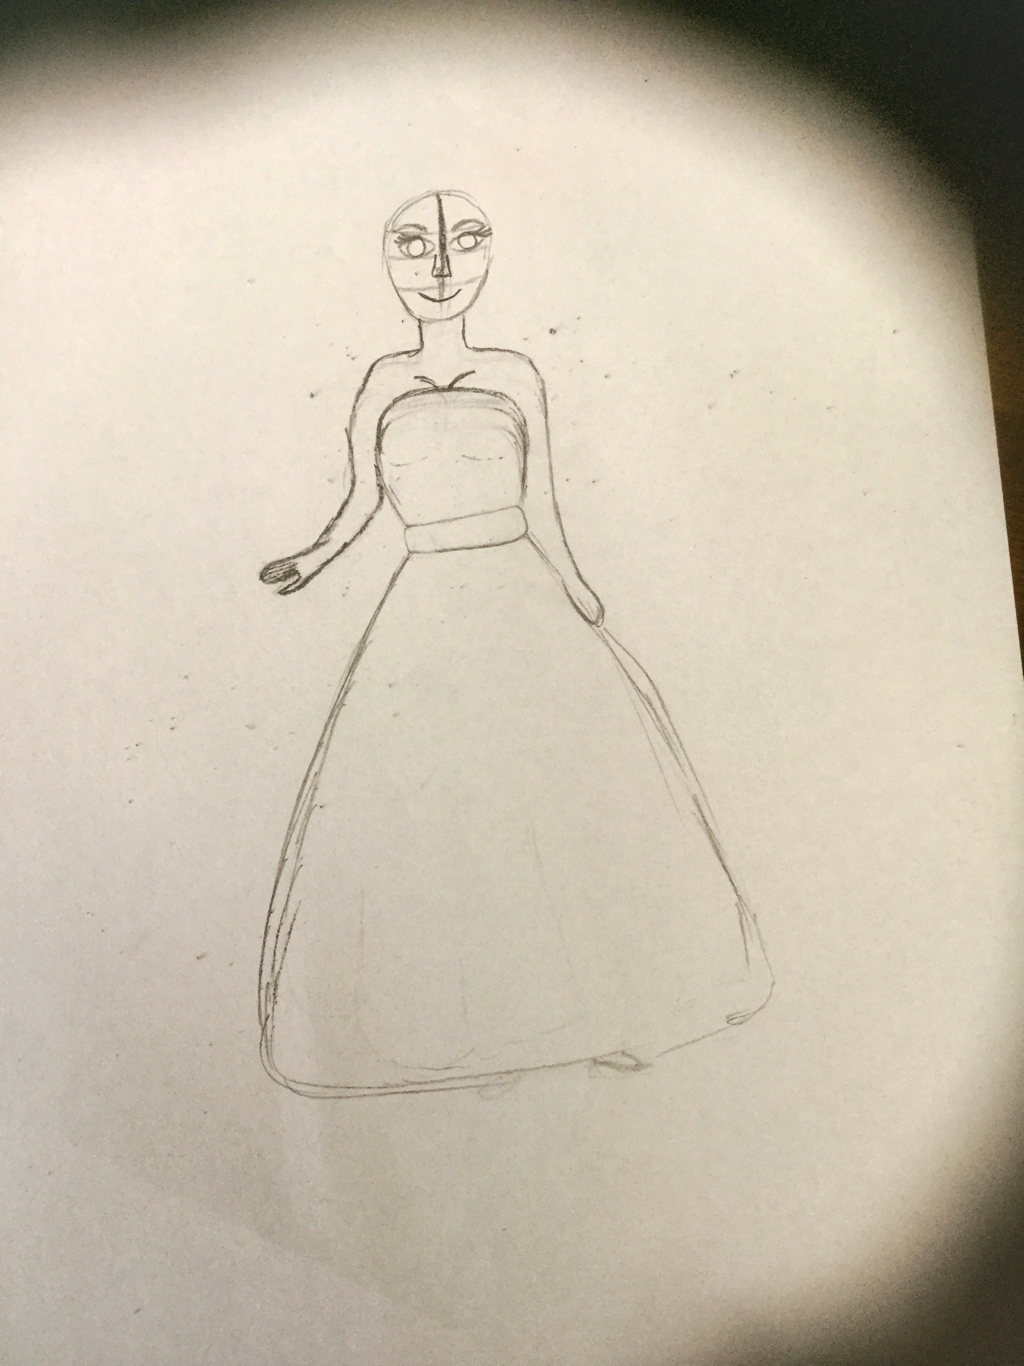 2. Define and add more detail to the sketch as well as sketching the face. 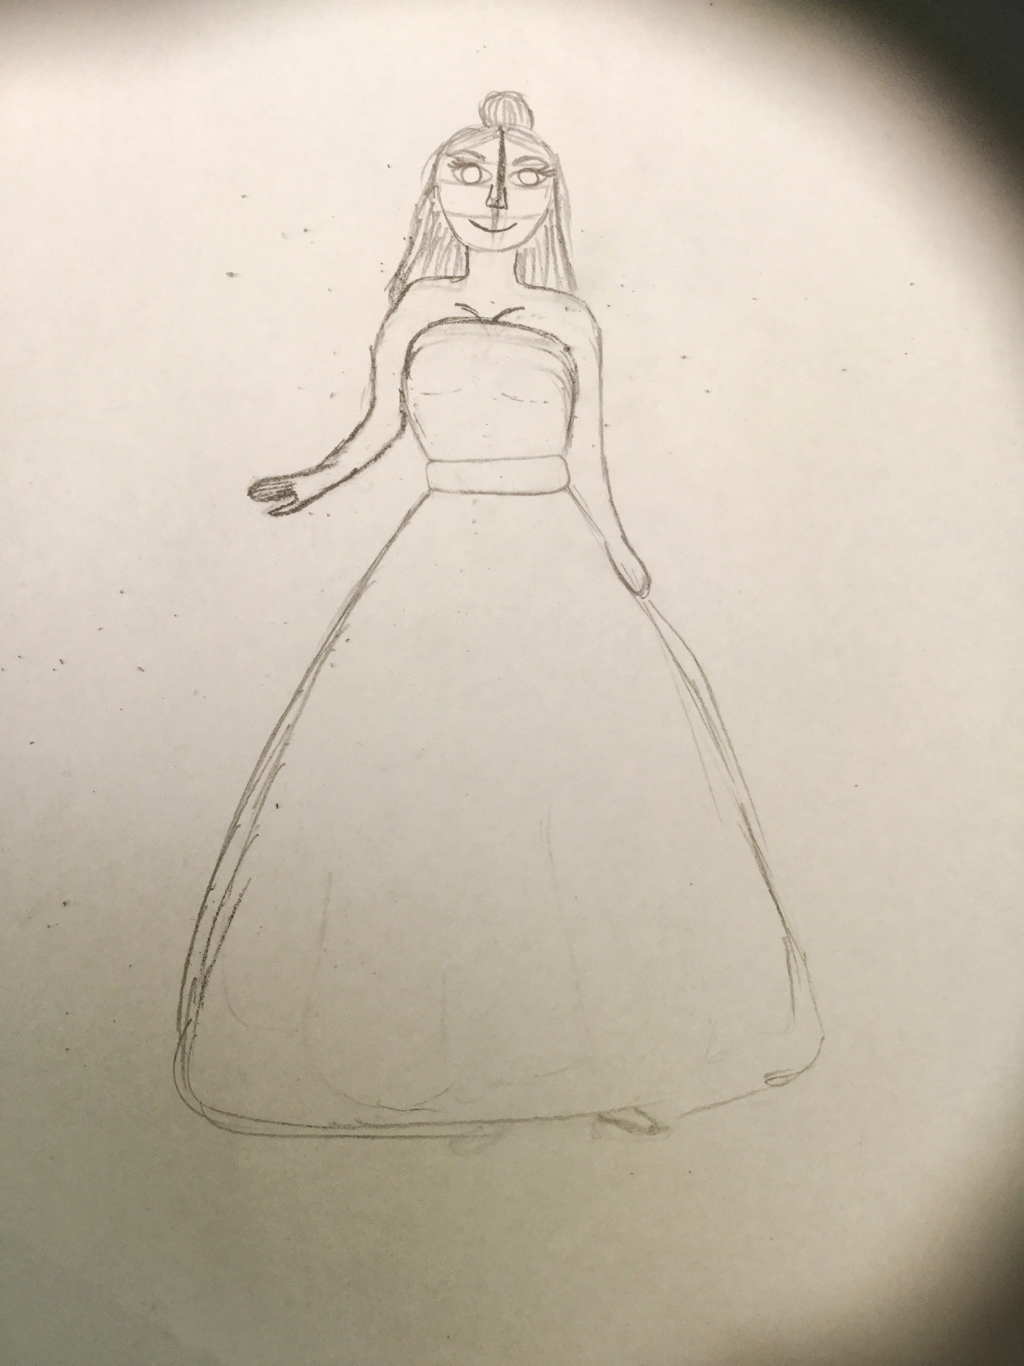 3. Outline the hair of your choice. Remember this is just a sketch plan. 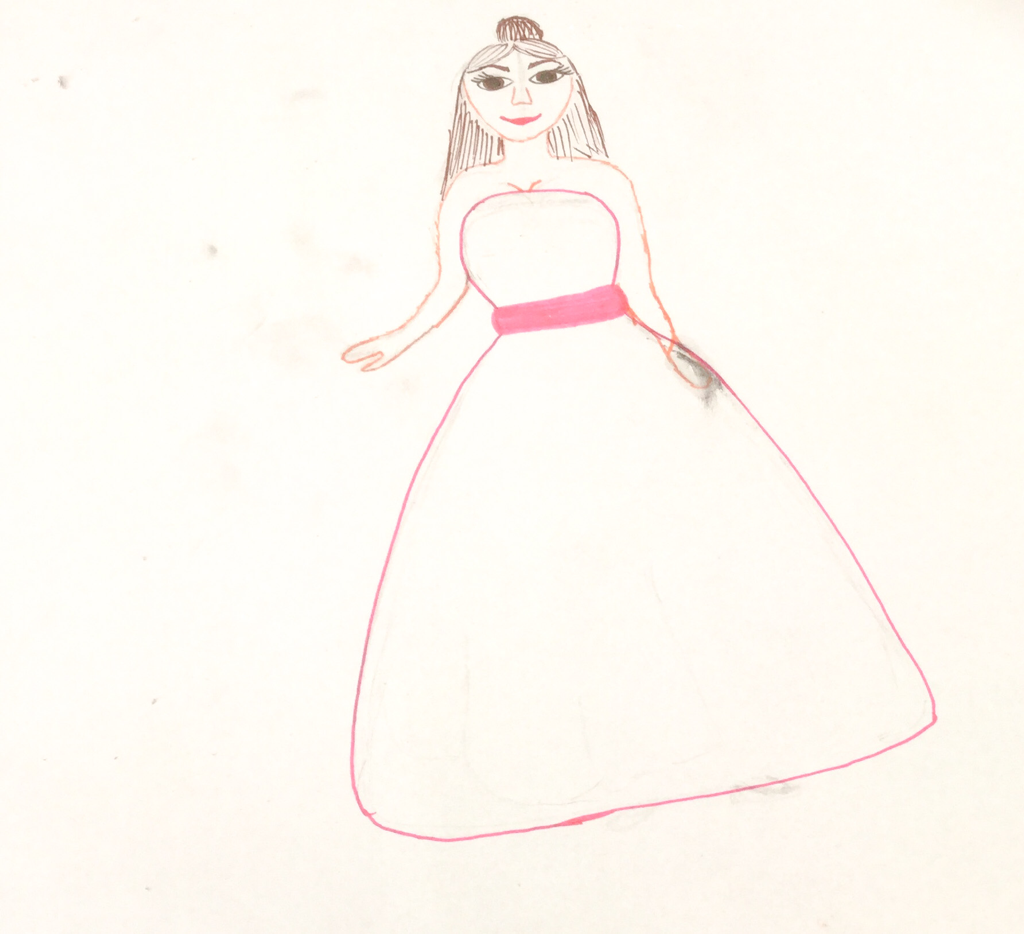 4. Go over the drawing with fineliners. By the way ignore the mistake I made with the hand it will be covered up with the petals. 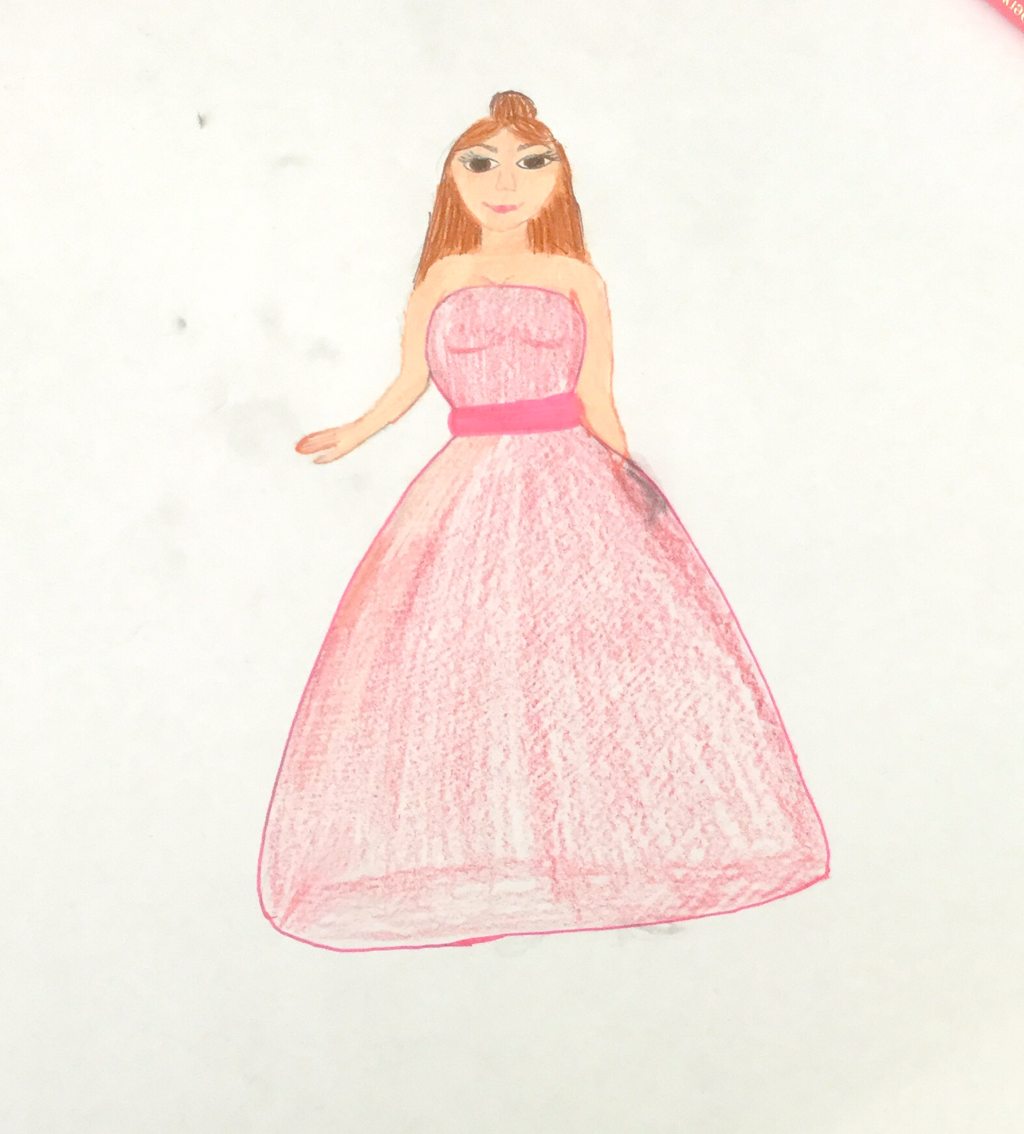 5. Now colour in the drawing. 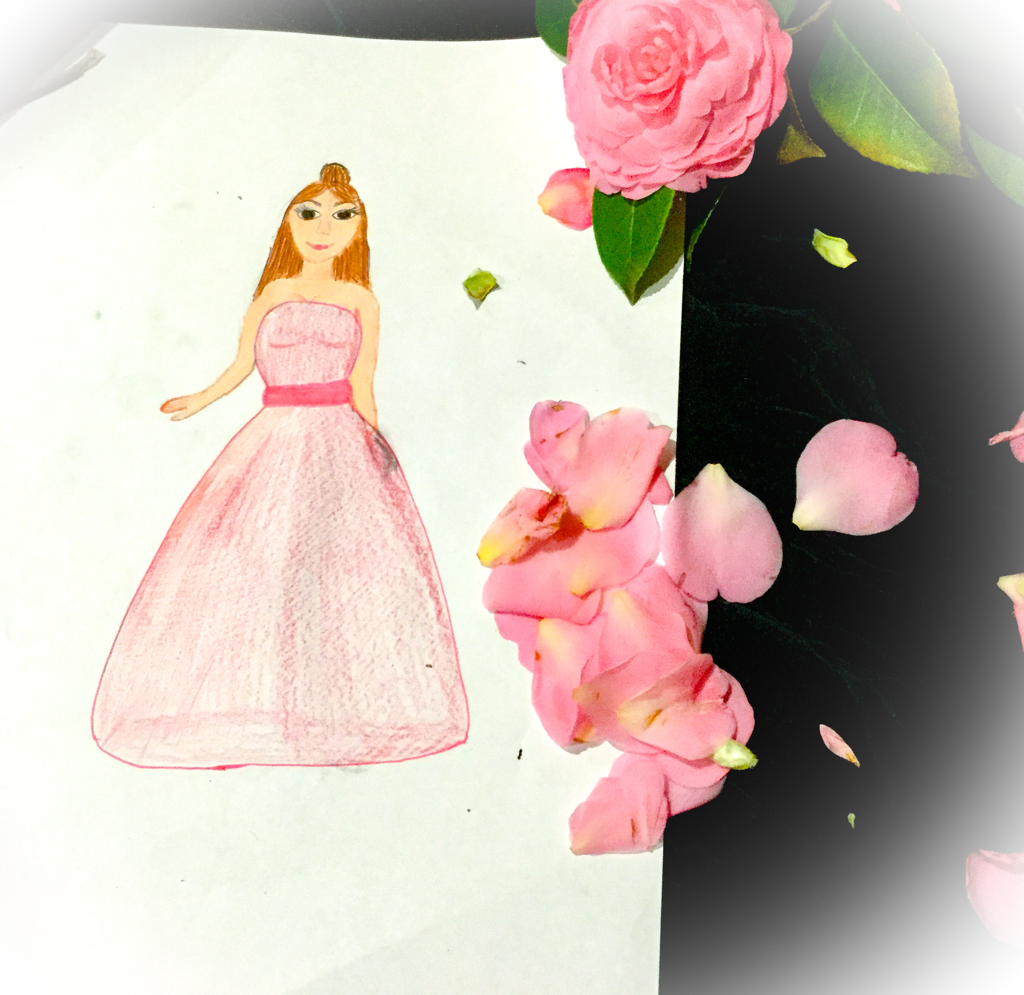 6. Now collect some petals from outside any colour you want. 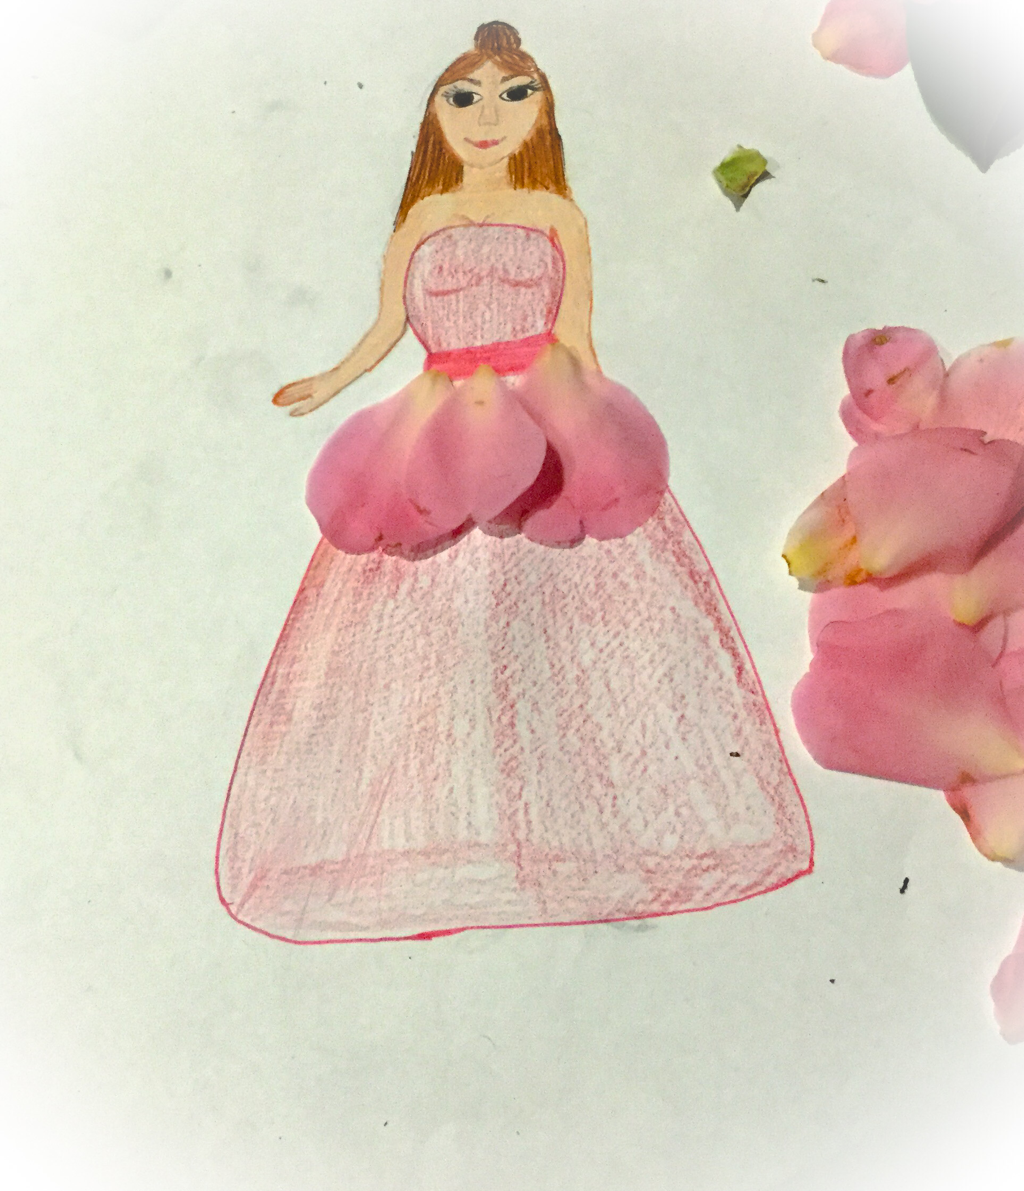 7. Now start placing petals on the drawing. 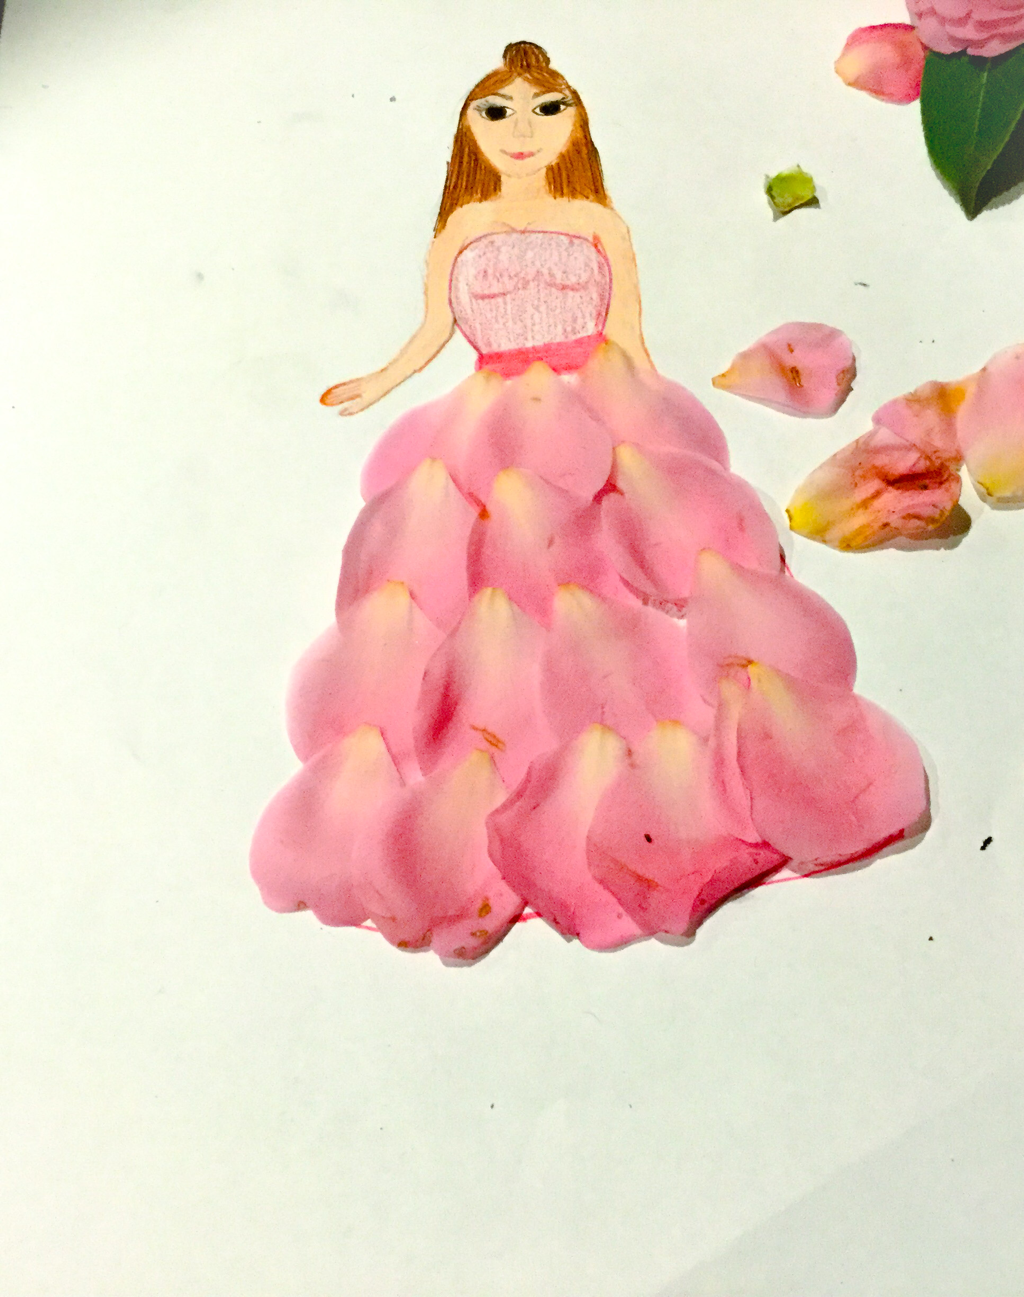 8. Keep repeating the line of petals till the end of the dress.  9. Also add small petals to the top of the dress. 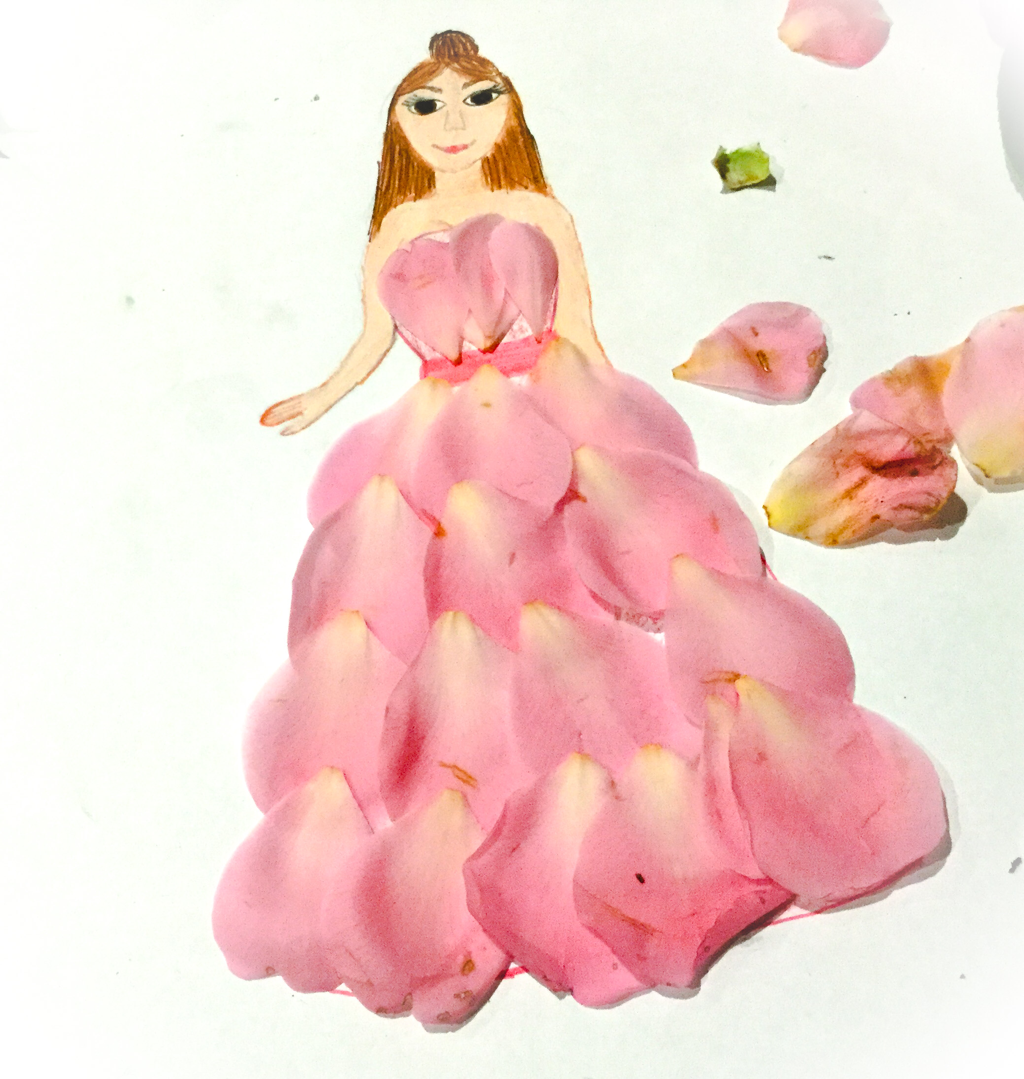 10. Now you are done with this piece of art. Next week I will be posting a text blog post. If you want to stay tuned about my posting and have a look at my photography Instagram (taypaints05).
0 Comments
Hey guys sorry I haven't been posting for the past week or 2 because I have been on a holiday to New South Whales with my family and my family friends. It was so much fun we made a few amazing friends. Where we played lots of awesome games and shared lots of stories together. Here are a few photos of the time I spent at Eden and Lakes Entrance. I will no be back to my usual posting schedule. Hello, today I'm back for the Wednesday post. Today I am talking about whether I prefer to piant from life, or from a reference photograph. I think both are great in their own way. I personly I like photographs for many reasons.
One is the a picture can't move like life. It is easier to draw or paint from something if it doesn't move. So a photograph is great for me. For example if you are happy with an angle outside and then the wind blows it and you have lost your perfect angle. If you use a photograph you can take a photo of your perfect angle. Second is that you don't have to sketch all at once. You can take breaks whenever you want. This is good because some work it take hours to create. If you have lost your inspiration you could take a break and come back with a clean slate. This is great because when you come back to your art you might have new ideas or mistakes and things you missed. Third reason is troubles with shadows, wind and weather when wanting to draw straight from the environment. This is not a problem when using a photograph. Over the time the shadow moves which can be annoying when trying to make your artwork perfect. Back before cameras you had no choice but to draw it from your mind, still life or memory. I think that would suck, but they wouldn't of known any other way. I would prefer the stagger of my warm room or art studio. Thank you for reading this little rant. I will post soon explaining my way of posting for the next 2 or so weeks.  Here are 3 book marks I have designed and what I used to make them. All my ideas are original except the quotes I found on the internet. You will need: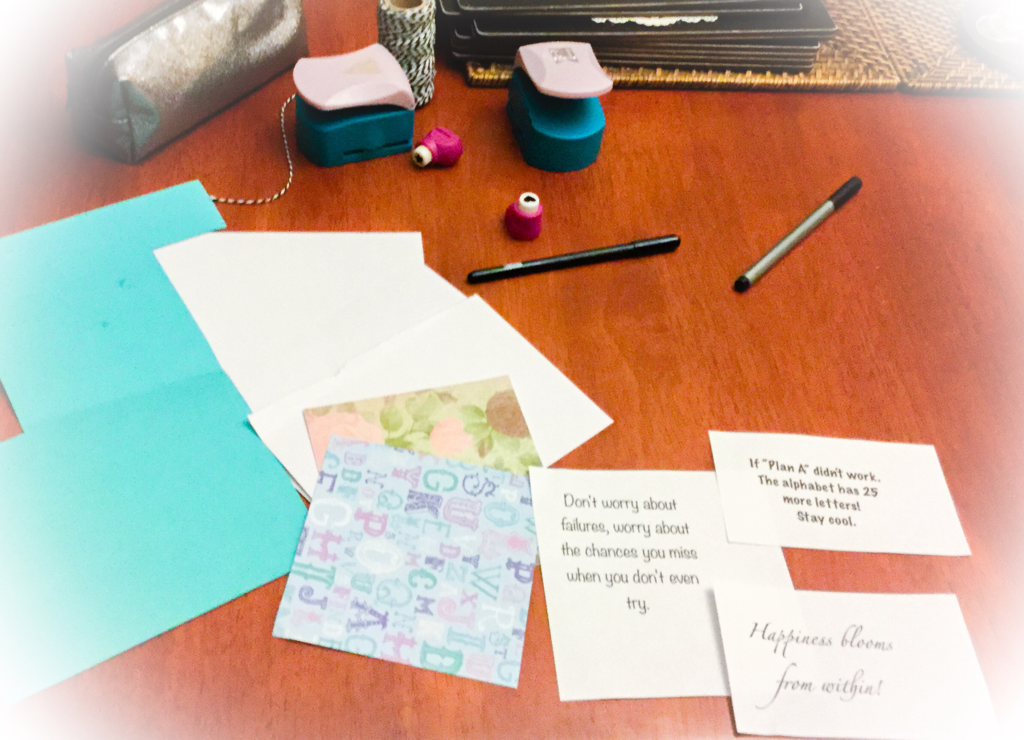
Method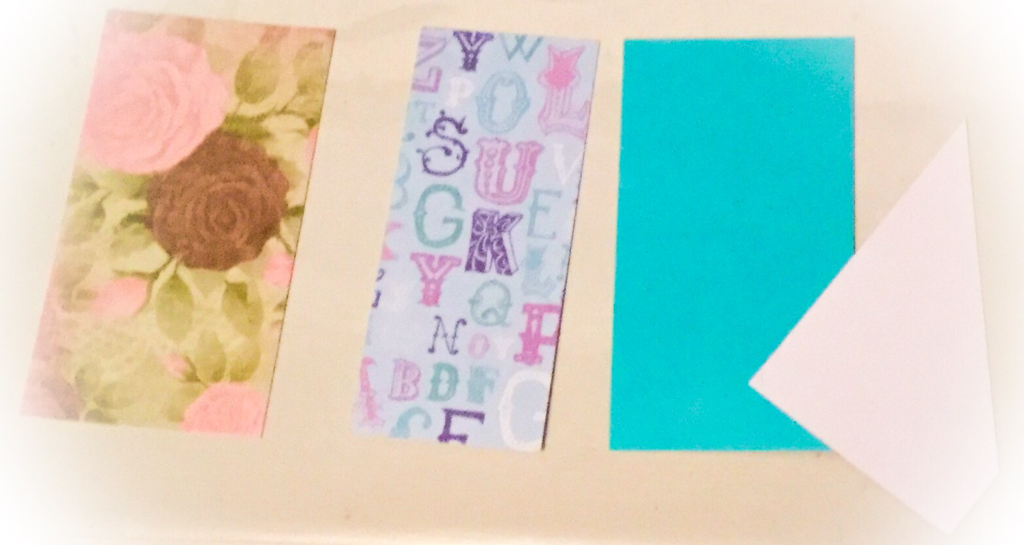 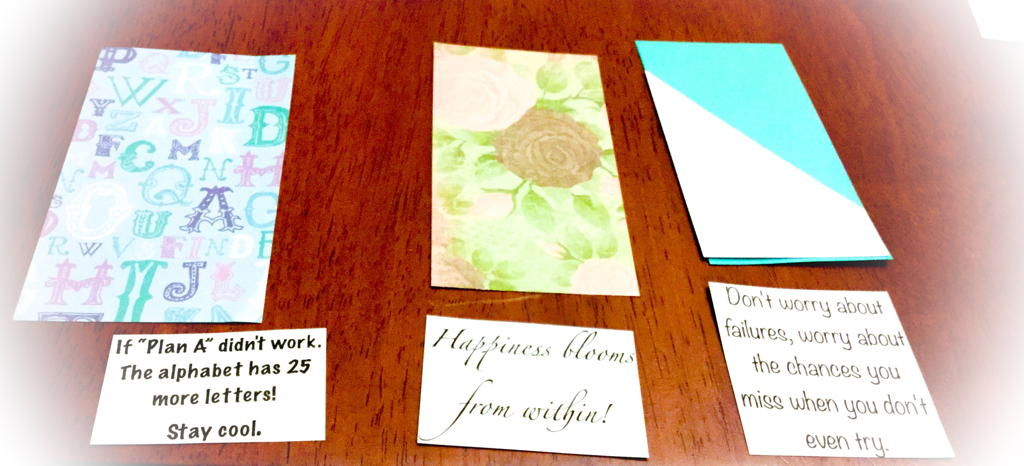 1. Cut all your book mark sheets to the right size. 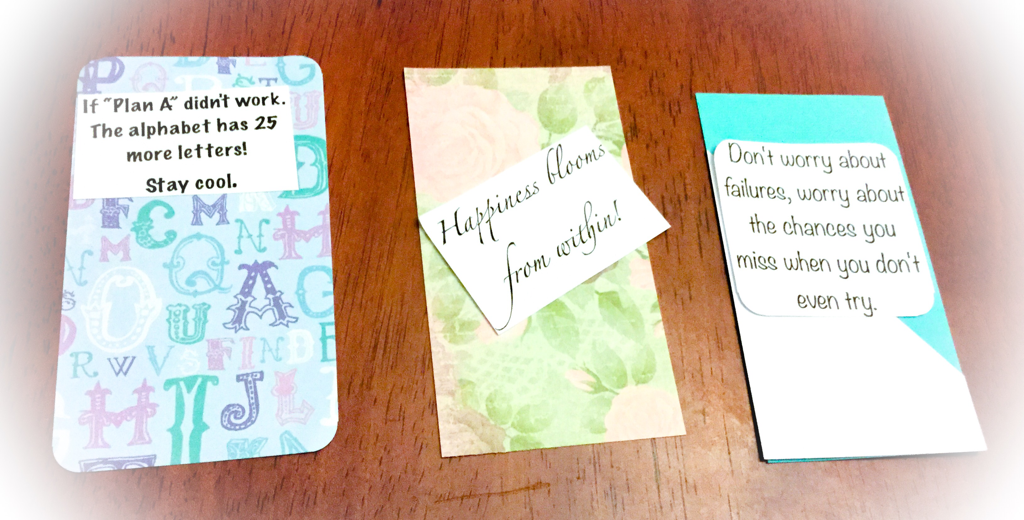 2. Print and cut out the quotes for the bookmarks. 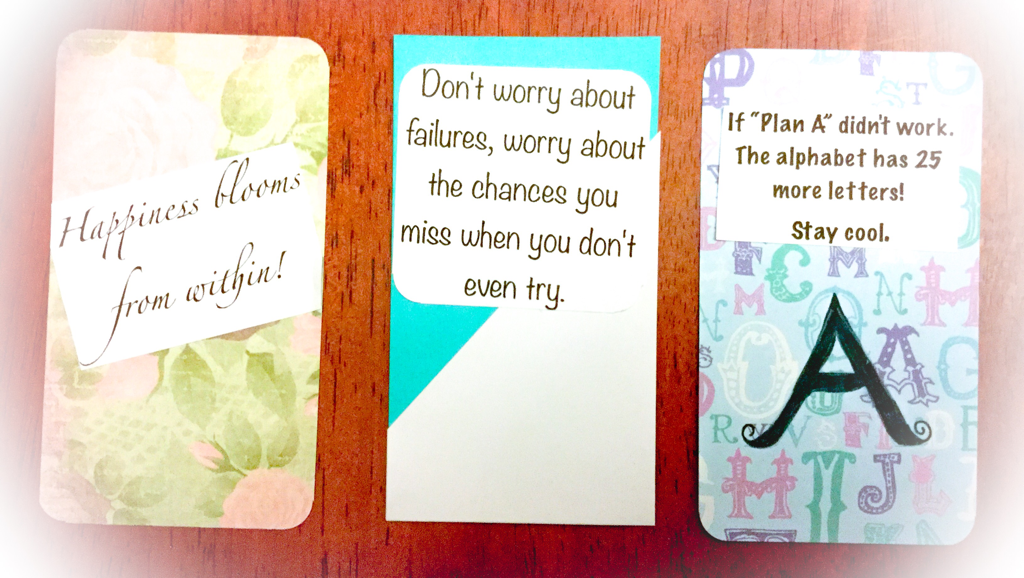 3. Now just place the book marks together. 4. Now stick down the design together. Have fun making book mark designs.
I know a lot of people including me have trouble finding inspo, so here are some ideas to find inspo. Just to say you don't have to do a drawing everyday, if you don't have inspo you can take a break. Also write down all your ideas when they come to you. So you have an area when you're stuck to go to and chose something on the list to draw. I will add a bibliography to the end of my post so you know where I found the images. Now I will go to the top 10 ways to find inspo.  1. Pintrest
2. Watch movies
3. Read/look at books
4. Look at past drawingsLooking at your past drawings is always a great thing to do. Especially at the end of the year to look at all the art you have done this year. You might find art you forgot to finish. Or your past work you'll give you more inspiration for better work. 5. Look on the internet
6. Search up how to draw on YouTube
7. Go through drawing books
8. Have a look at your favourite artists drawings
9. Look at things around you
10. Let inspo come naturally
Bibliography1st- https://www.cnbc.com/2015/05/01/13-famous-logos-that-require-a-double-take.html
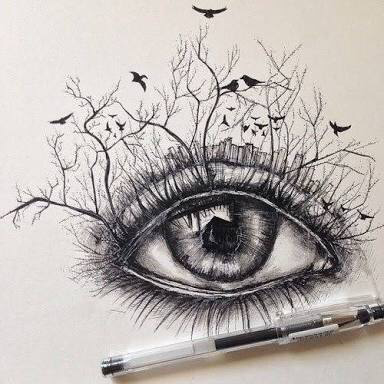
2nd- http://bsnscb.com/disney-wallpapers.html 3rd- http://www.talkandroid.com/guides/best-apps/best-apps-for-reading-books/ 5th- http://www.google.com/doodles/googles-new-logo 6th- https://www.youtube.com/watch?v=NlVpLOb_7c0 7th- https://www.pinterest.com/explore/book-drawing/ 8th- https://www.pinterest.com/HerBonedaddy/drawing-stuff/ 9th- http://www.pbs.org/wgbh/nova/earth/making-chemicals-naturally.html 10th- https://feltmagnet.com/drawing/How-to-Draw-Still-Life Hey sorry I haven't posted for a few weeks, I have been busy with school. Here is a tutorial on how to draw a strange eye artwork. This is something different from what I usually do. The inspo I found was from Pinterest and I saw a drawing of Alice in Wonderland in a keyhole. Instead I decided to take out the Alice in wonderland and add an eye looking in. 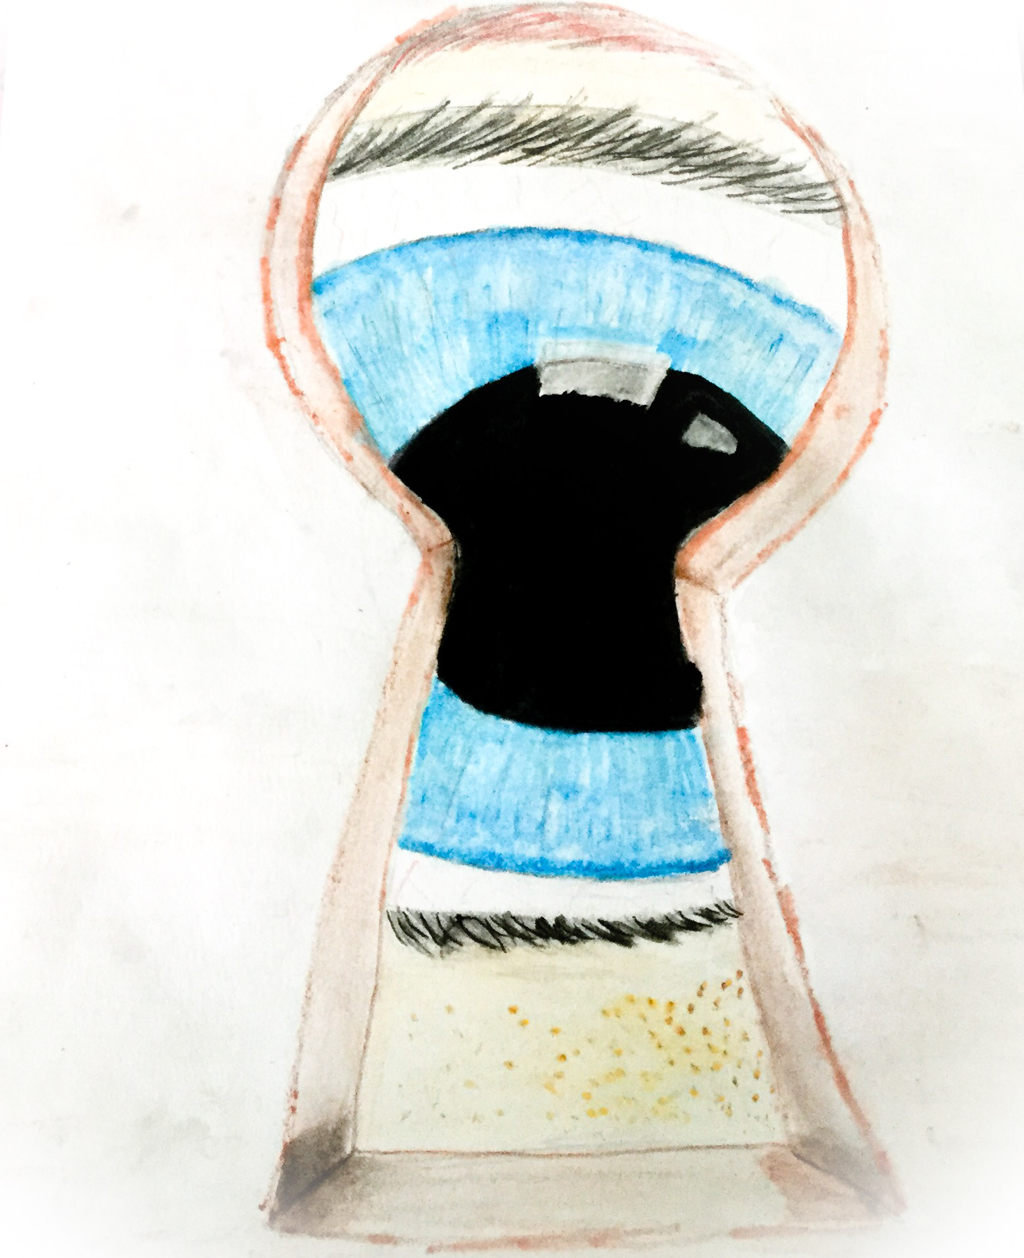 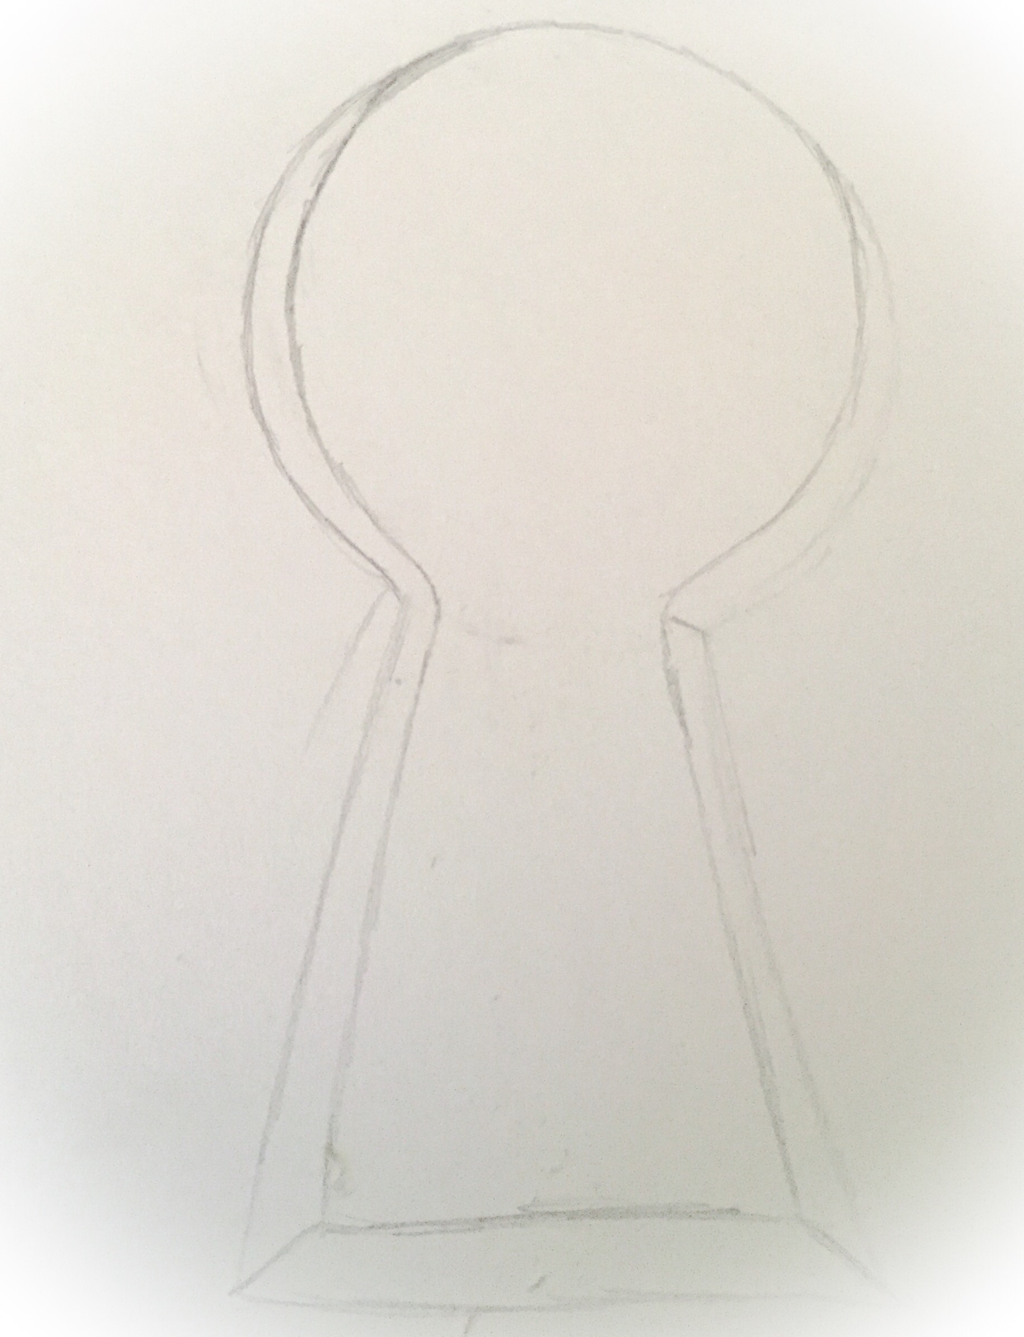 1. First draw a circle and connect a triangle to the bottom of the circle. Then add depth if you want to make it look more realistic. 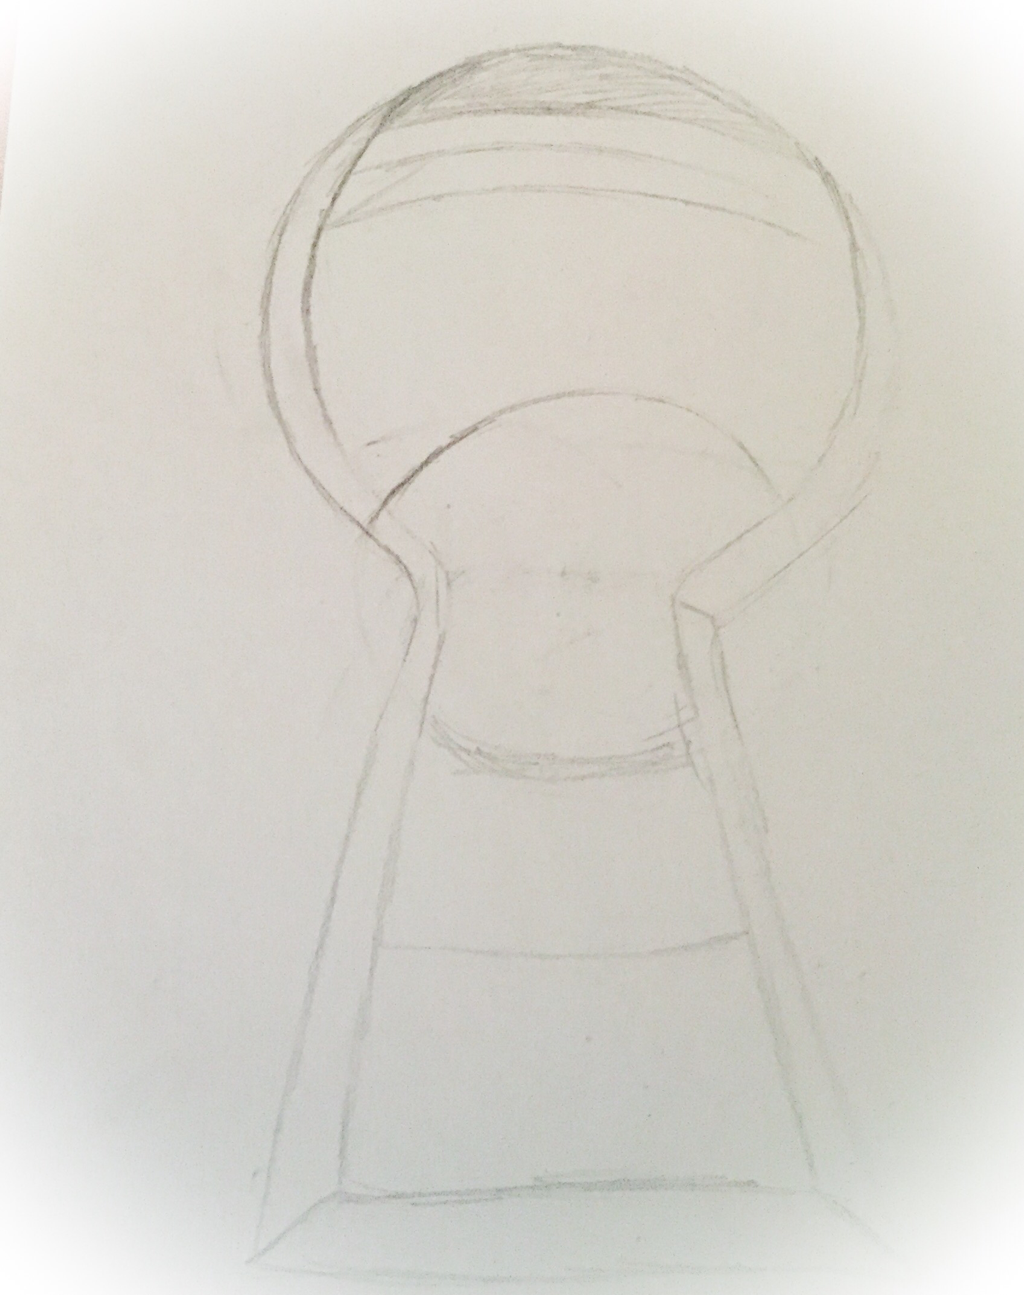 2. Do a sketch of an eye (a pupil and the overall eye). As well as the bottom on an eye brow. 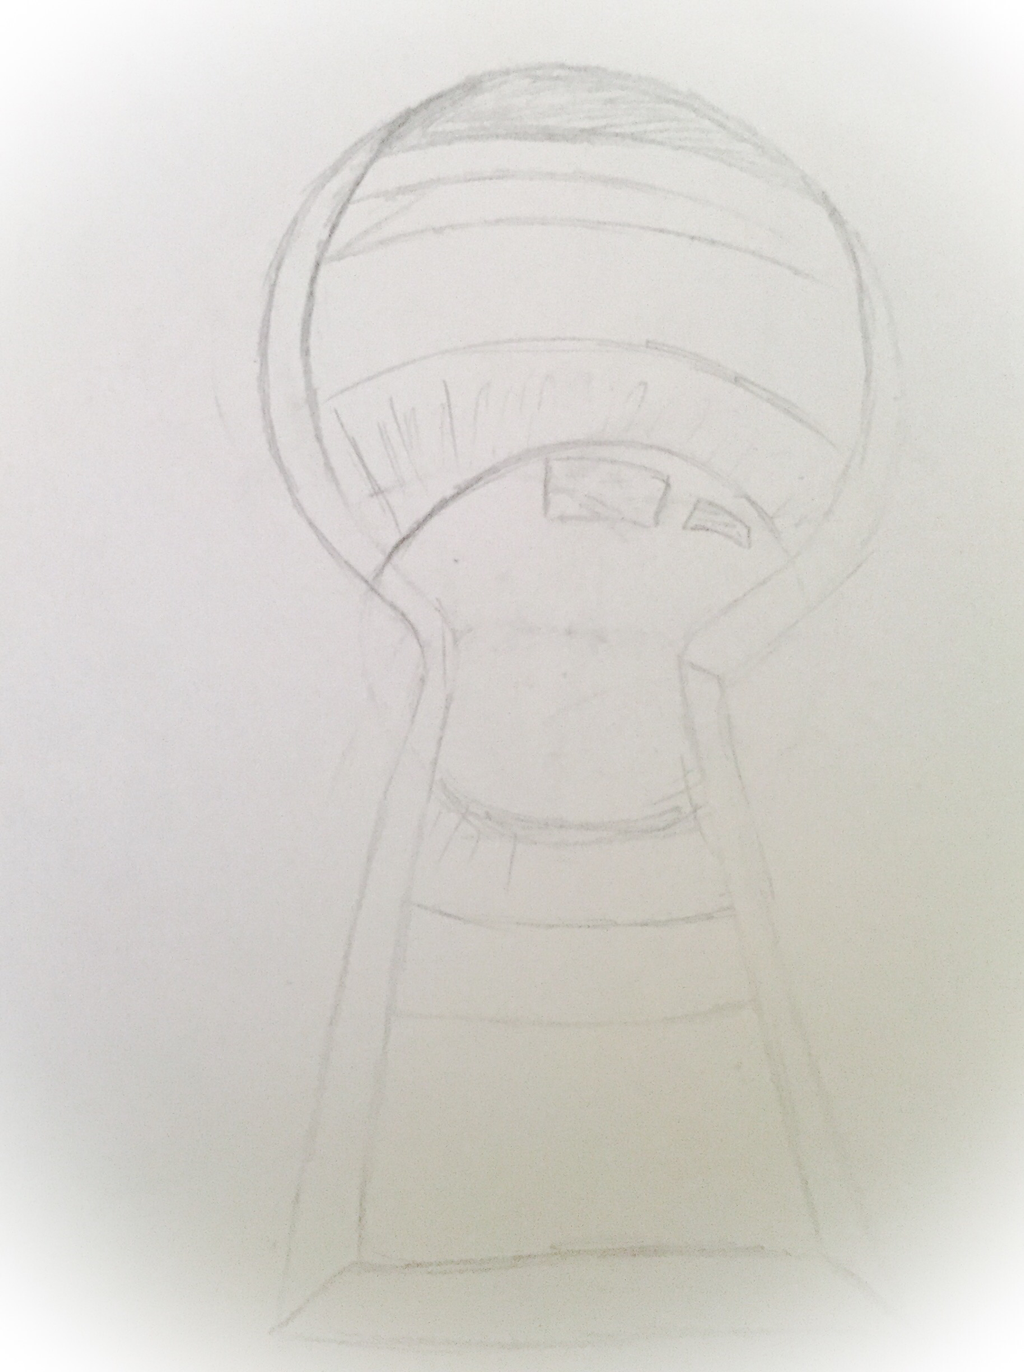 3. Add some shine to the eye. As well as a circle around the pupil. 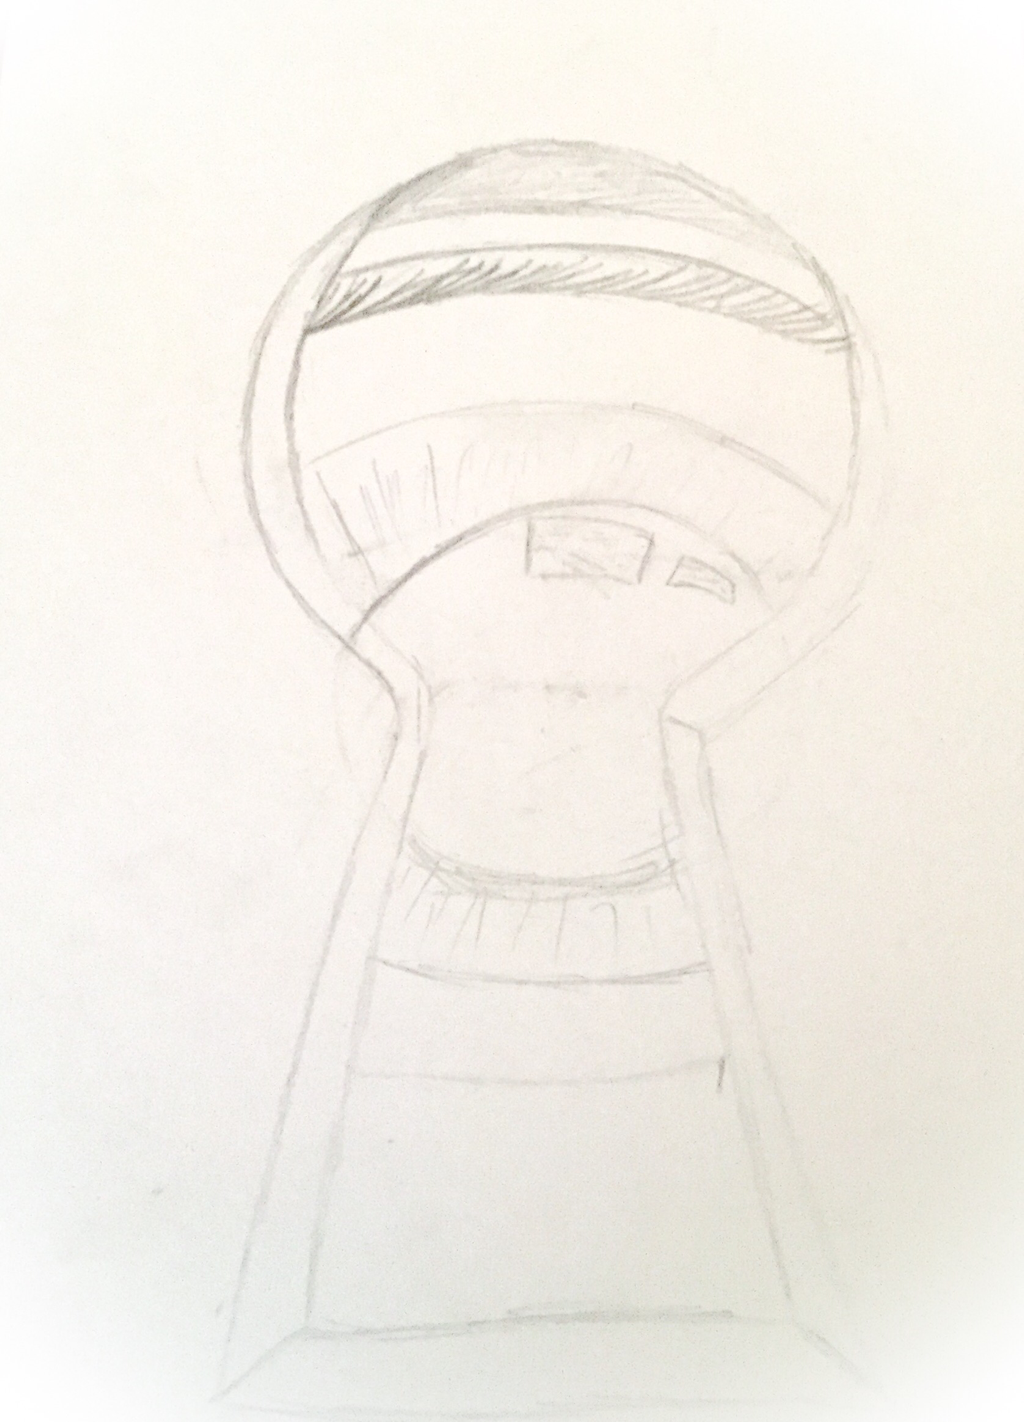 4. Add fine lines for eyelashes. 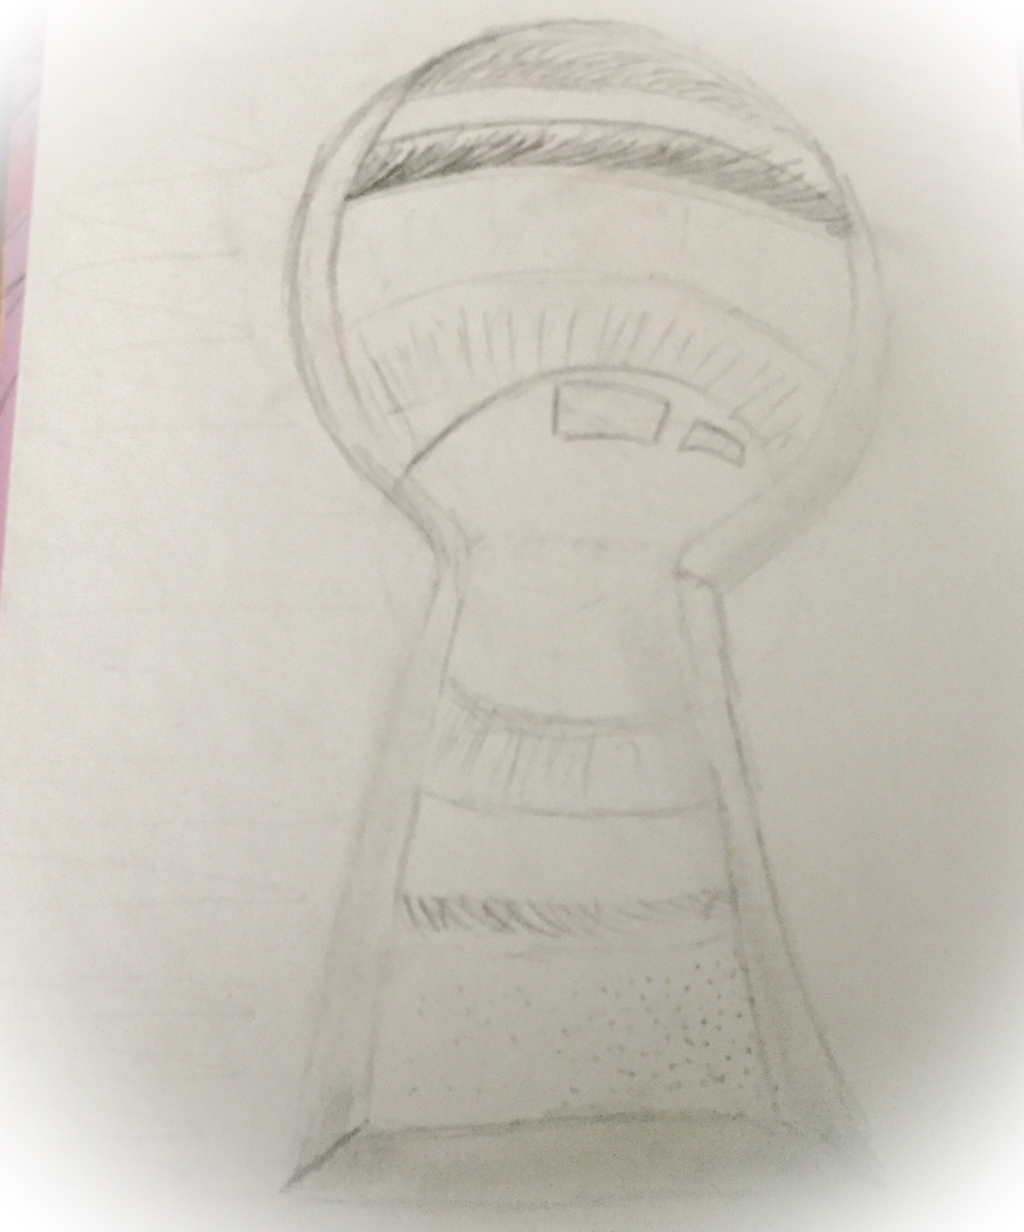 5. Add bottom eyelid eyelashes and some freckles. 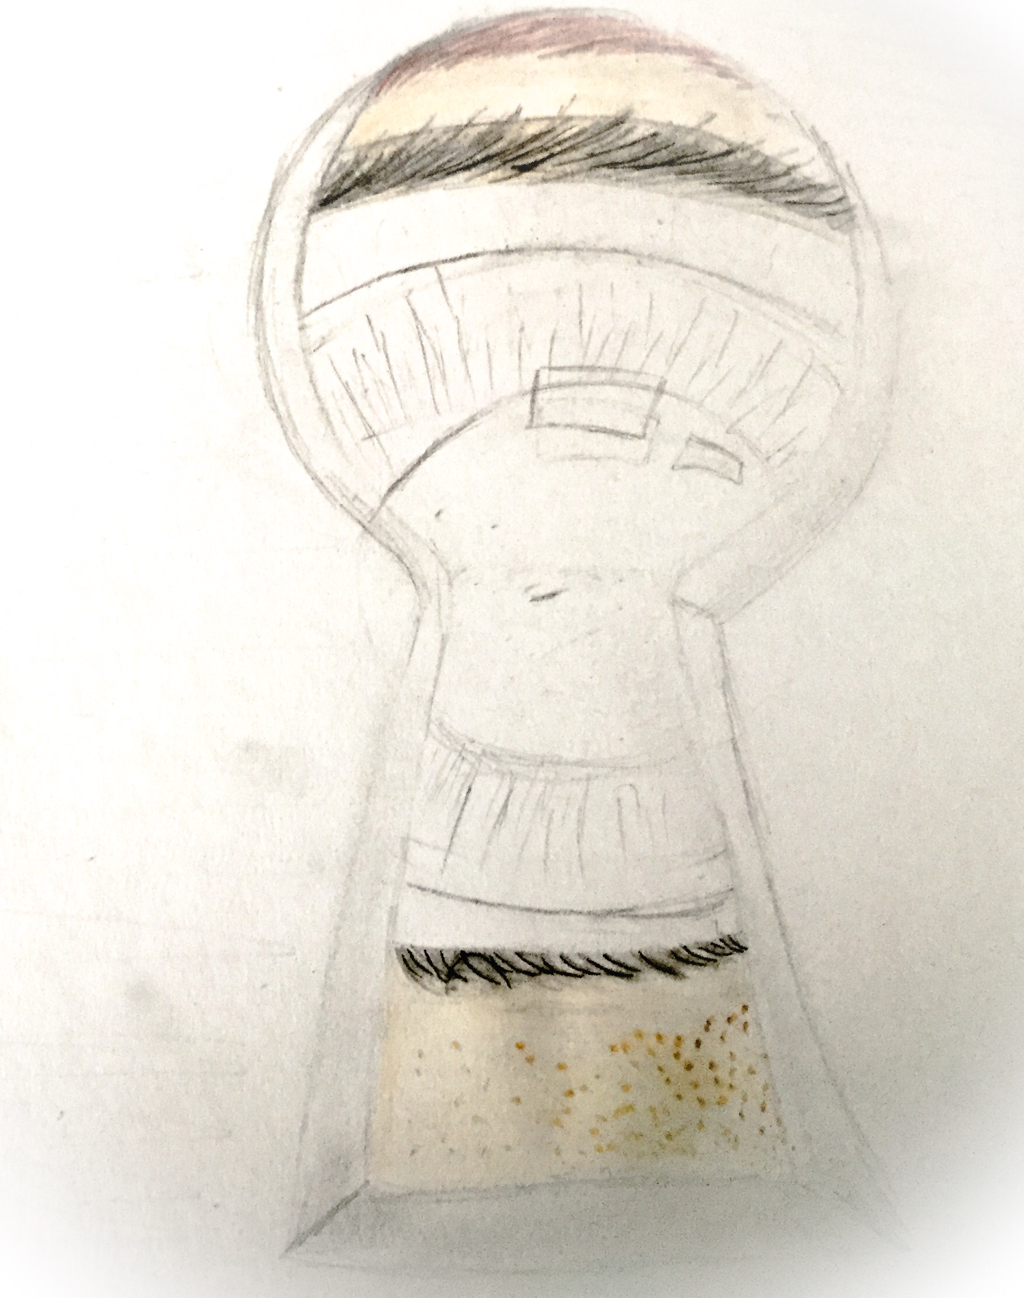 6. Use watercolour pencils to the artwork. Use a fine liner to go over the eyelashes. 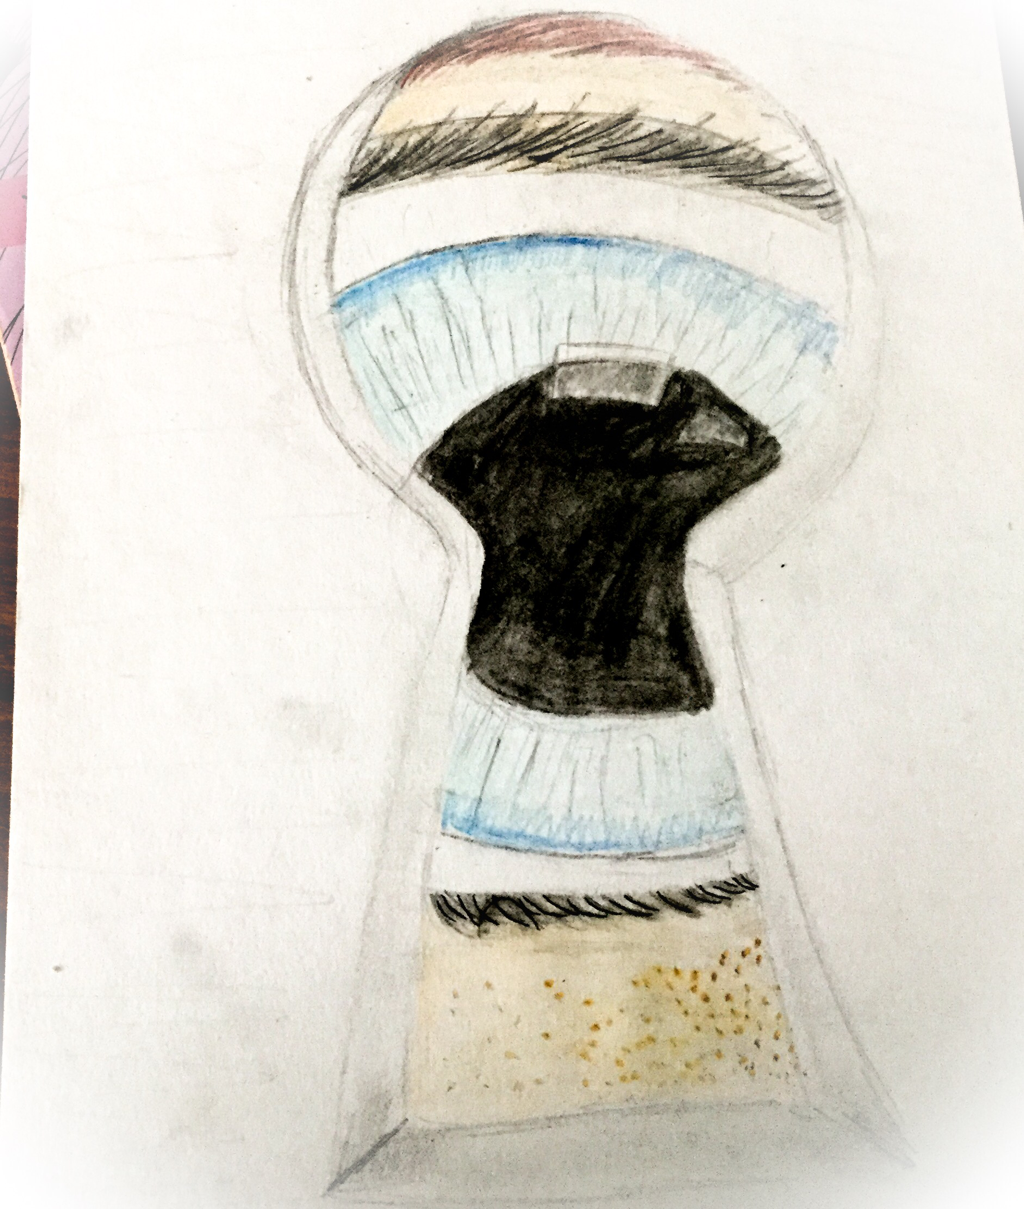 7. Add black to the pupil and layers of light blues. 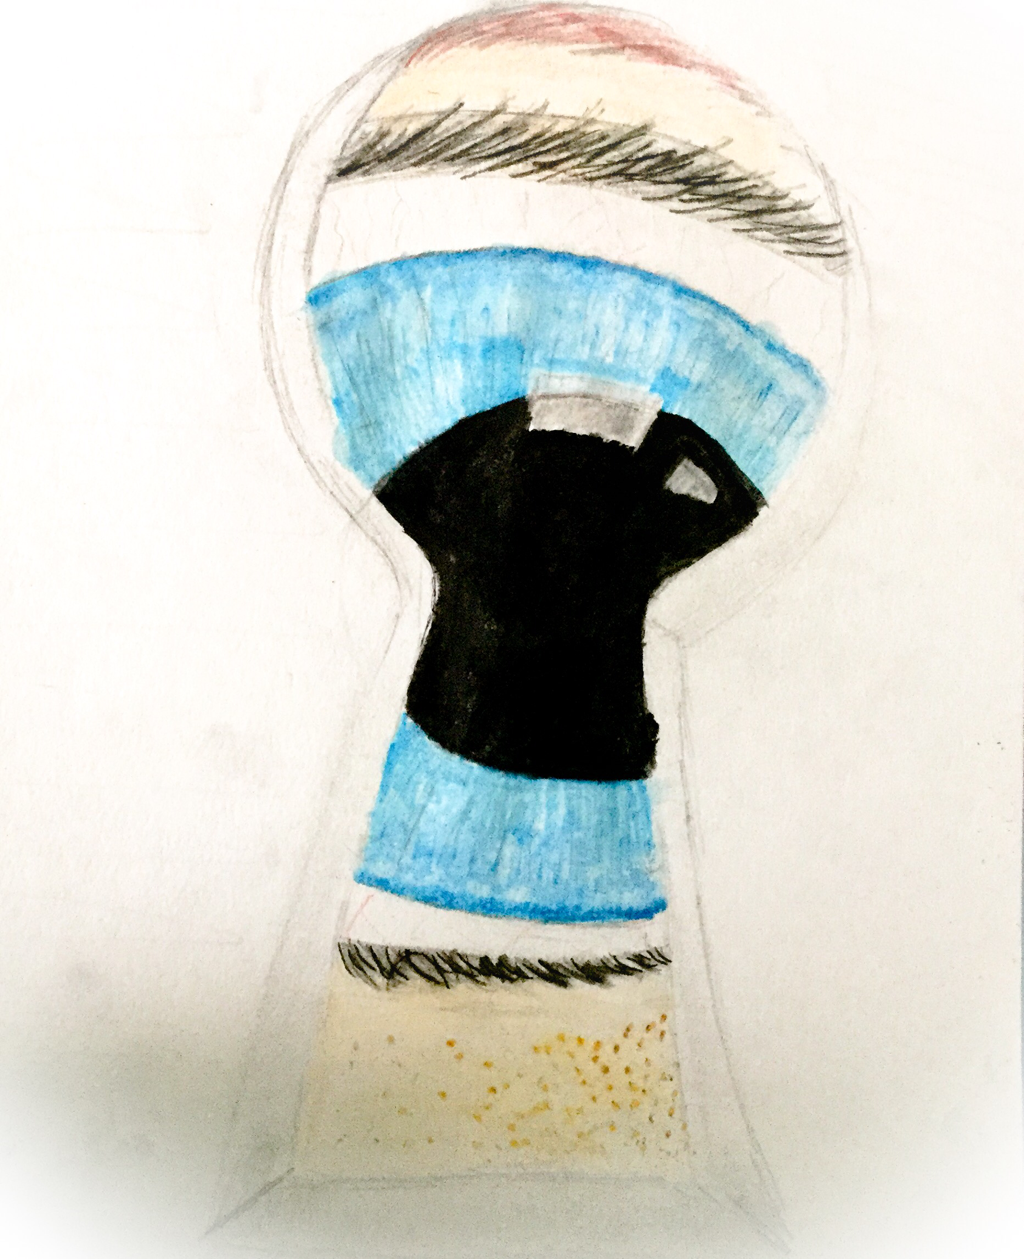 8. Add more blue colours to the eye. Also finish up the face.  9. Add brown to the keyhole and add shadow.
Hey now I am back to my usual posting. Today for the weekly Wednesday writing I am giving some inspiring quotes about art and life. I hope that this adds some inspiration to your week. All of these photos are mine and the quotes I have put who made them or they are anonymous and it didn't say who it was by.  1. Logic will get you from point a to point b. Creativity will get you everywhere. -Einstein  2. "If I could say it in words there would be no reason to paint." -Edward Hopper  3. A true artist is both one who is inspired, but one who inspires others. -Salvador Dali 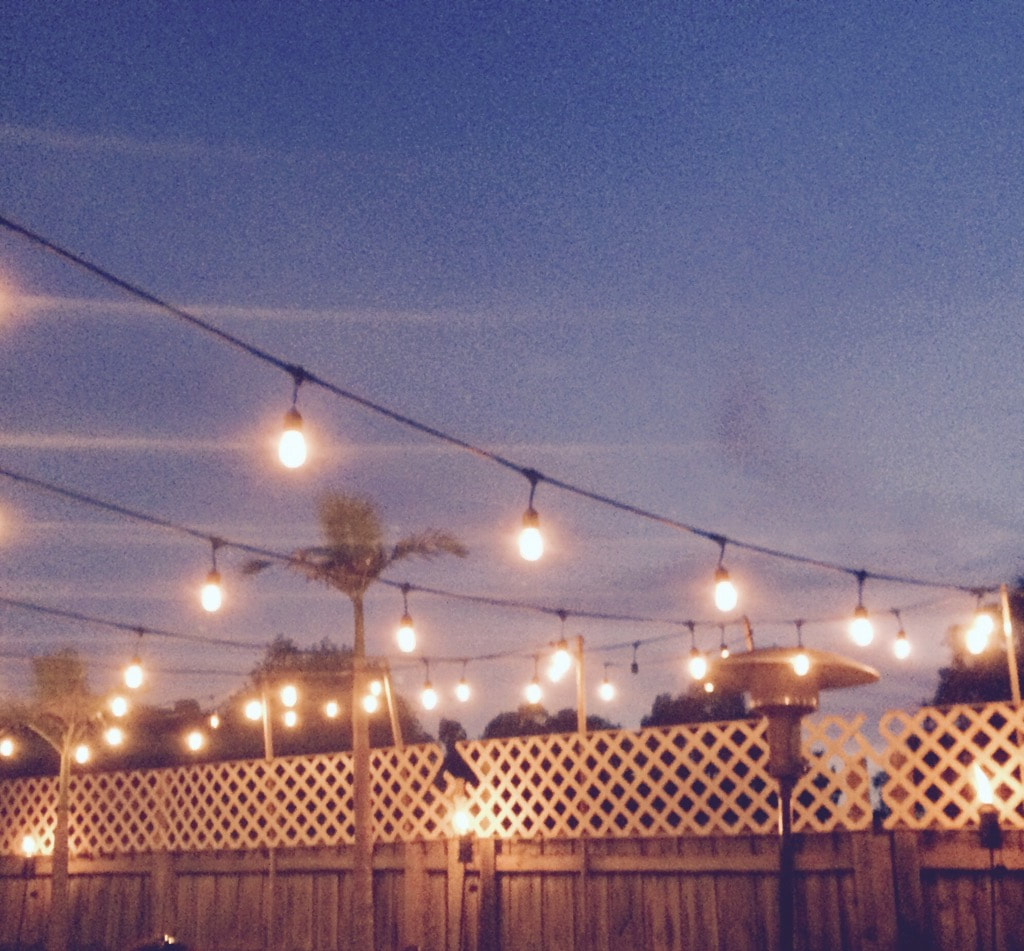 4. Everything you can imagine is real. -Pablo Picasso  5. If you can hear a voice within you say, 'you cannot paint.' then by all means PAINT, and that voice will be silenced. -Vincent Van Gogh 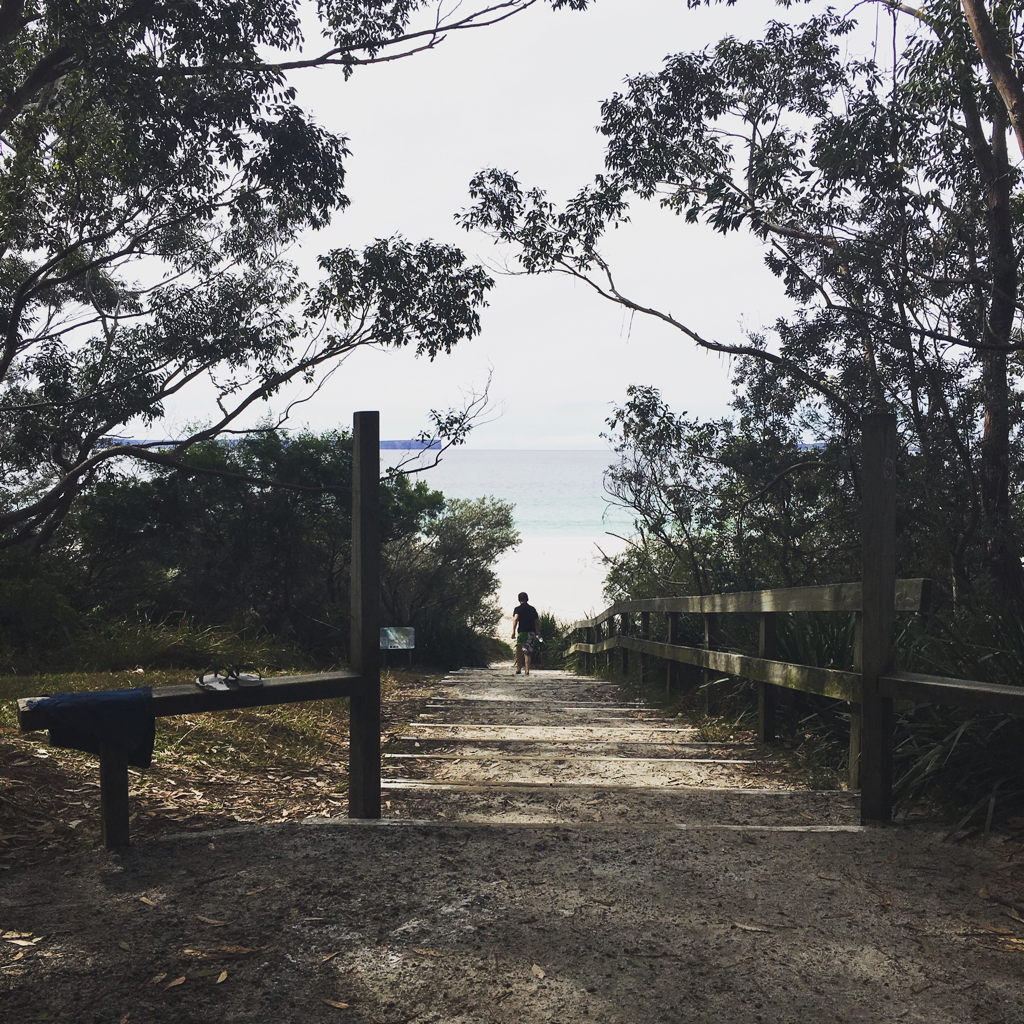 6. Life's a journey not a race.✨  7. You are beautiful just the way you are.🌹 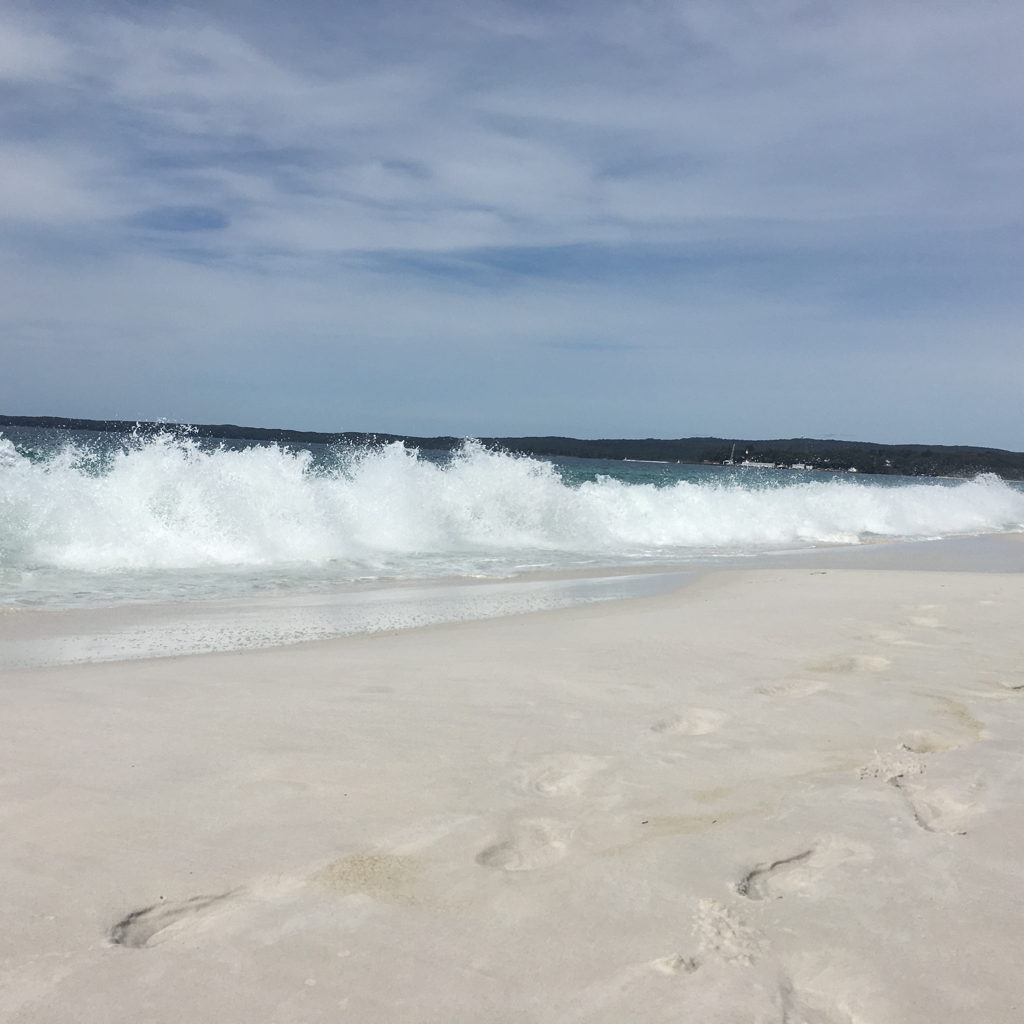 8. You can't stop the waves, but you can learn to surf. -Jon Kabat-Zan  9. Happiness blooms from within.🌸  10. Wherever you go, go with all your heart.💘
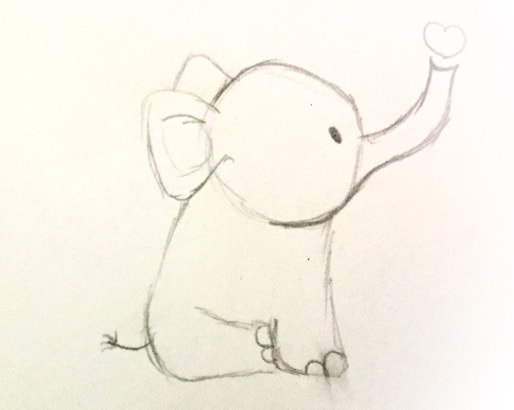 This is the last post about the happiness challenge of a 2 week drawing and posting challenge. Then I will be back to normal posts.  1. Draw a circle the seize you want their head to be. 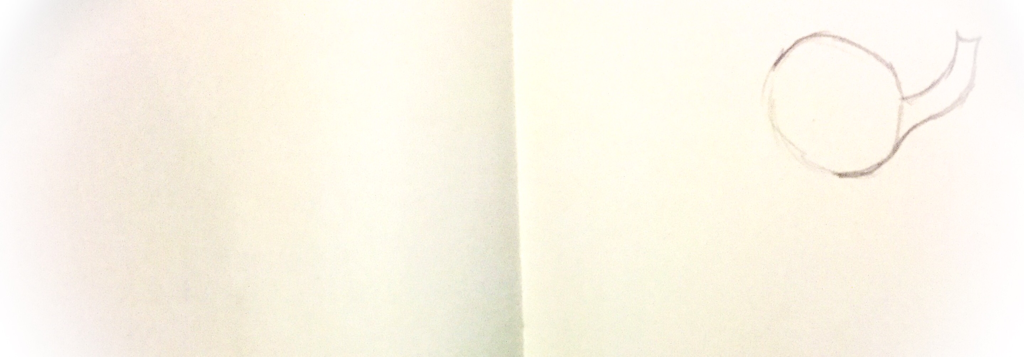 2. Now draw a trunk. A wonky sort of thin lines. 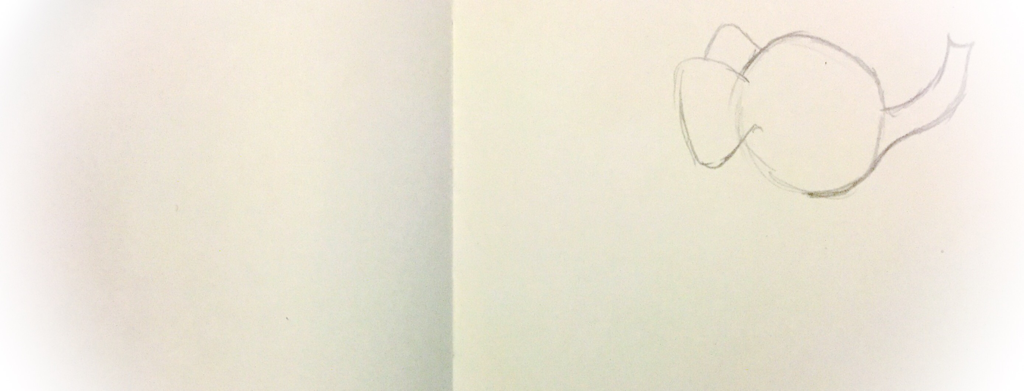 3. Draw big ears, sort of like rounded triangles. 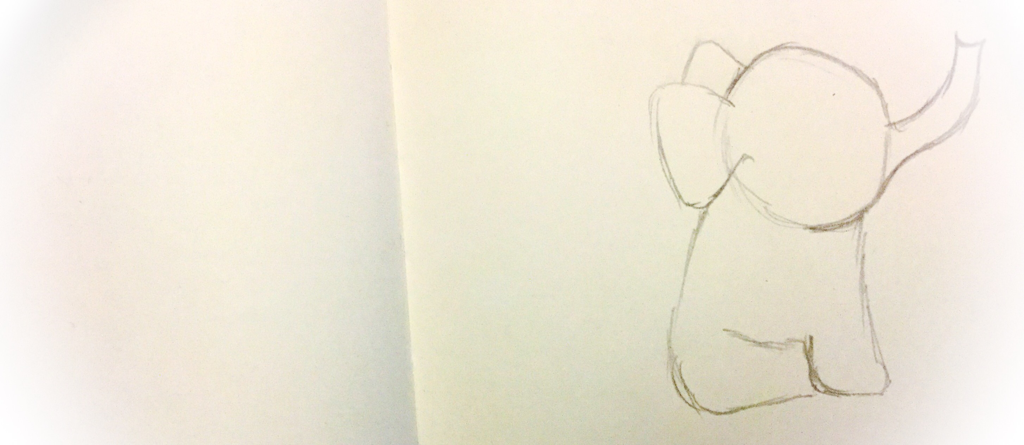 4. Draw a body, corner size with legs. 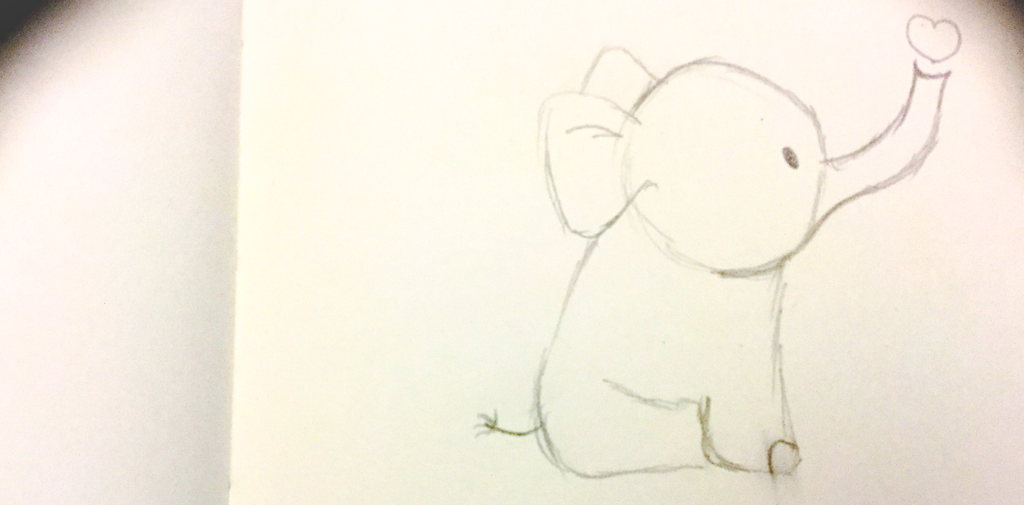 5. Now draw a small heart, tail and eye. You can colour f you want I didn't.
 This is the second last post before I go back to normal posts. So this post is a step by step tutorial on how to draw a cute girrafe. 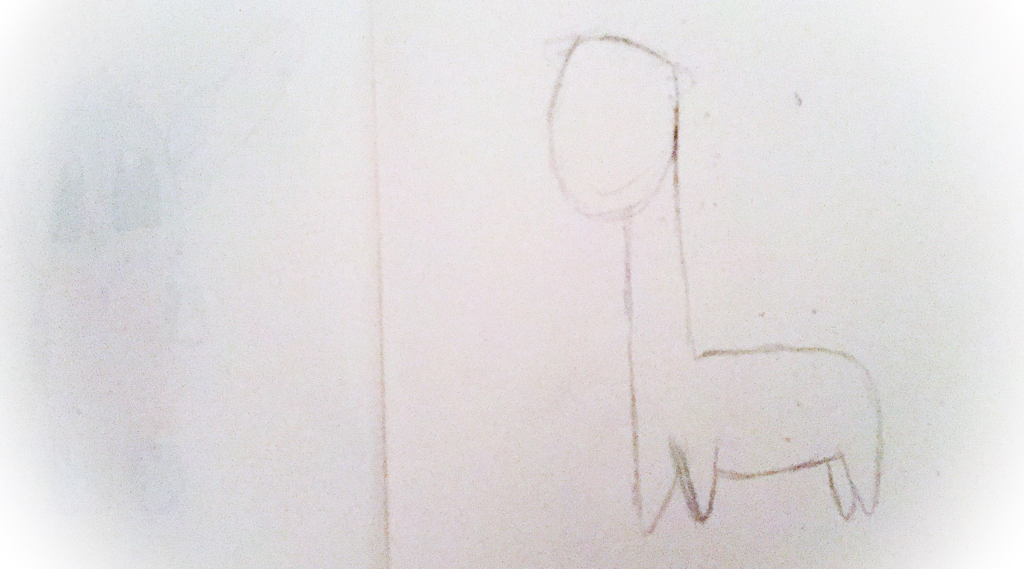 1. Fish draw a sketch of the body with pointy legs and a round half oval sort of head. With a long head. 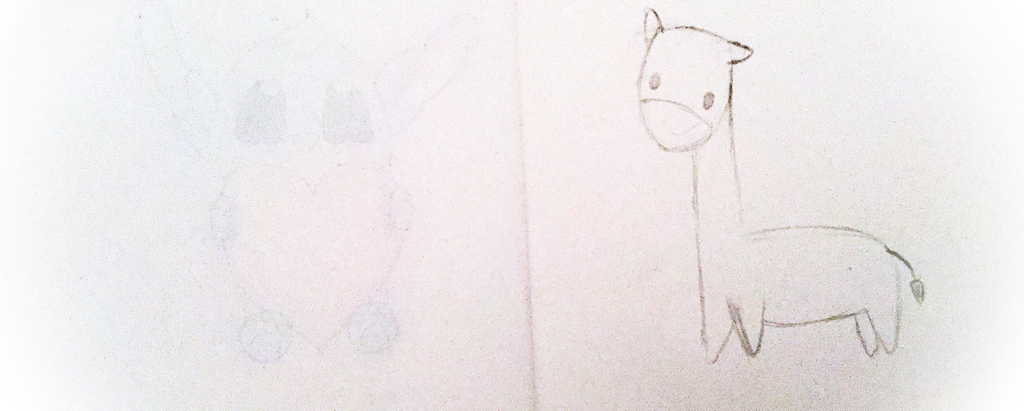 2. Add a tail, a curvey line over to show the nose. 2 eyes and a eye on each side however you want them to be like. 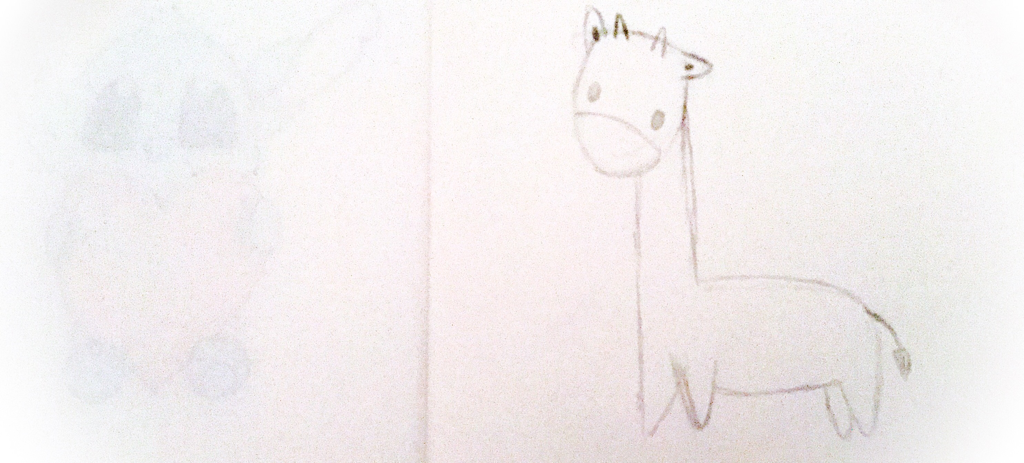 3. Draw 2 long triangles for the horns. 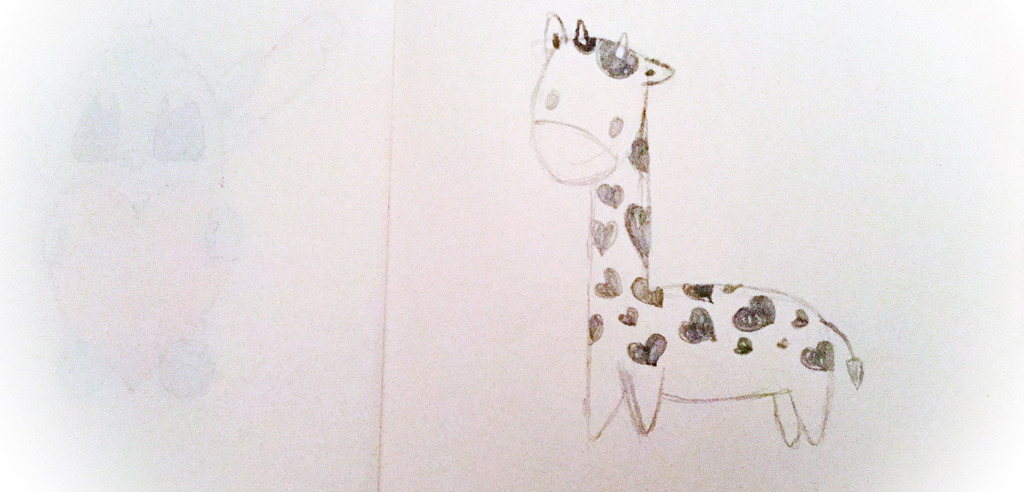 4. Lastly draw love hearts for the spots. You can go over with a fine liner or colour it in if you want.
 This is one of the last posts for the 2 week happiness challenge of drawing. Sorry I missed a few days because of being busy. When the challenge is finished I will go back to my usual posts. Wednesday I will post tips, tricks, facts, ext. Then on Sundays I do Step by step tutorials and DIYS. 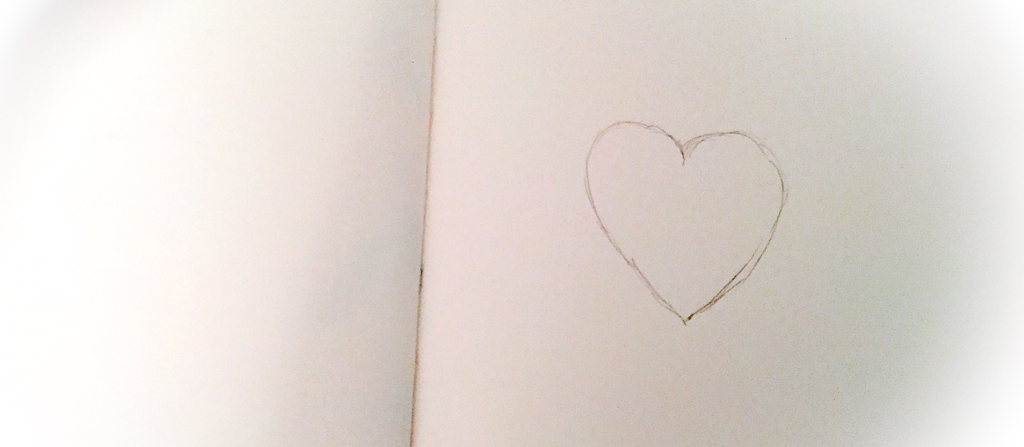 1. Draw a heart, whichever size you want. 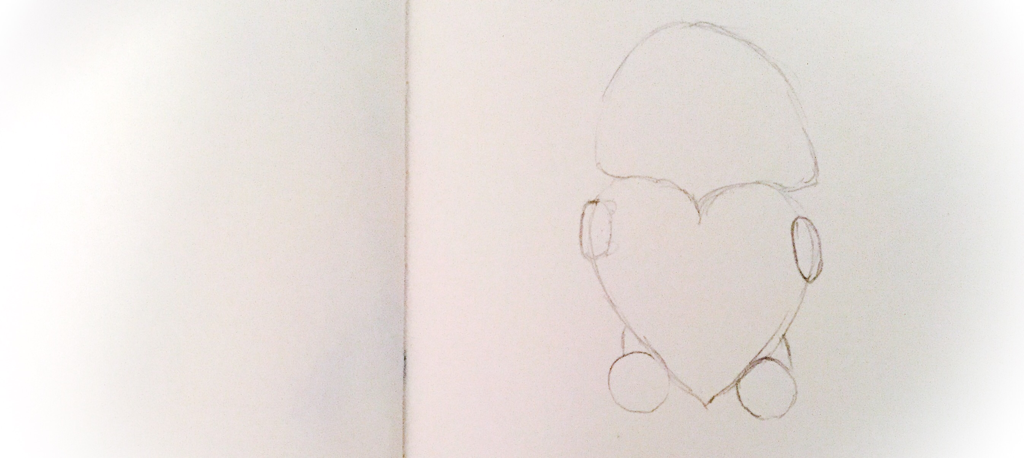 2. Now draw a rounded triangle for the head. Also draw an oval on either side of the heart. As well as a circle at the bottom of each side for the feet. 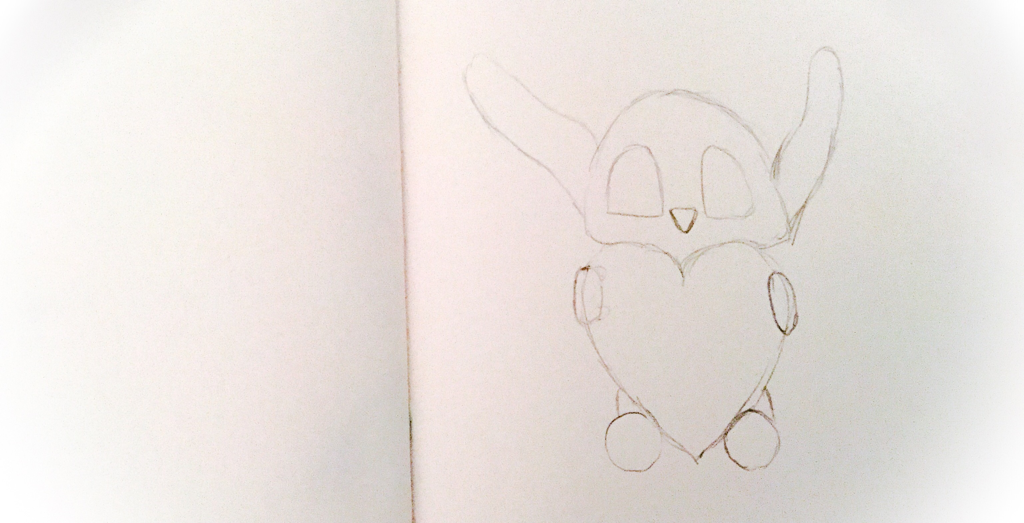 3. Draw two oval half triangle sort of shapes for eye sizes. As well as ears, they have to be long but however you would like. 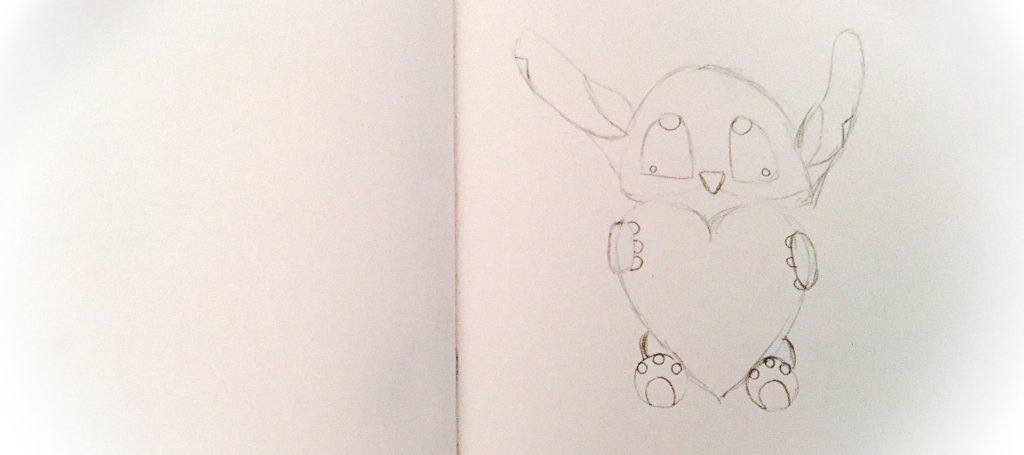 3. Draw 3 small circles and a big circle for the feet. Also 3 fingers on each paw and small circles for the light in the eyes. 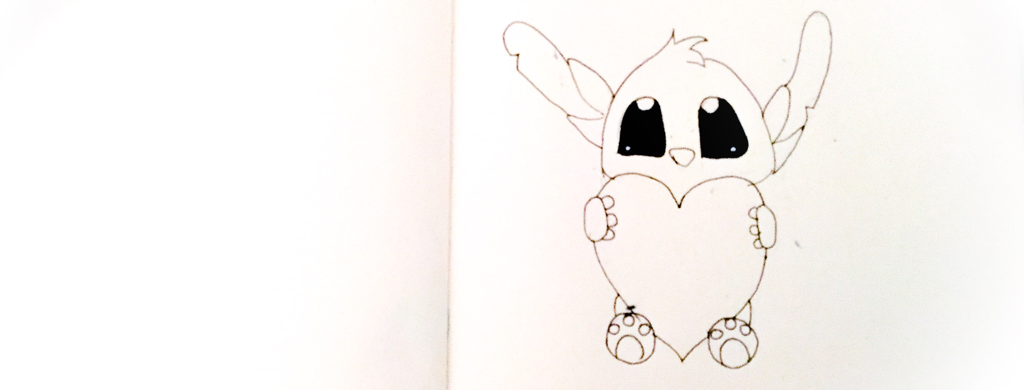 4. Go over the drawing with fine liner. 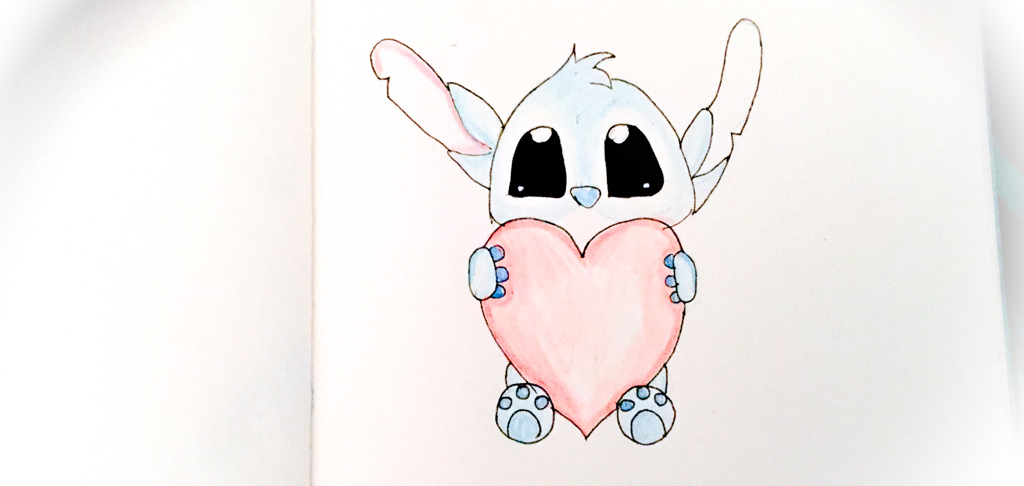 5. Now if you would like you can colour it in. (I didn't finish colouring it in this image).
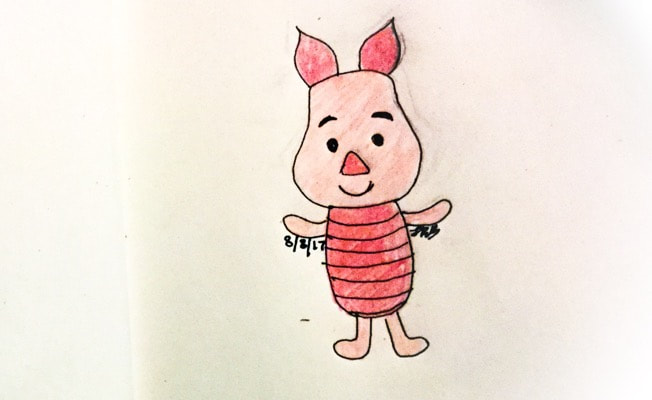 This is another post on my 2 week happiness drawing challenge. Today I am doing how to draw piglet from Winnie the Pooh. This is the third last post of the challenge and then I will go to my usual posting. 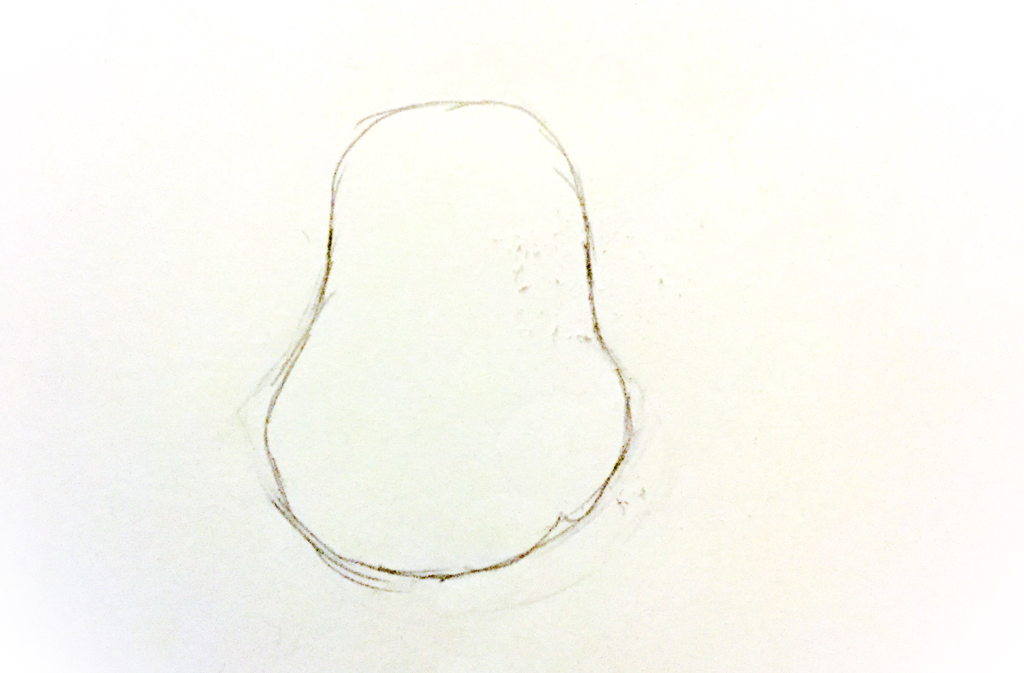 1. First draw an oval and a bigger sort of circle at the bottom to make it look like the image above. 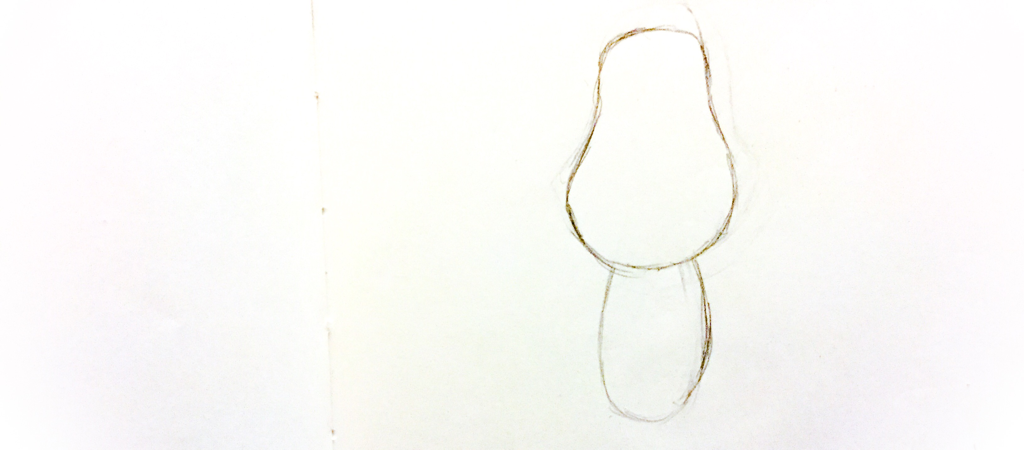 2. Draw a oval connecting into the head. To form the body. 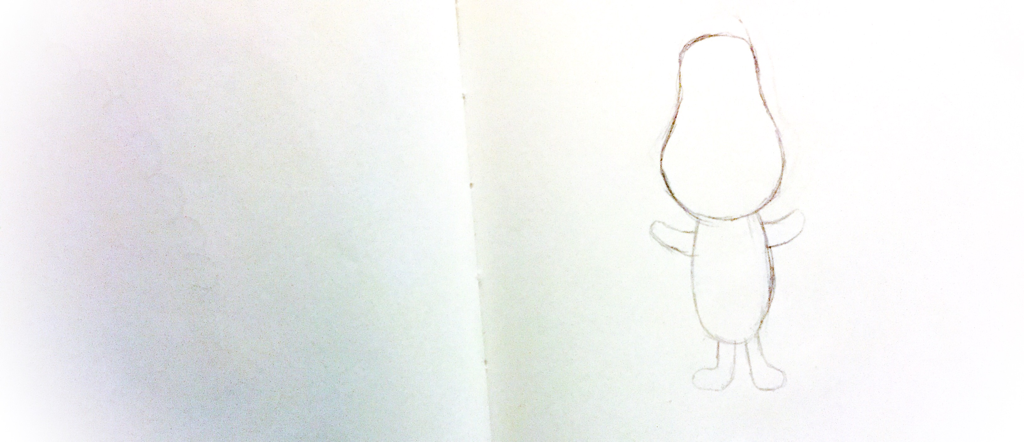 3. Now draw the legs and arms. Two long ovals connecting onto the body for the arms and two long ovals with feet for the legs. 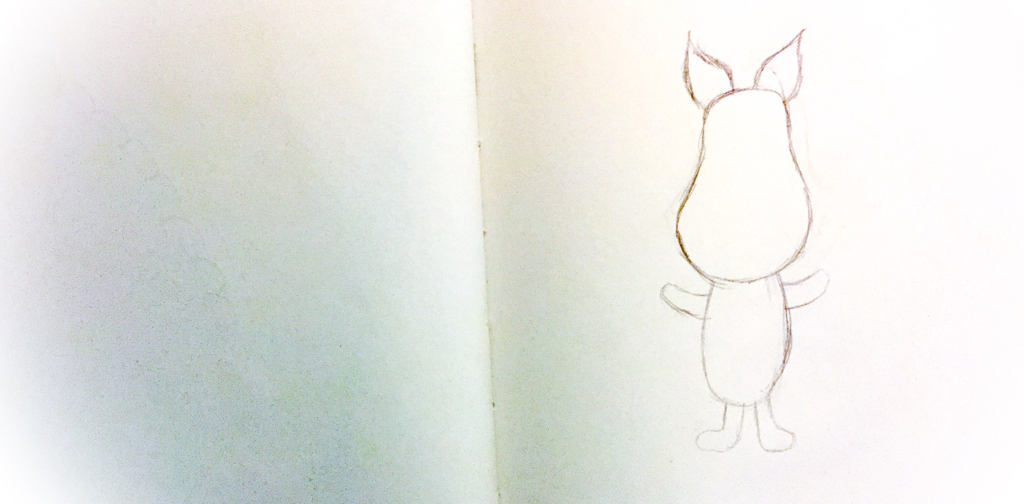 4. Now draw the ears with not perfect triangles for the ears. 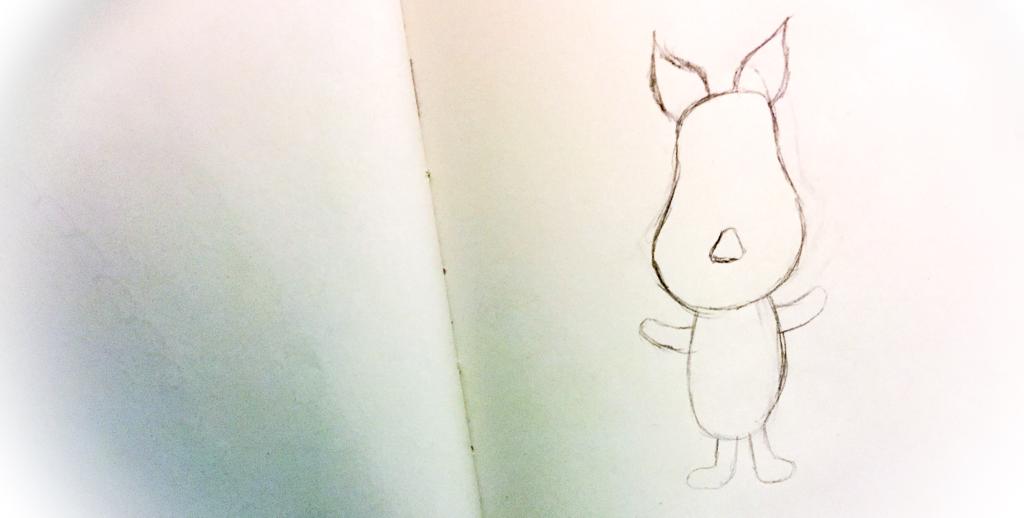 5. Draw a triangle with curves not points. 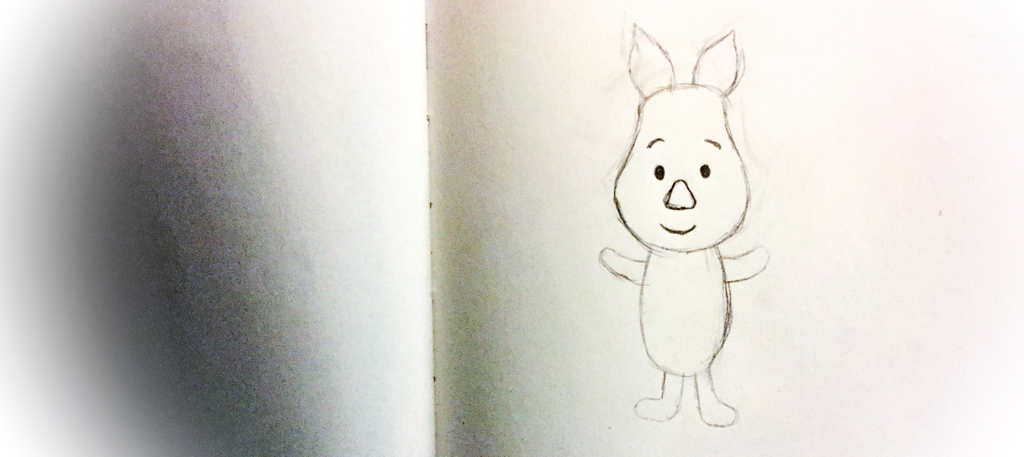 6. Next draw two dots for the eyes, a curve for the smile underneath the nose. As well as small curves above the eyes as eyebrows. 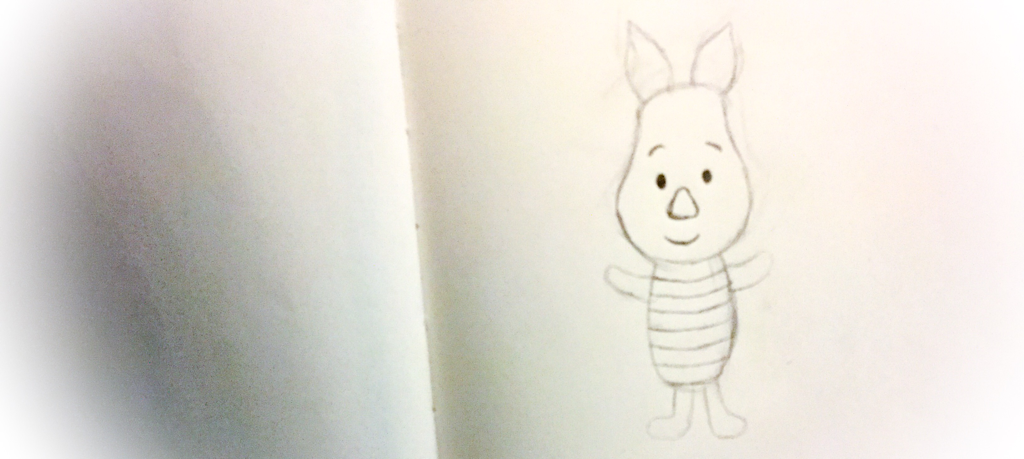 7. Draw curvey lines on the body. 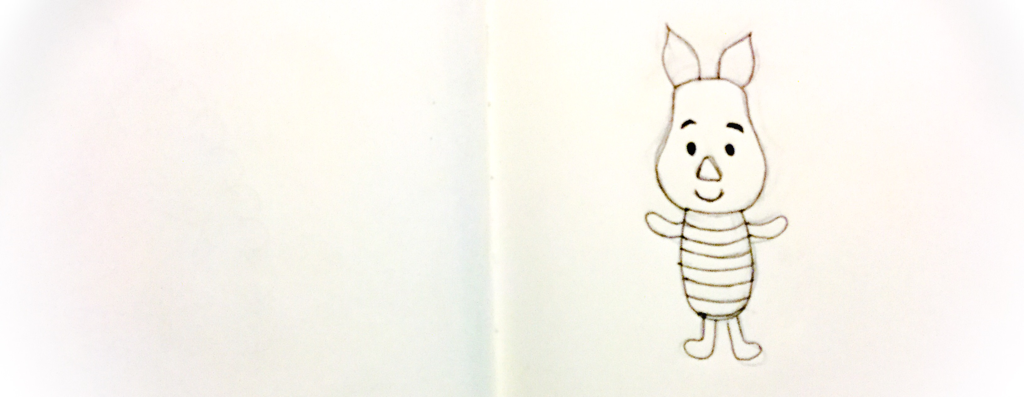 8. Go over the greylead lines with a fine liner. 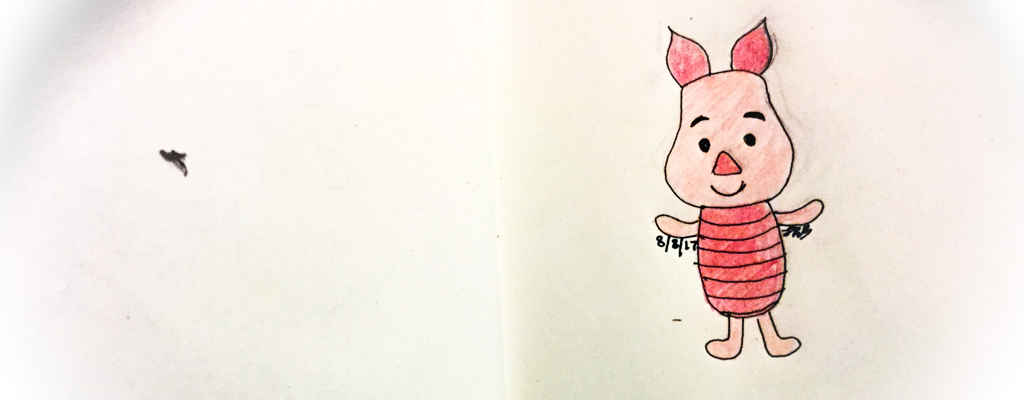 9. Colour in the drawing if you would like. I used coloured pencils and then your done.
 This is another post from the 2 week drawing challenge. This is another Disney tutorial, how to draw Mickey Mouse.  1. First draw a big circle with 2 small circles for the ears. 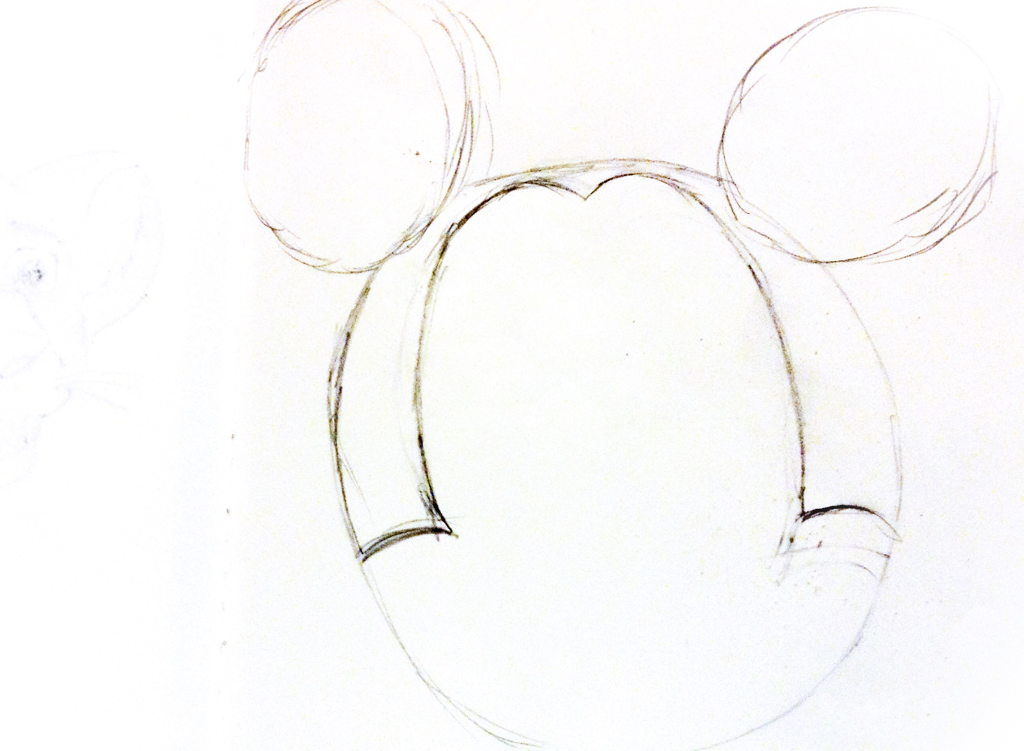 2. Draw a lump on each side for cheaks and curves up on each side, like the image. 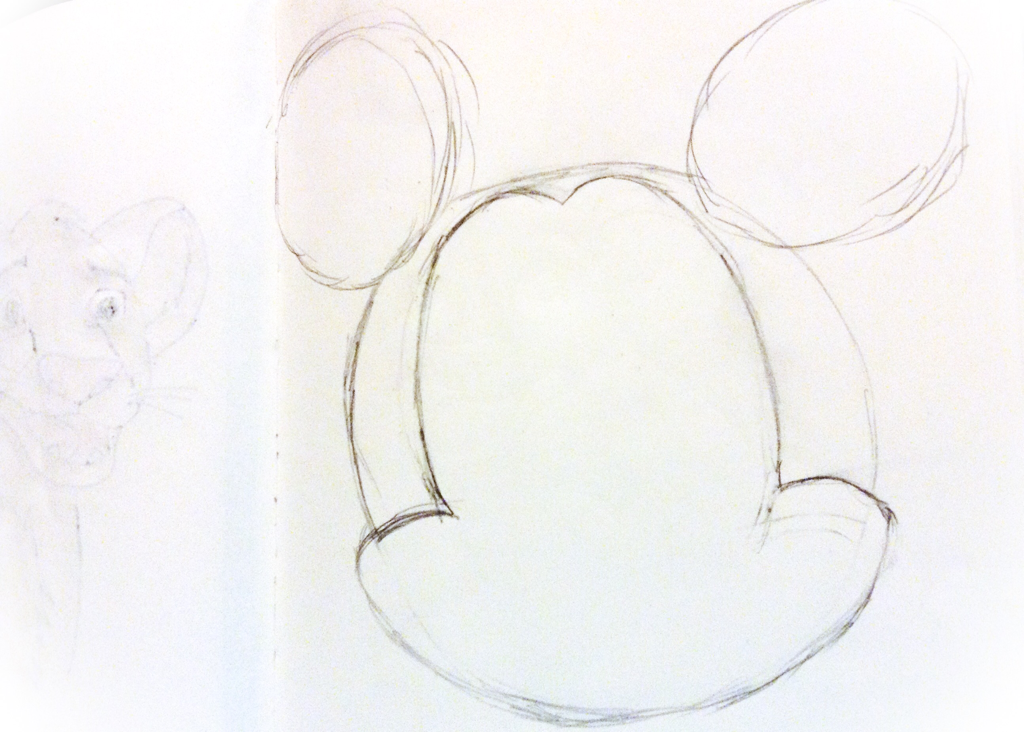 3. Now define the cheaks.  4. Do a bump at the bottom for the mouth, then draw the mouth. A curvey line and two small lines on each side and a curve from each side of the line to the other, with a tounge. 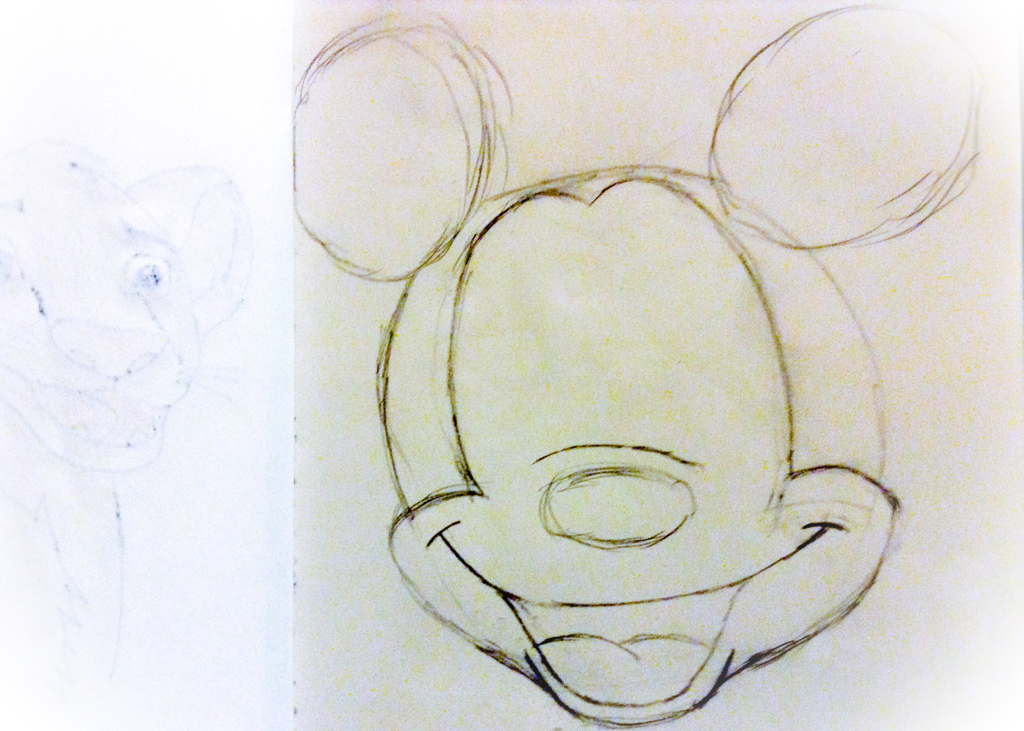 5. Draw a oval above the mouth and a curved line around the size of the nose. 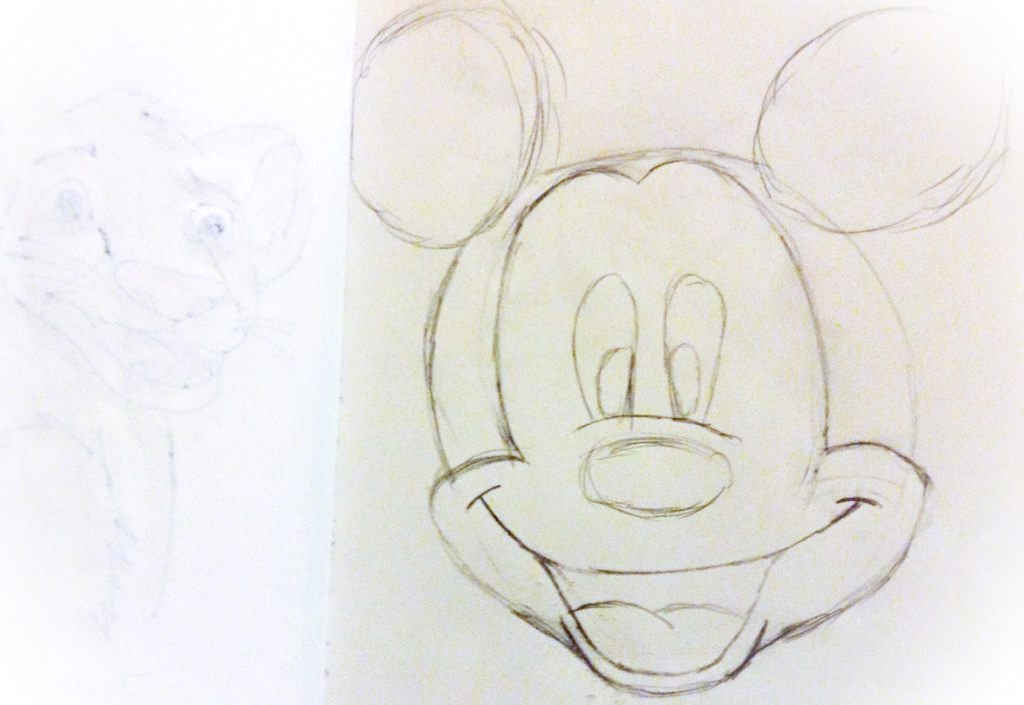 6. Draw the eyes on the line and a small pupil. 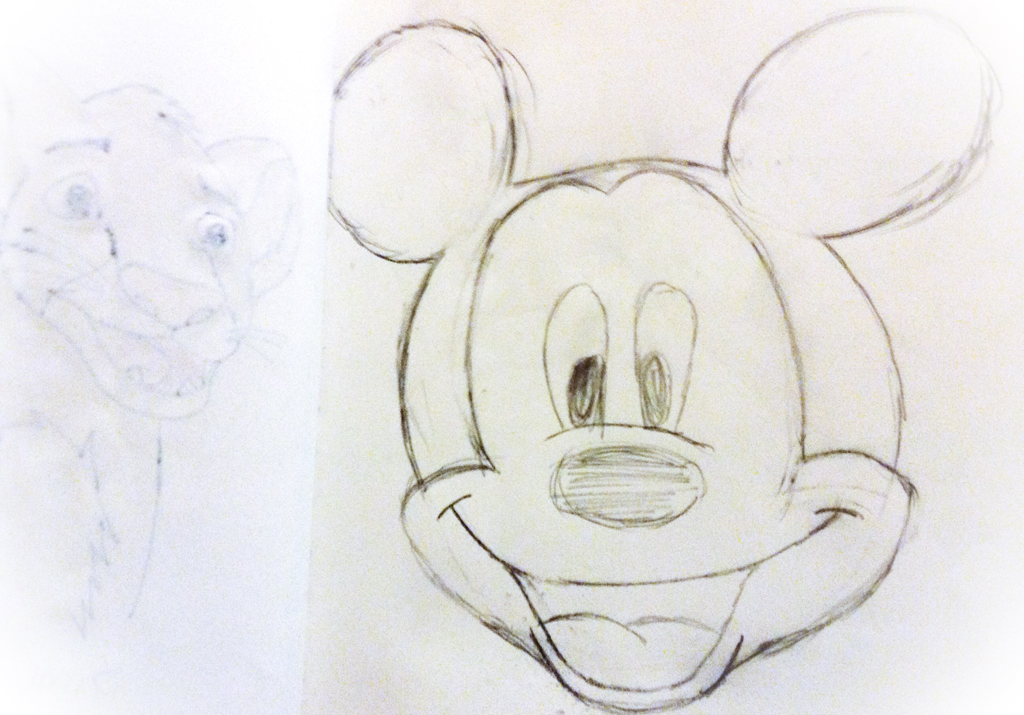 7. Nine define the lines and colour in the nose and pupils. 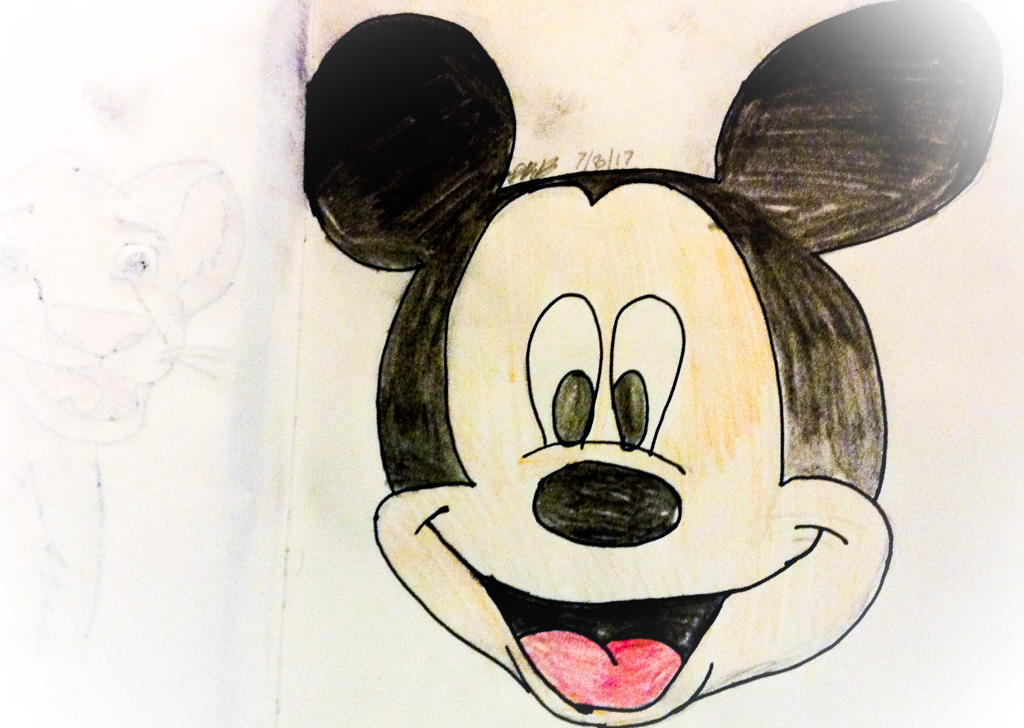 8. Lastly you can go over it with fine liner and colour it in or leave it.
 Sorry I haven't posted for a few days about the 2 week drawing challenge, I have been fairly busy. This is a step bye step tutorial on how to draw Simba from the Lion King. Sorry for the fuzzy photos I took them in the car. 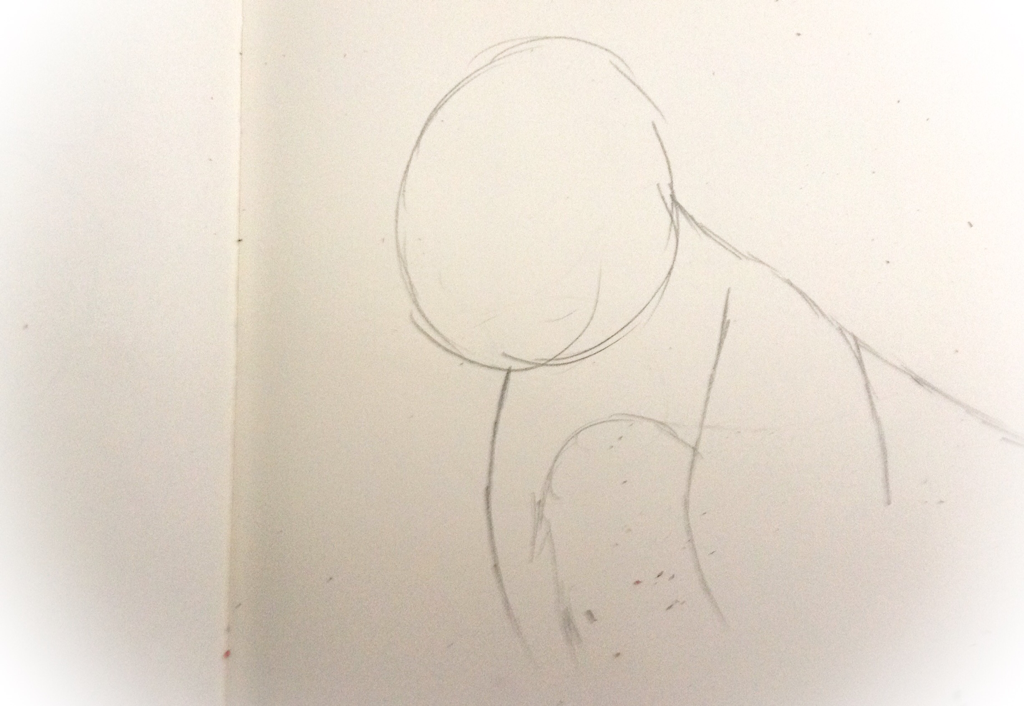 1. First draw a circle for the head and a sketch for the body. 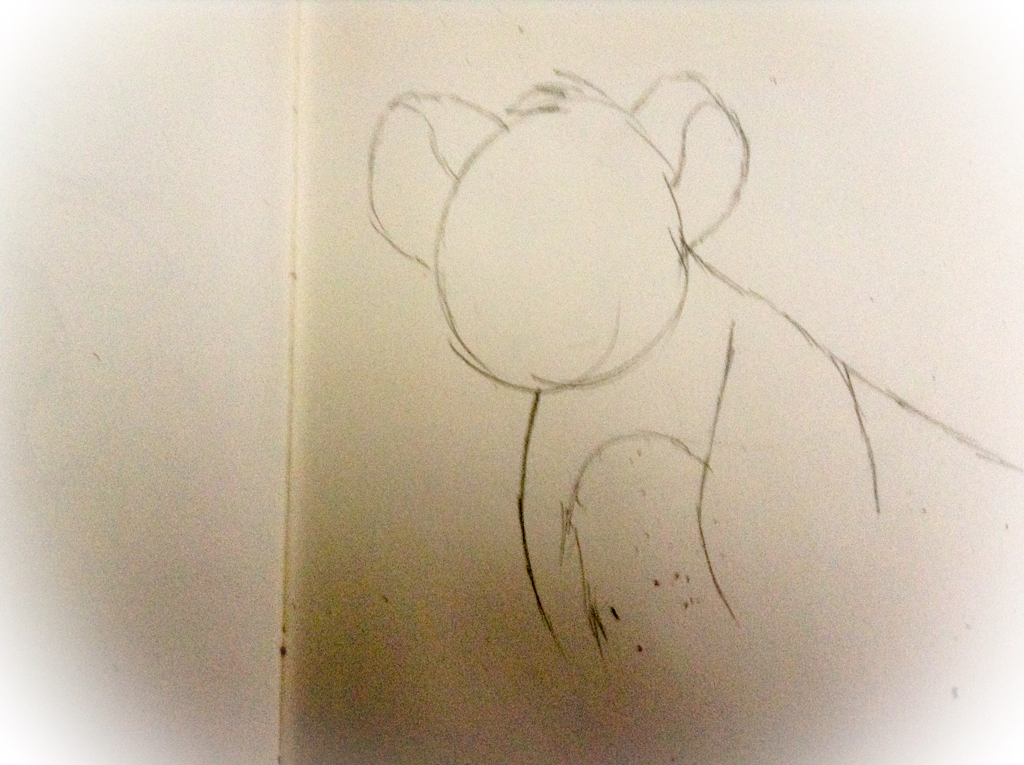 2. Now draw a fine sketch if the ears. 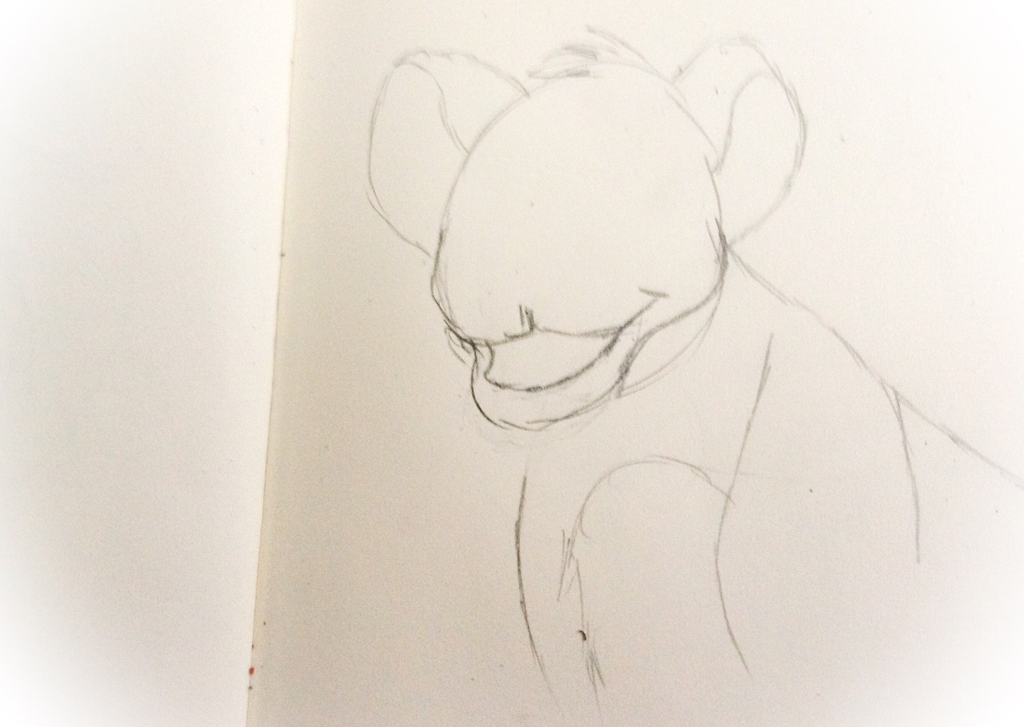 3. Next define the mouth more, with two bumps for the nose and a half oval sort of line for the mouth. 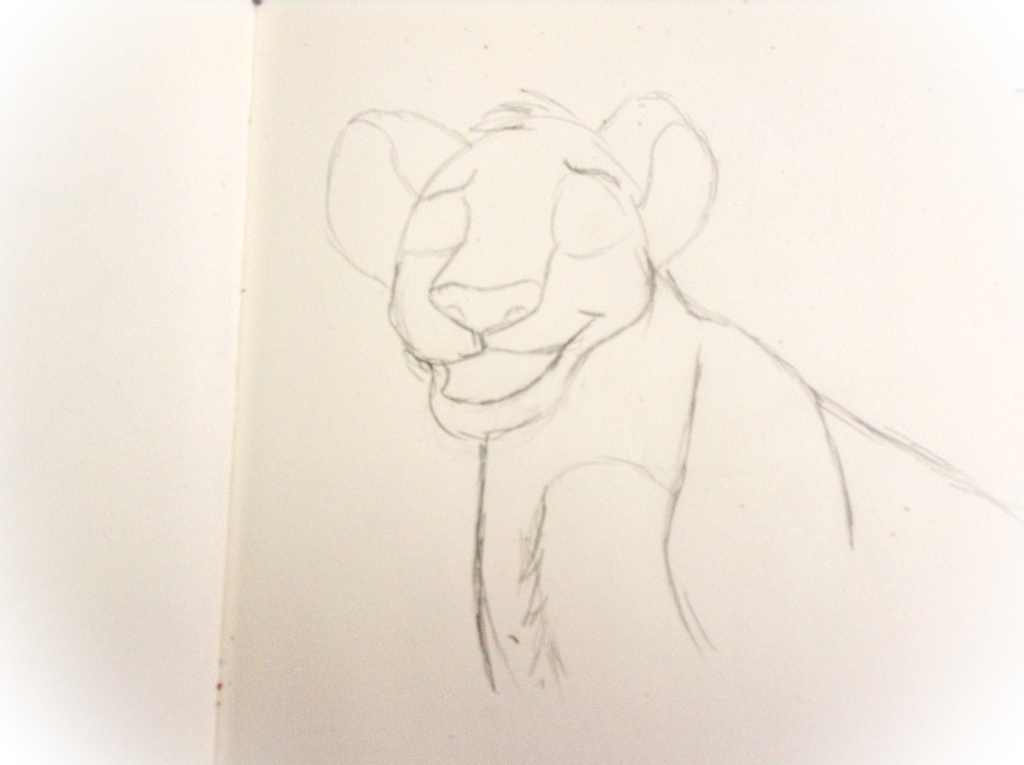 4. Now draw a snout, two lines on ether side of the nose. Also two faint ovals for eyes and eyebrows. 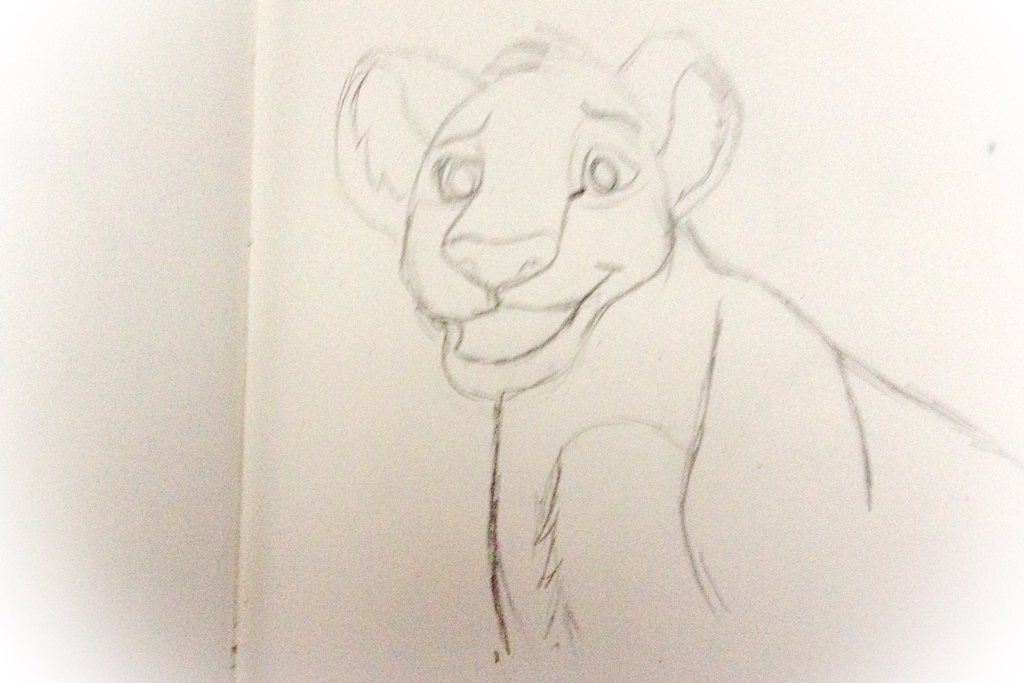 5. Now draw the eyes and pupils. 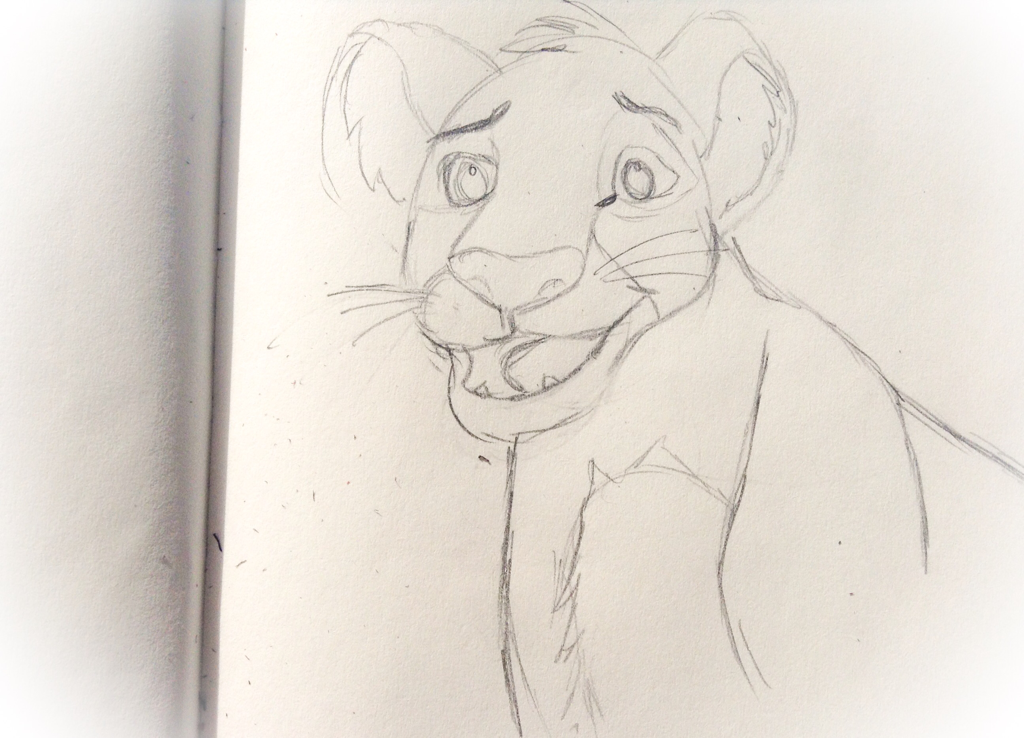 6. Now finish off the face with some ear fur, wiskers and 2 teeth. 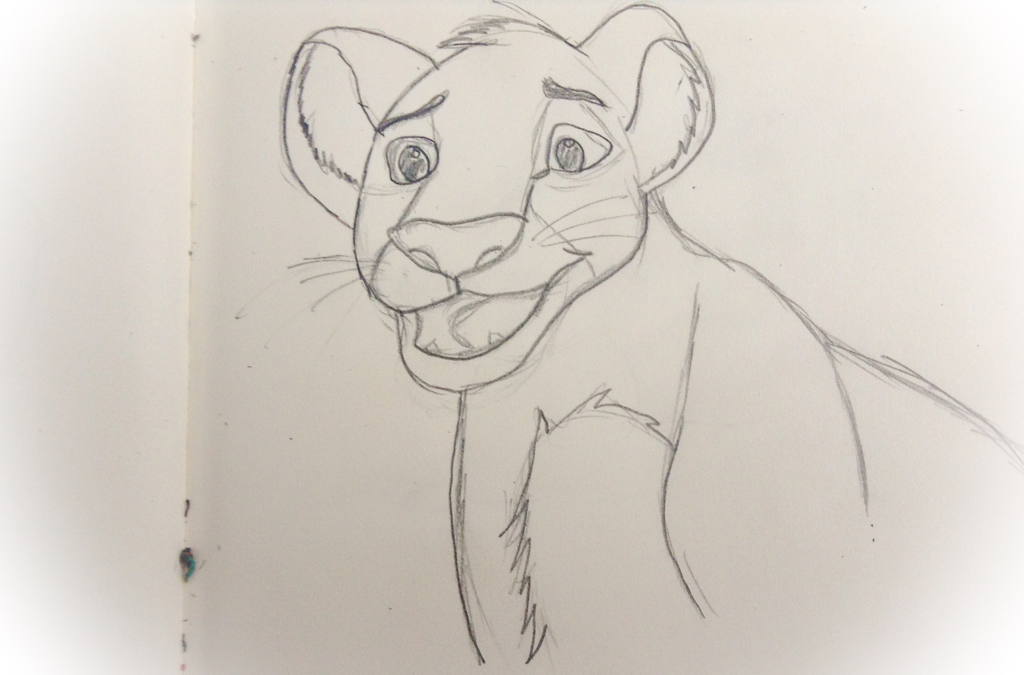 7. Finals the lines and rub out not important lines. 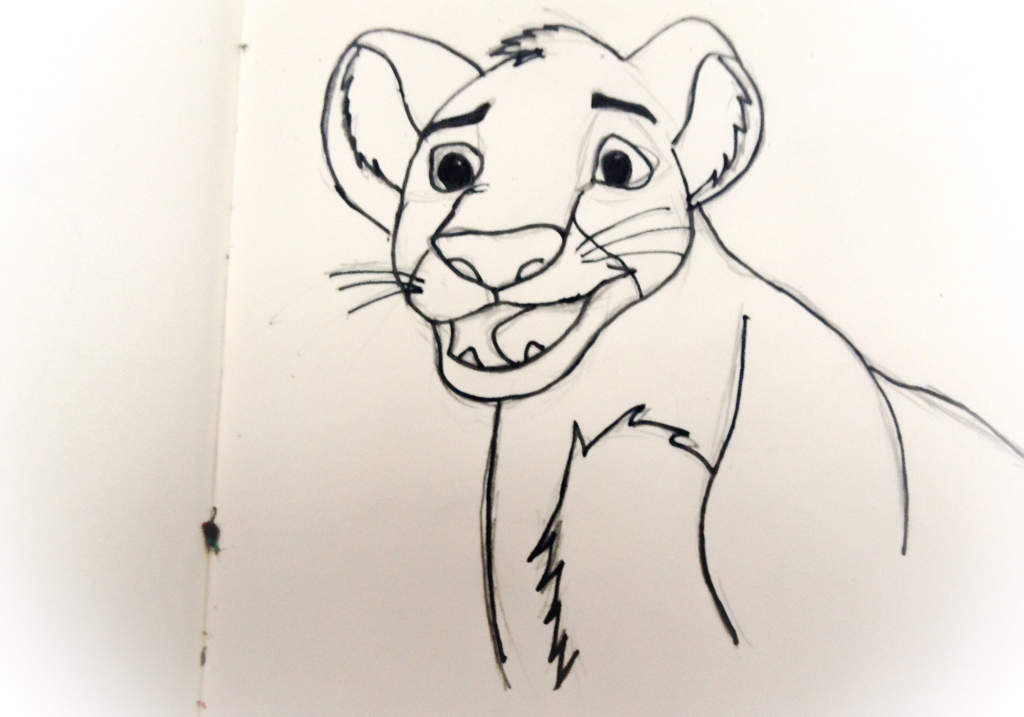 8. Go over with fine liners. 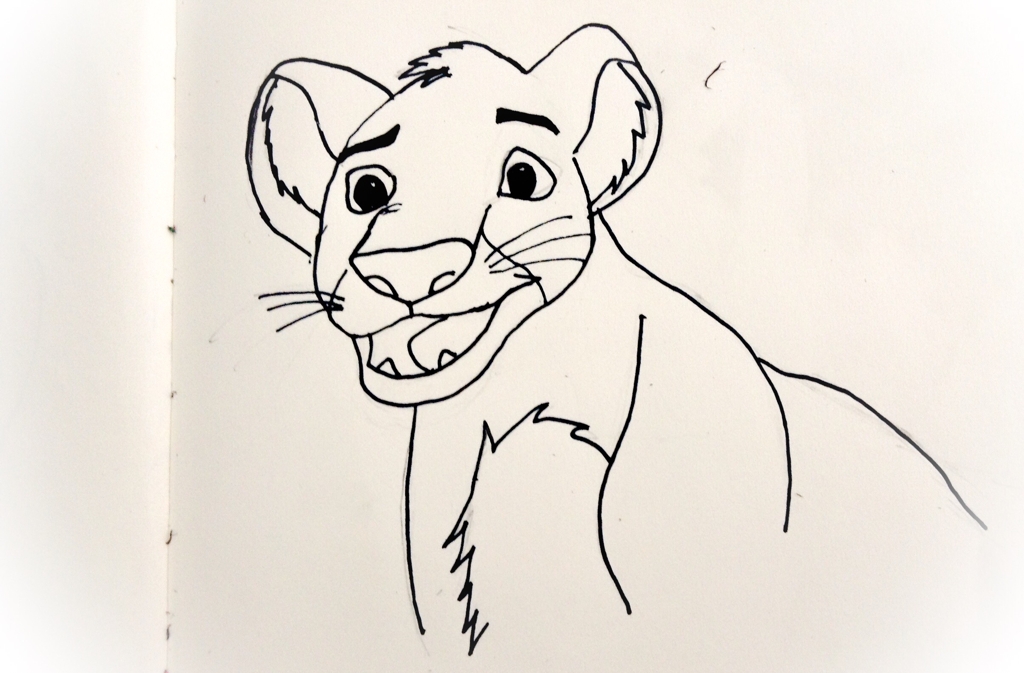 9. Rub out spare grey lead lines. 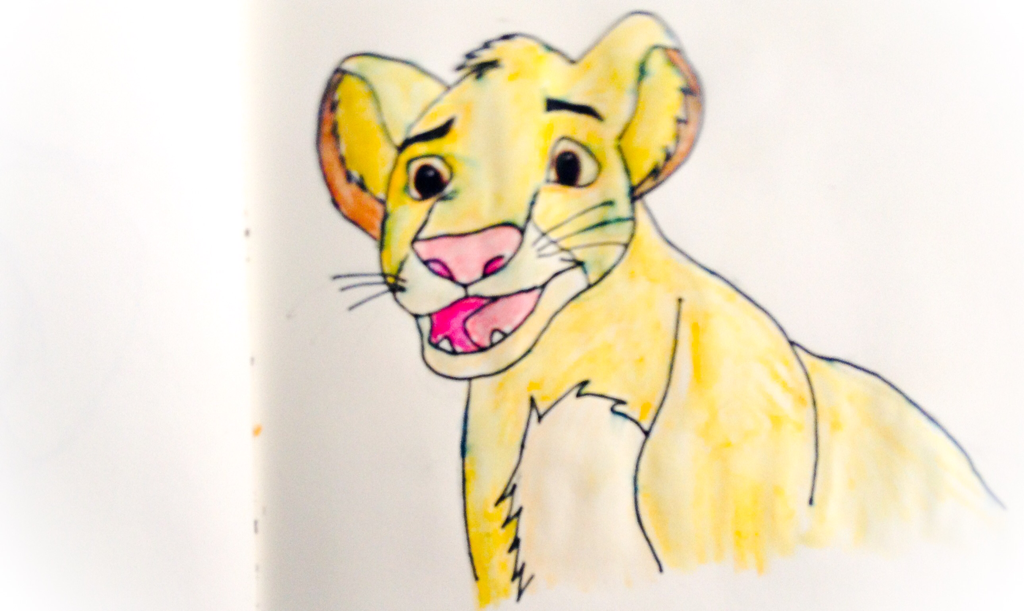 10. Lastly colour in the draw I used watercolours.
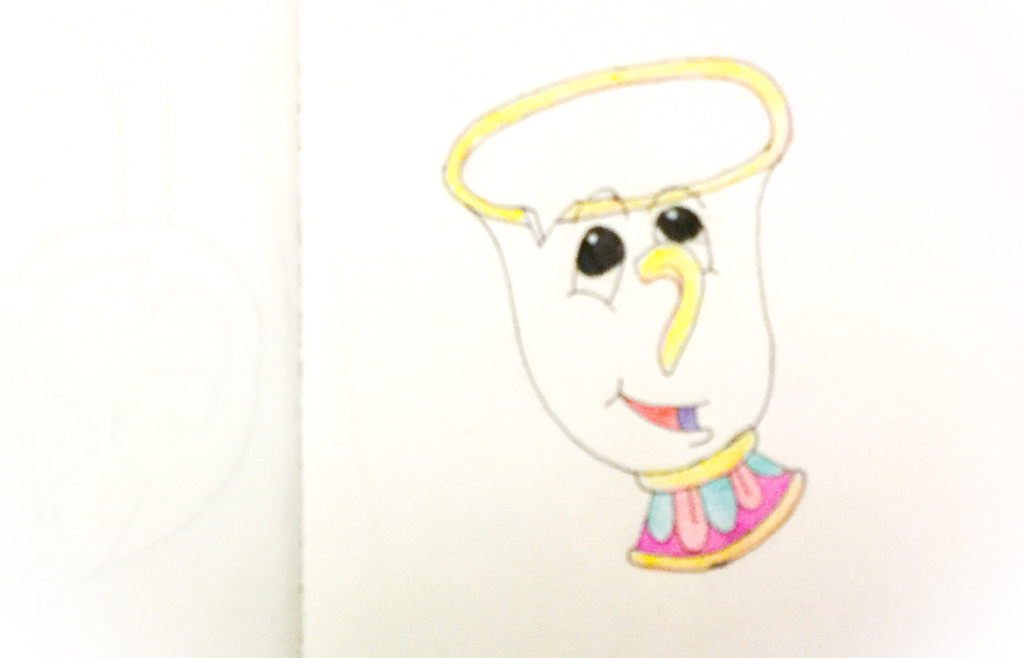 This is another drawing from my 2 week happiness challenge. This is how to draw a cartoon Chip from Beauty and the Beast.  1. First draw a long oval.  2. Draw a long curve connecting from one side to another side long. Like in the image. 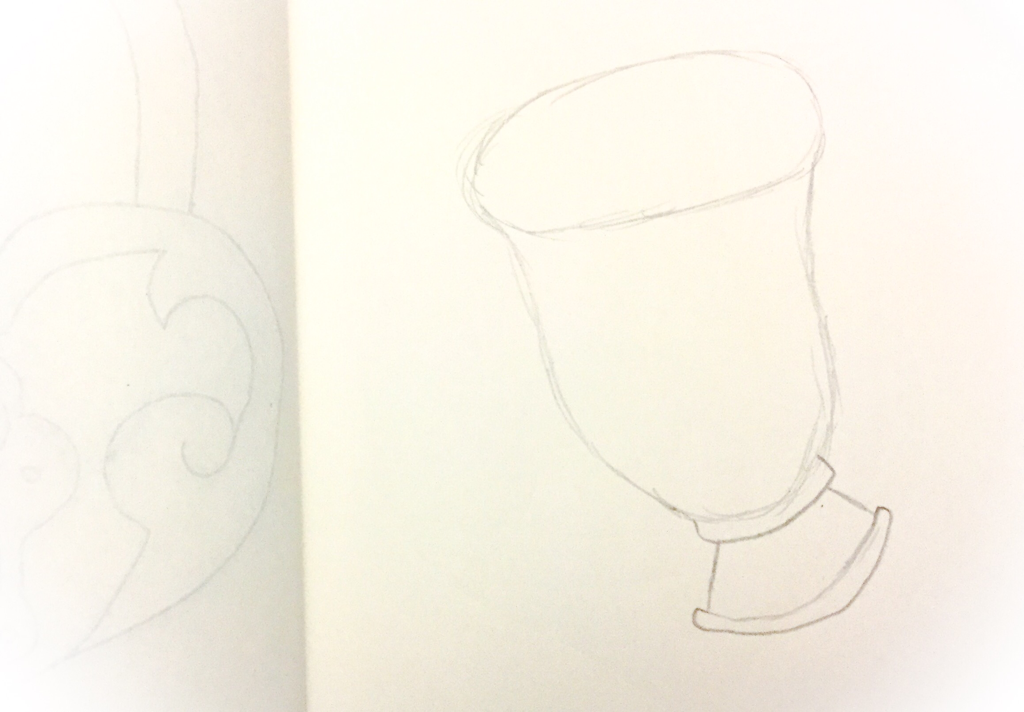 3. Draw the stand a thin line around the cup, then another bigger thin line about a centimetre or two and connect them together with two lines. 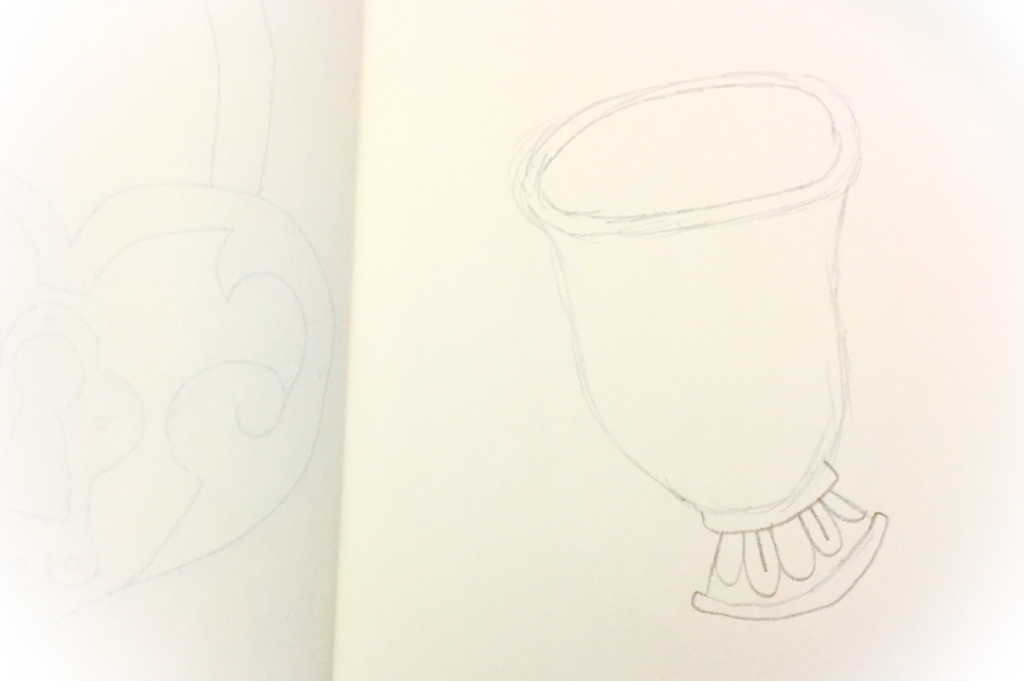 4. Draw a thin line around the rim and some loops as decoration at the bottom. 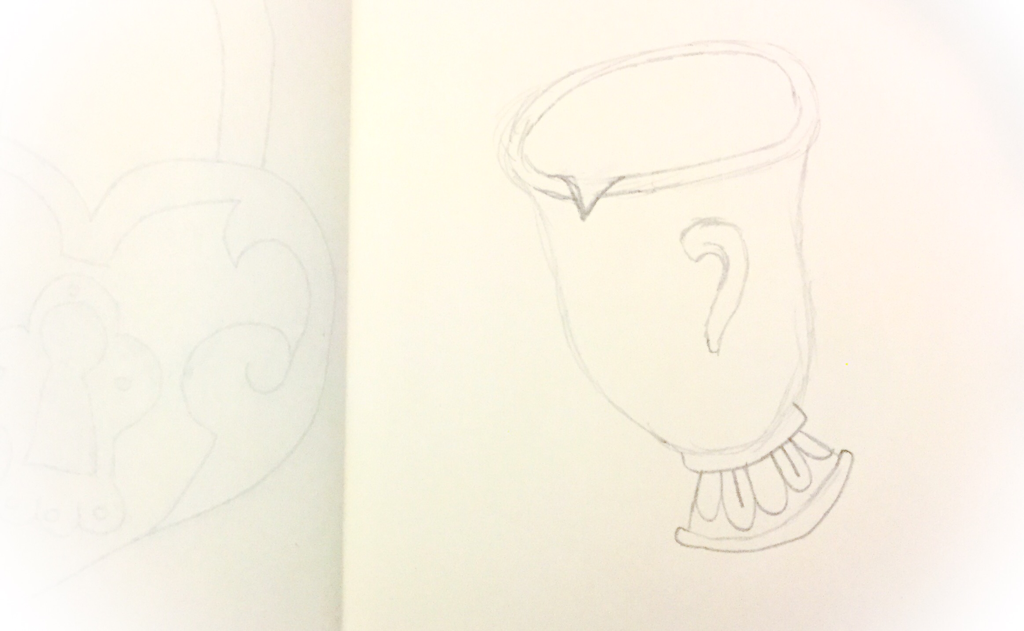 5. Draw a handle and a chip in the rim. 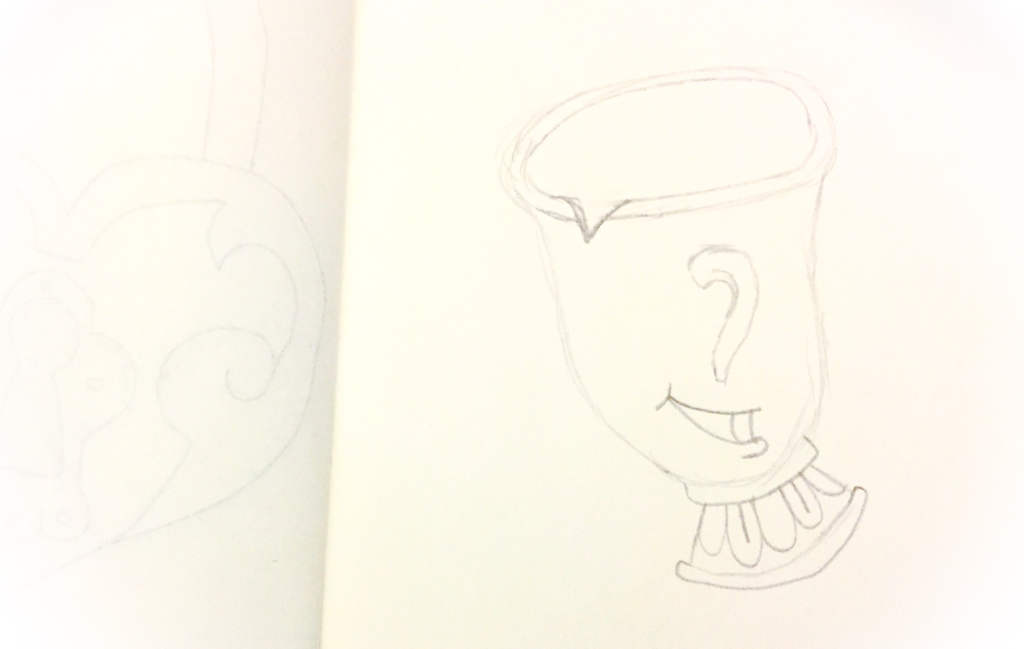 6. Now draw the smile. A small curve and draw two lines out of the curve and a small line to draw the tongue.  7. Now draw the eyes. 2 curves on each side of the handle. 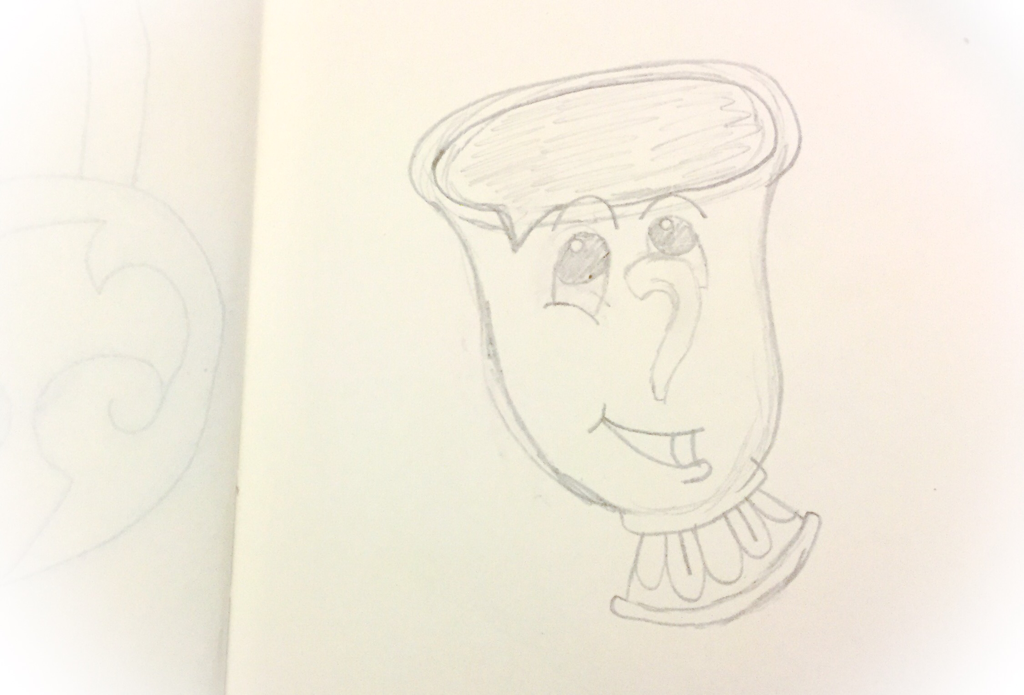 8. Now draw the pupils and some curvey lines for eyebrows about the eyes. 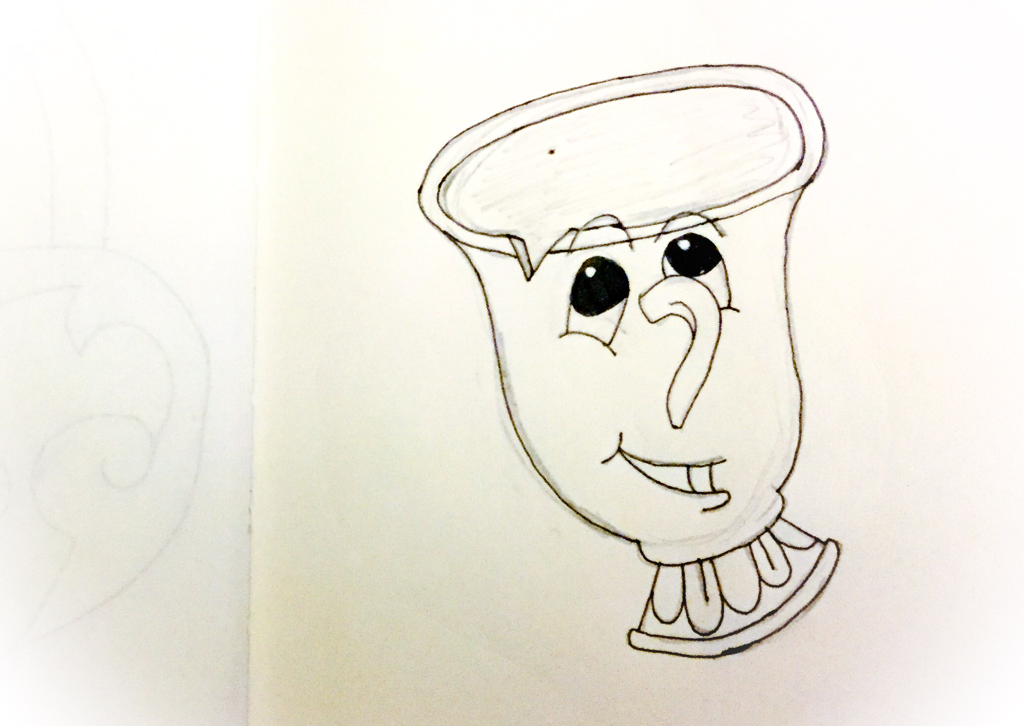 9. Go over with a fine liner.  10. Now colour it in however you like.
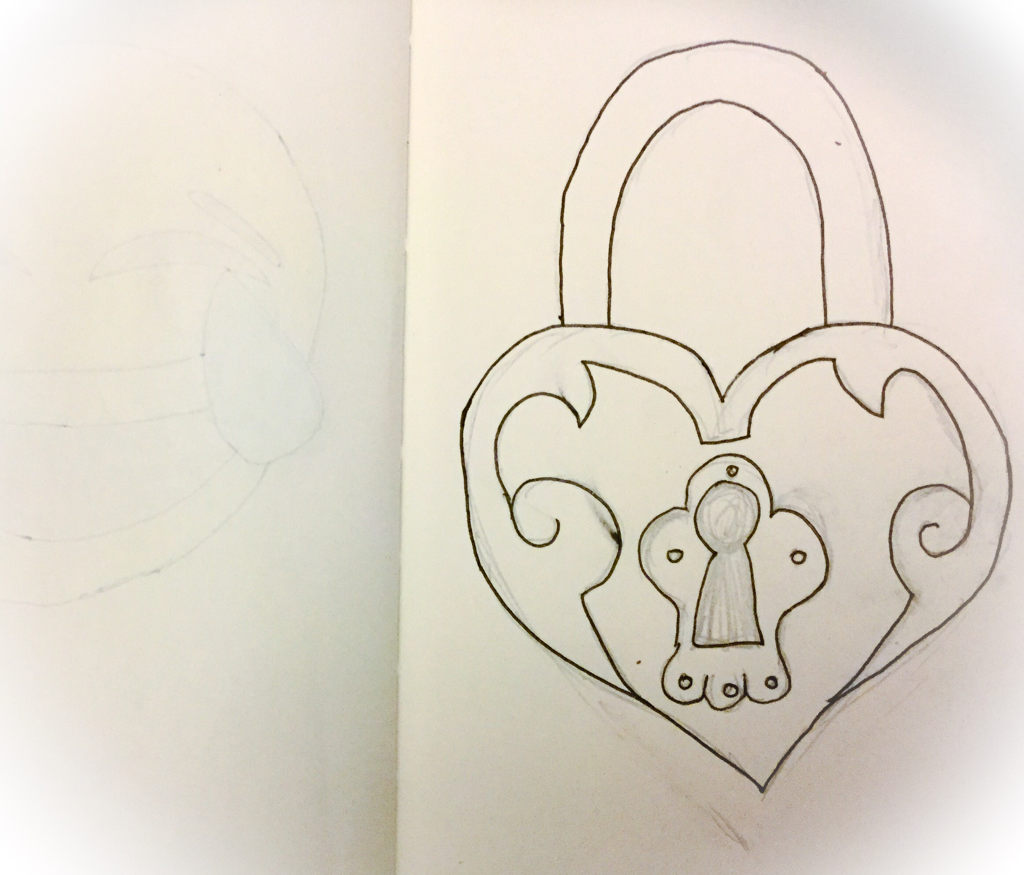 Hey today I have an easy heart lock. This is the third day of the 2 week happiness challenge. 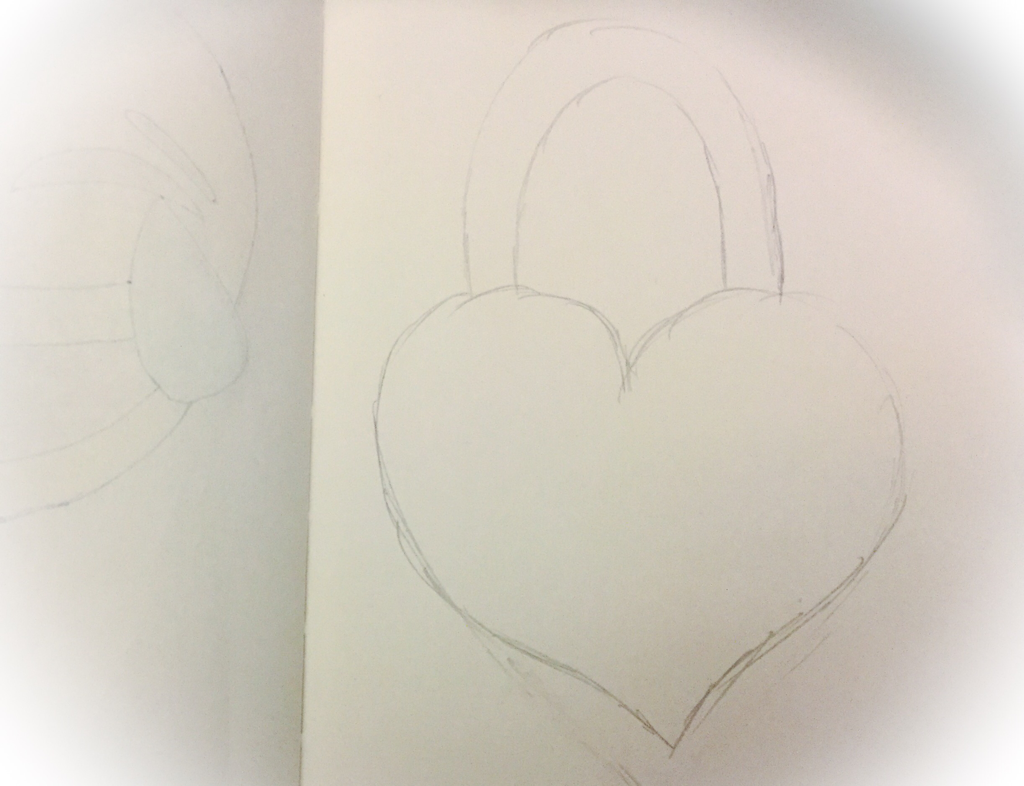 1. Draw a love heart the size of the lock you want and draw a handle. 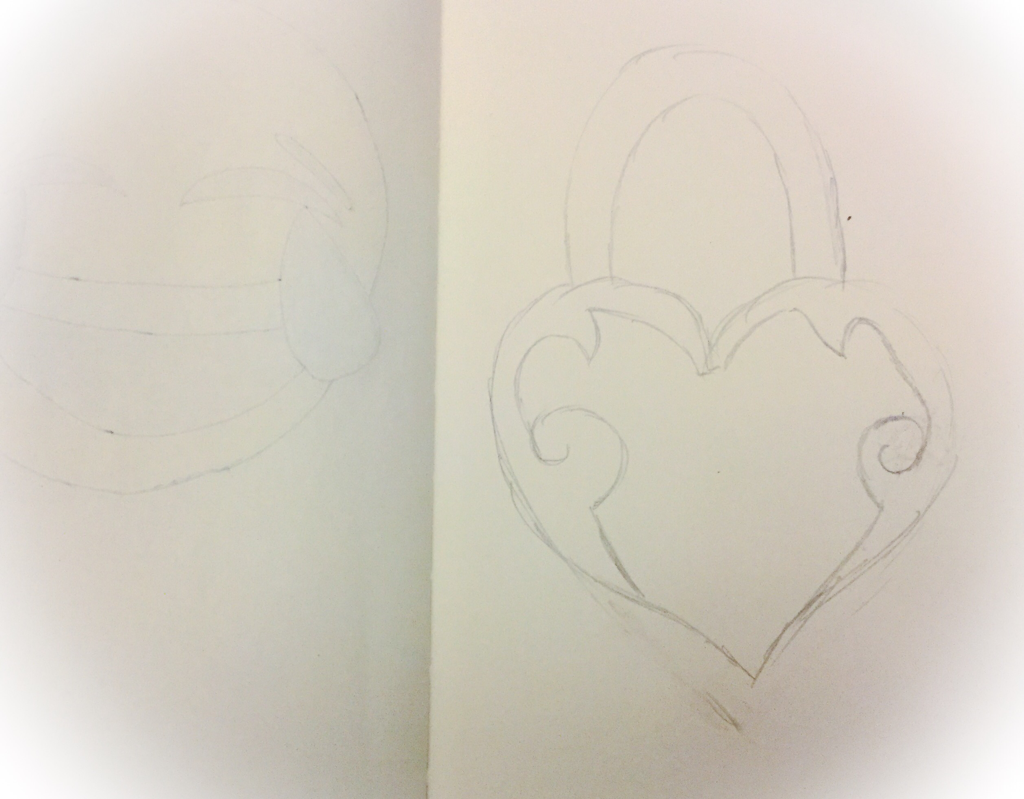 2. Draw some random curly lines. Have them the same on the other side. 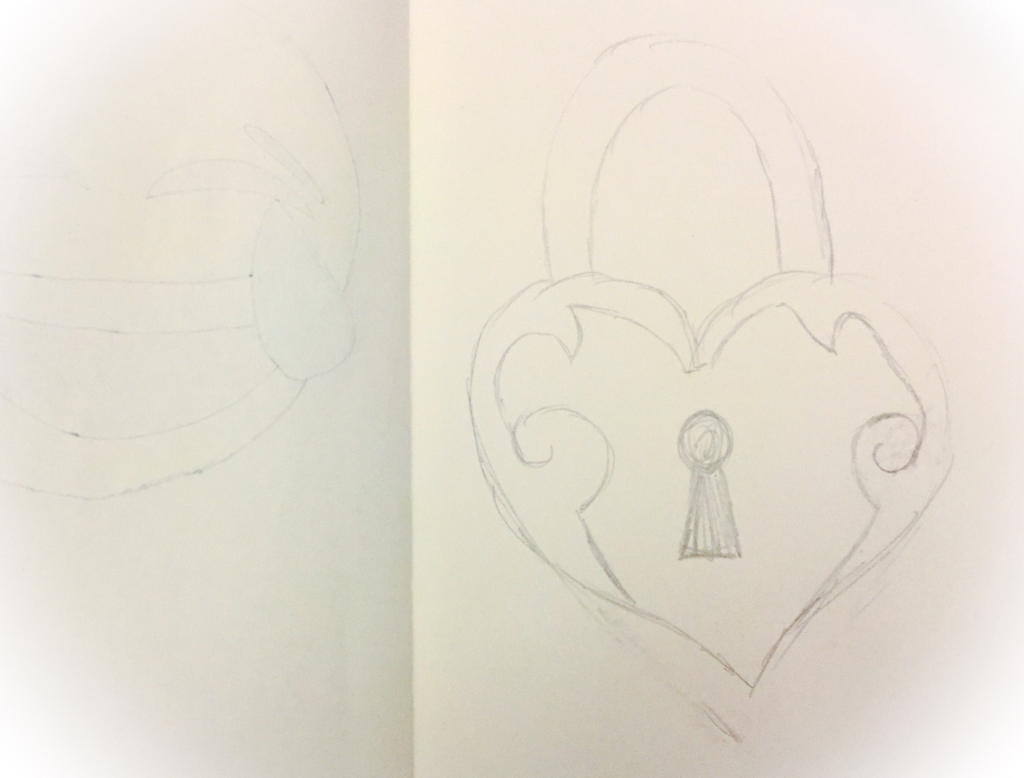 3. Now draw a small circle and a long triangle underneath the key hole. 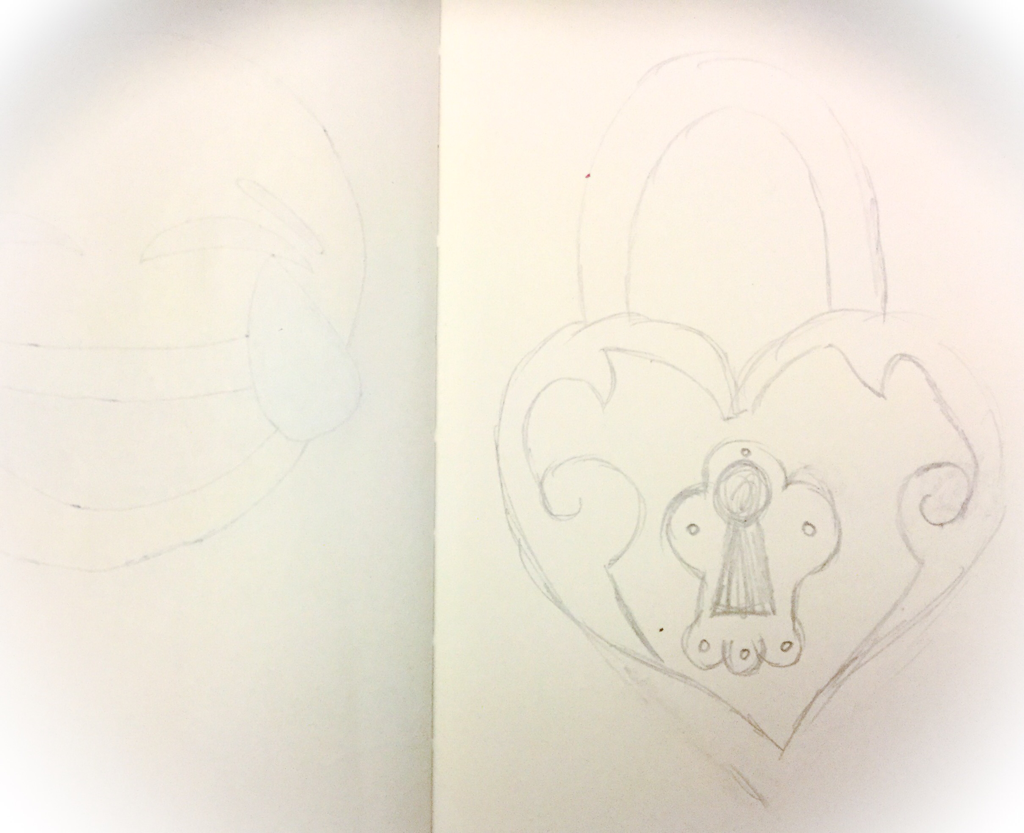 4. Now do some fancy circles around the key hole.  5. Then go over with fine liner. You can colour it in if you want.
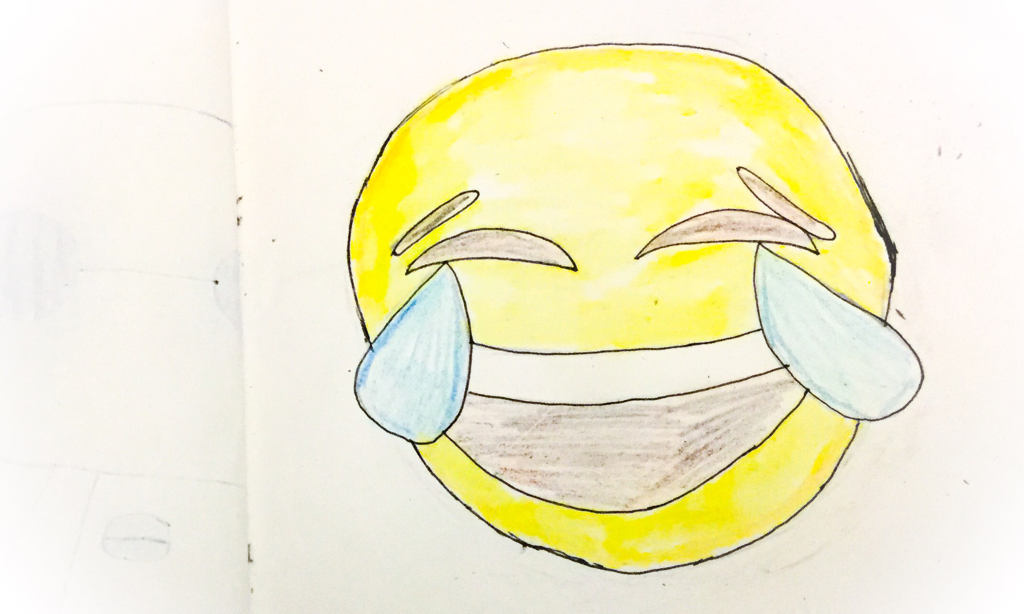 Hey today is the second day of the 2 week happiness challenge. This time I am dong a step by step how to draw a laughing emoji. 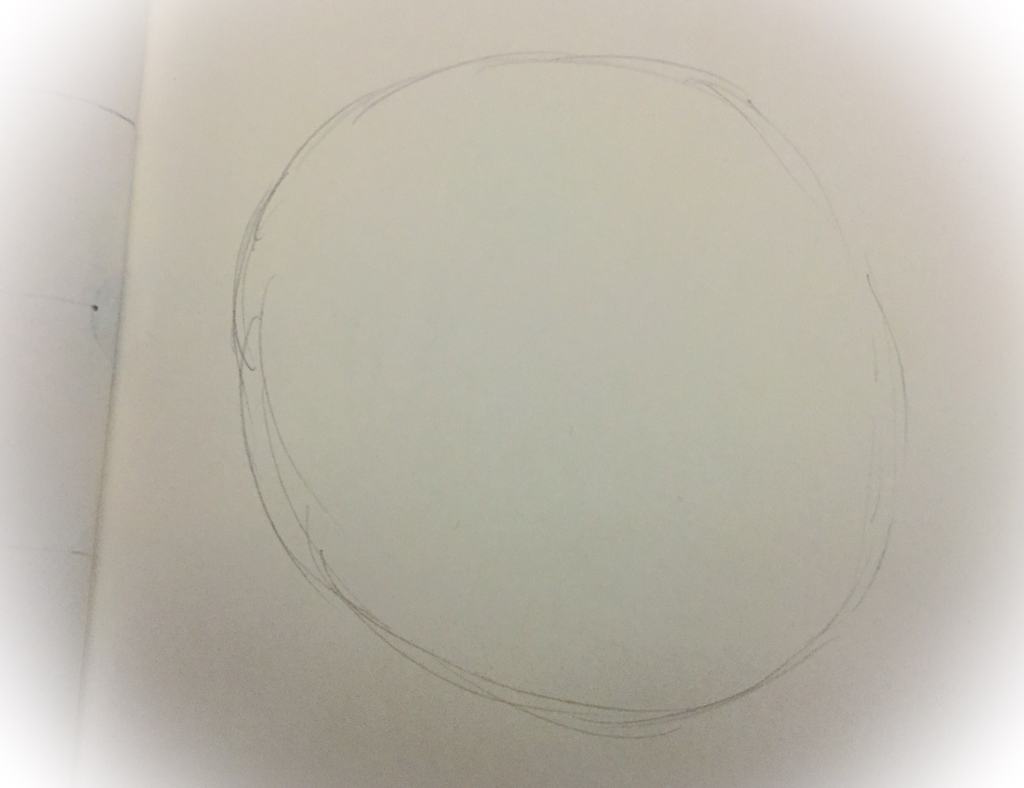 1. First draw a even circle. However the size you want it to be.  2. Now draw 2 curvey thick lines, like eyebrows. 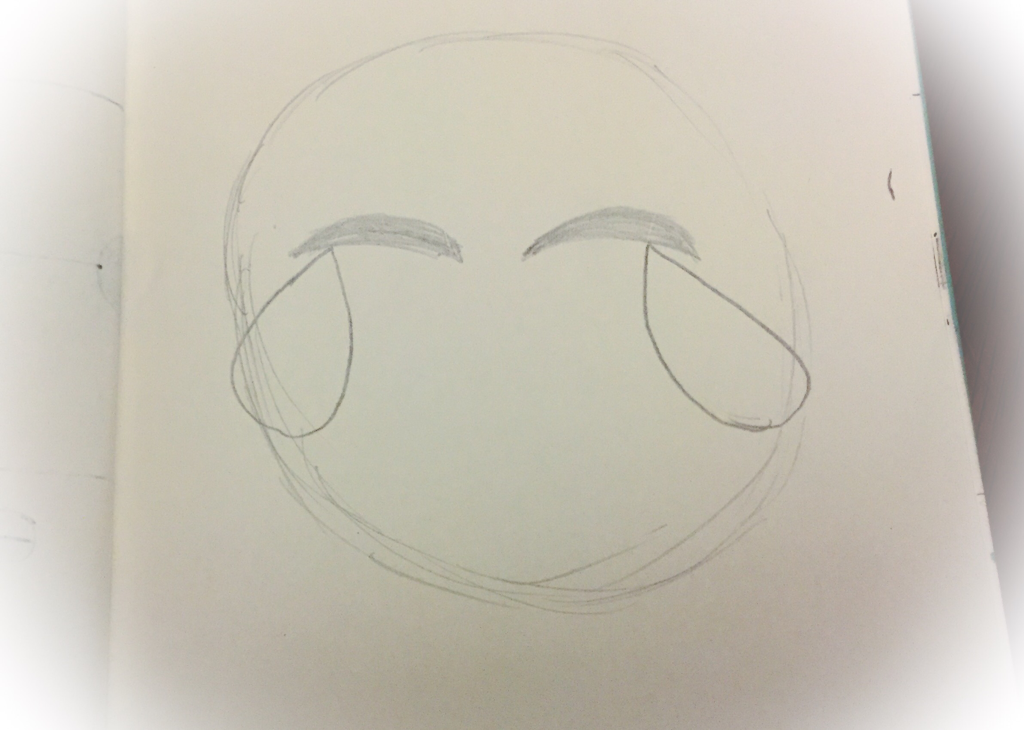 3. Now draw 2 tears on the sides of the eyes. 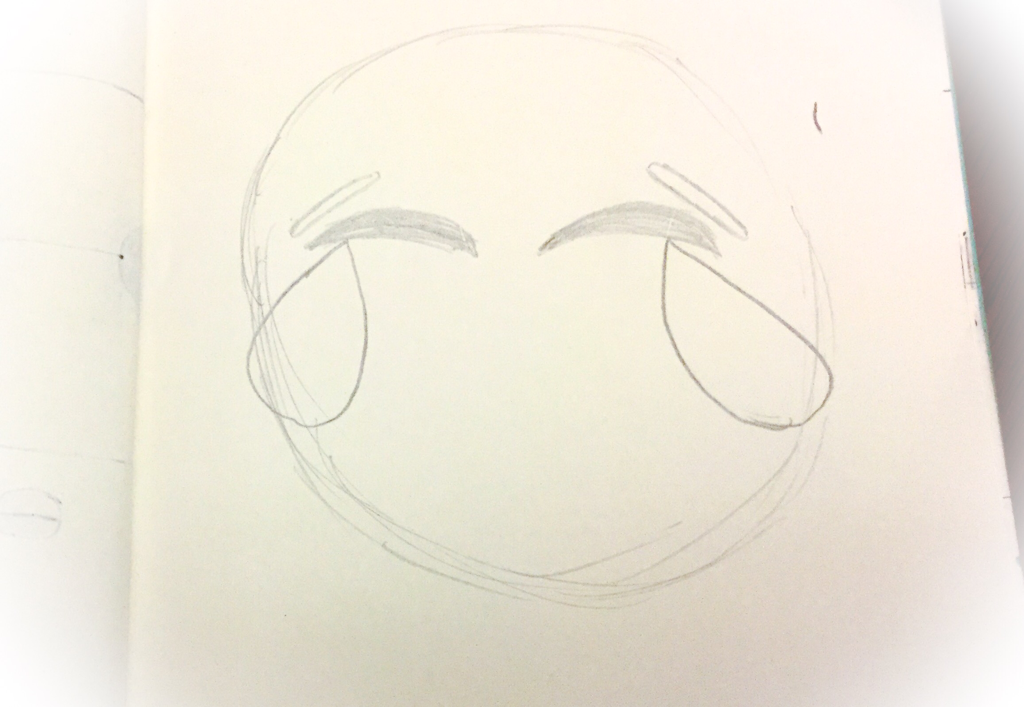 4. Now draw some thin ovals on the sides of the eyes. Don't colour in, these will be the eyebrows. 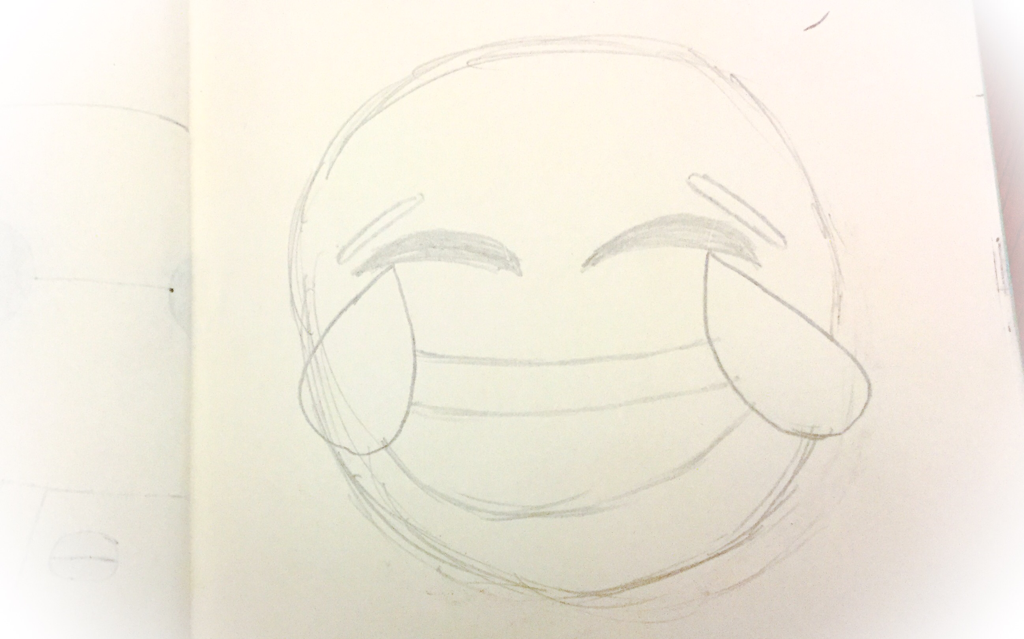 5. Now draw the smile. 2 lines connecting from tear to tear. Then a fatter line to finish the smile. 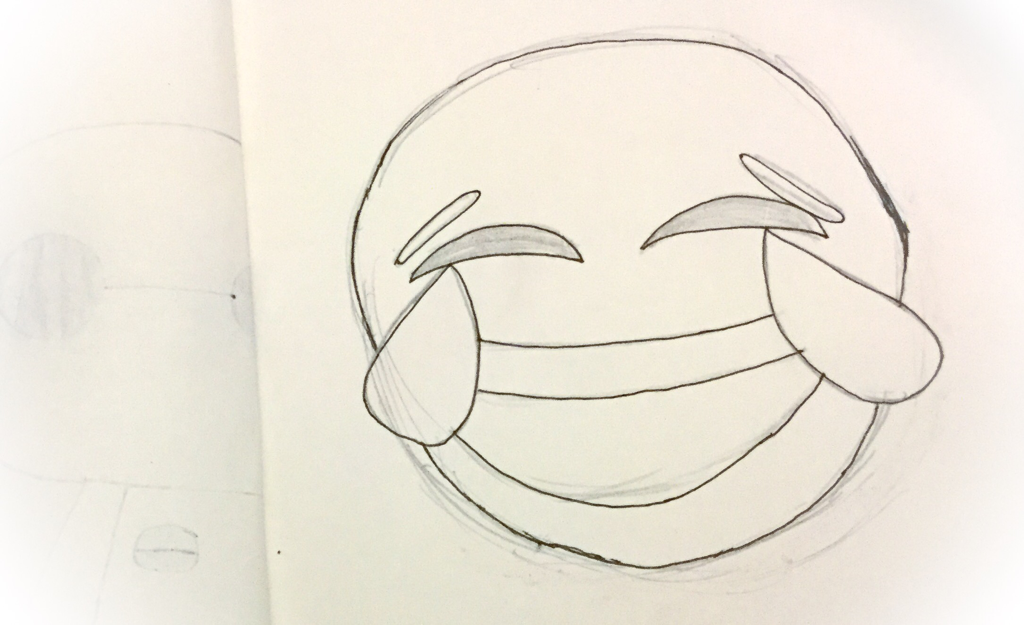 6. Then do a fine line and rub out the grey lead lines.  7. Now just colour it in. I used coloured pencils.
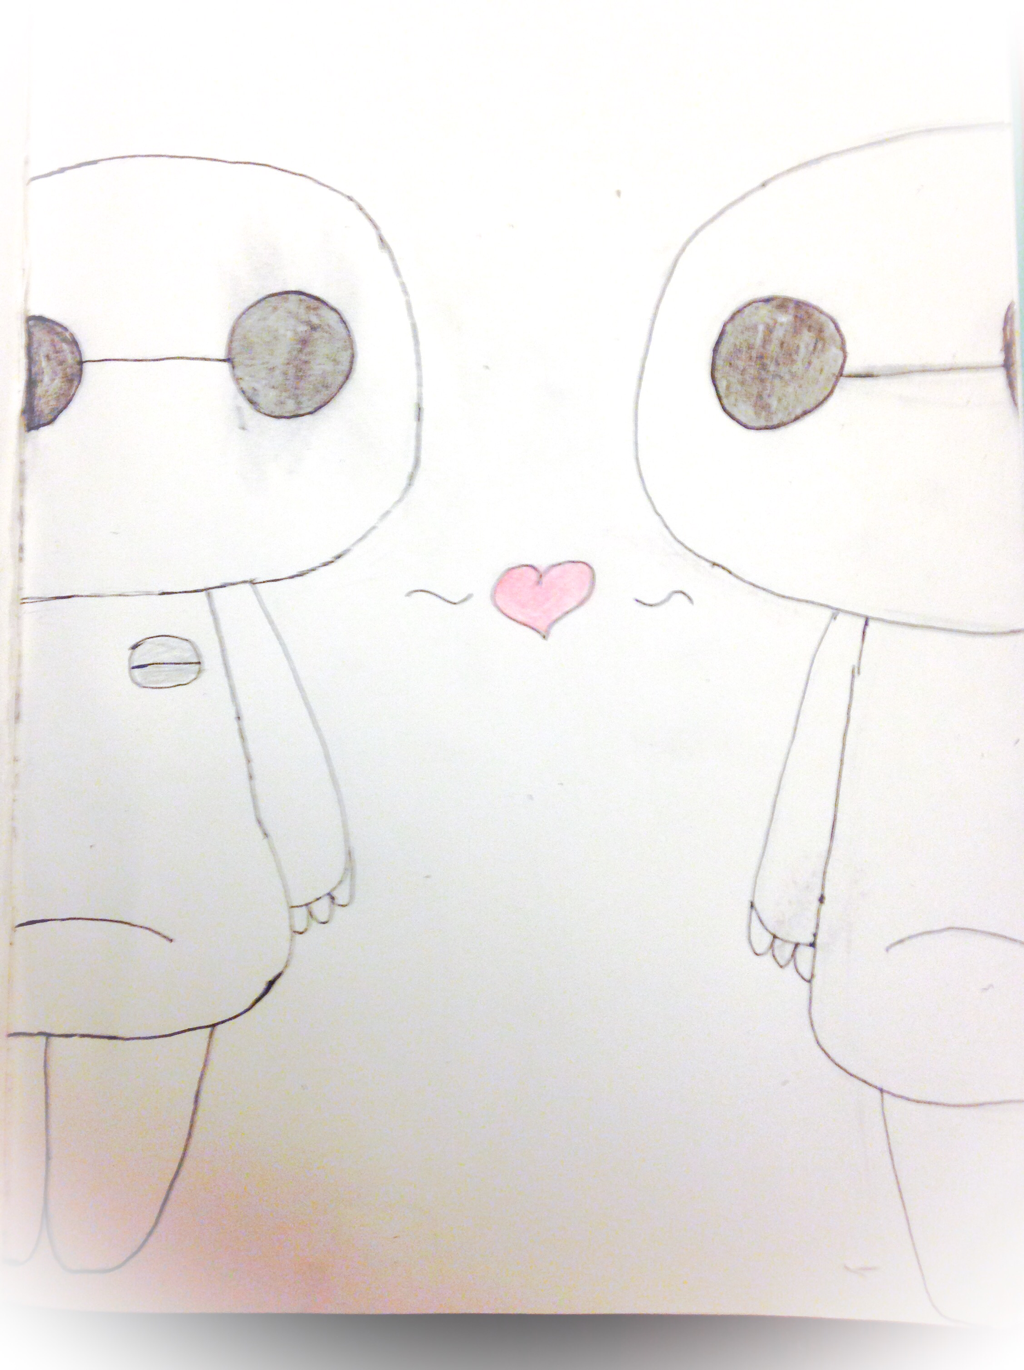 This is my first step by step drawing tutorial for my 2 week happiness project challenge. This as you can tell by the title is about how to draw a cute baymax pair. I found this idea of half a baymax on the internet and decided to make a cute pair because the left side looked bare.  1. First draw a half circle going off the page.  2. Now sketch a line for the body and a skinny to fat line for the arm.  3. Round off both the arm and the body, in a sort of oval shape. 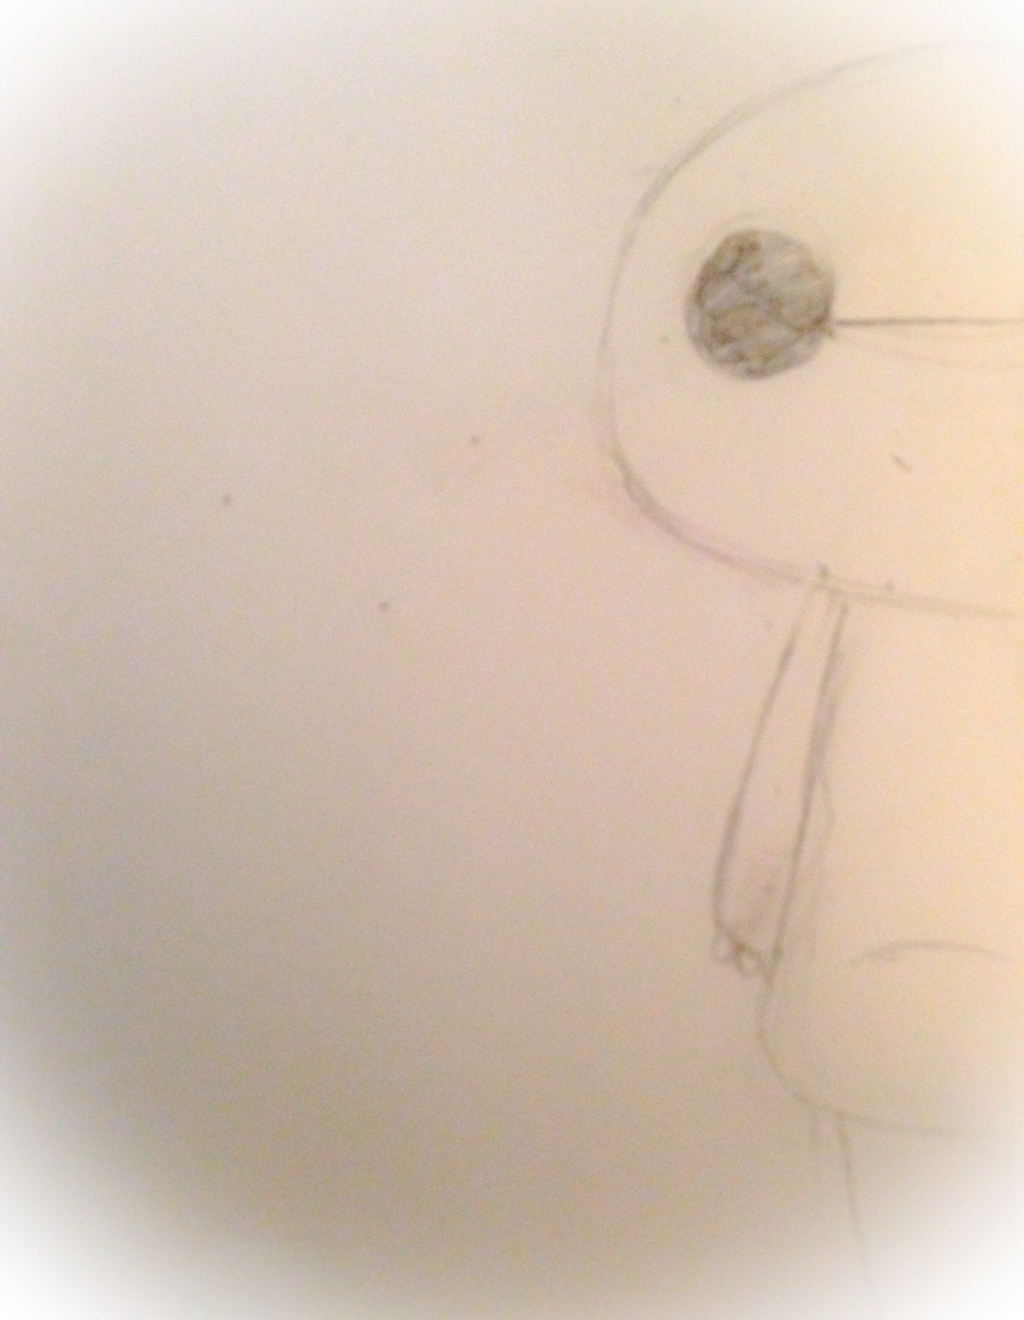 4. Now draw the small fingers on the hand and draw the eyes. A dark circle and line. 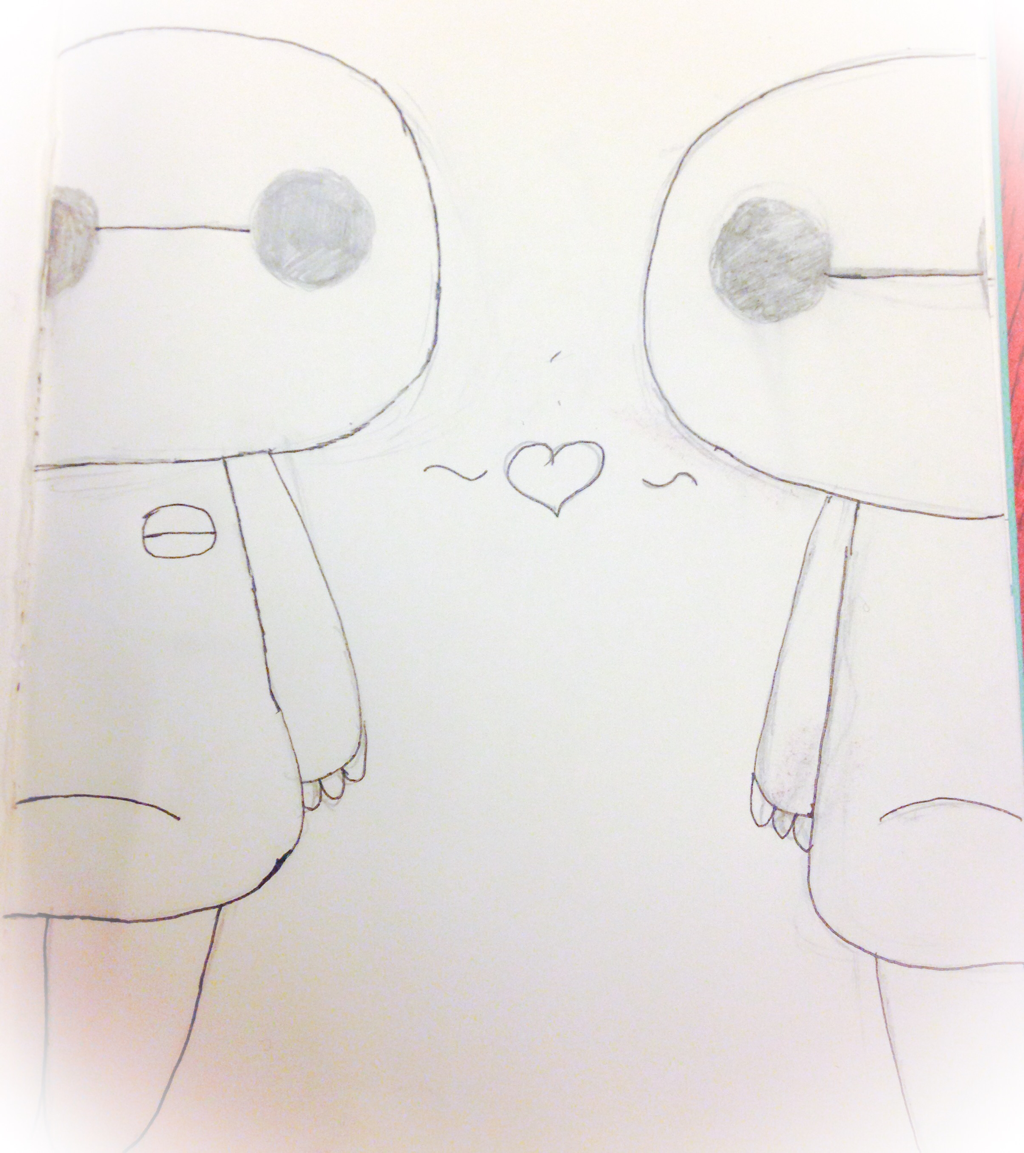 5. Now draw the same baymax but in the other side. You could add a button and heart too. 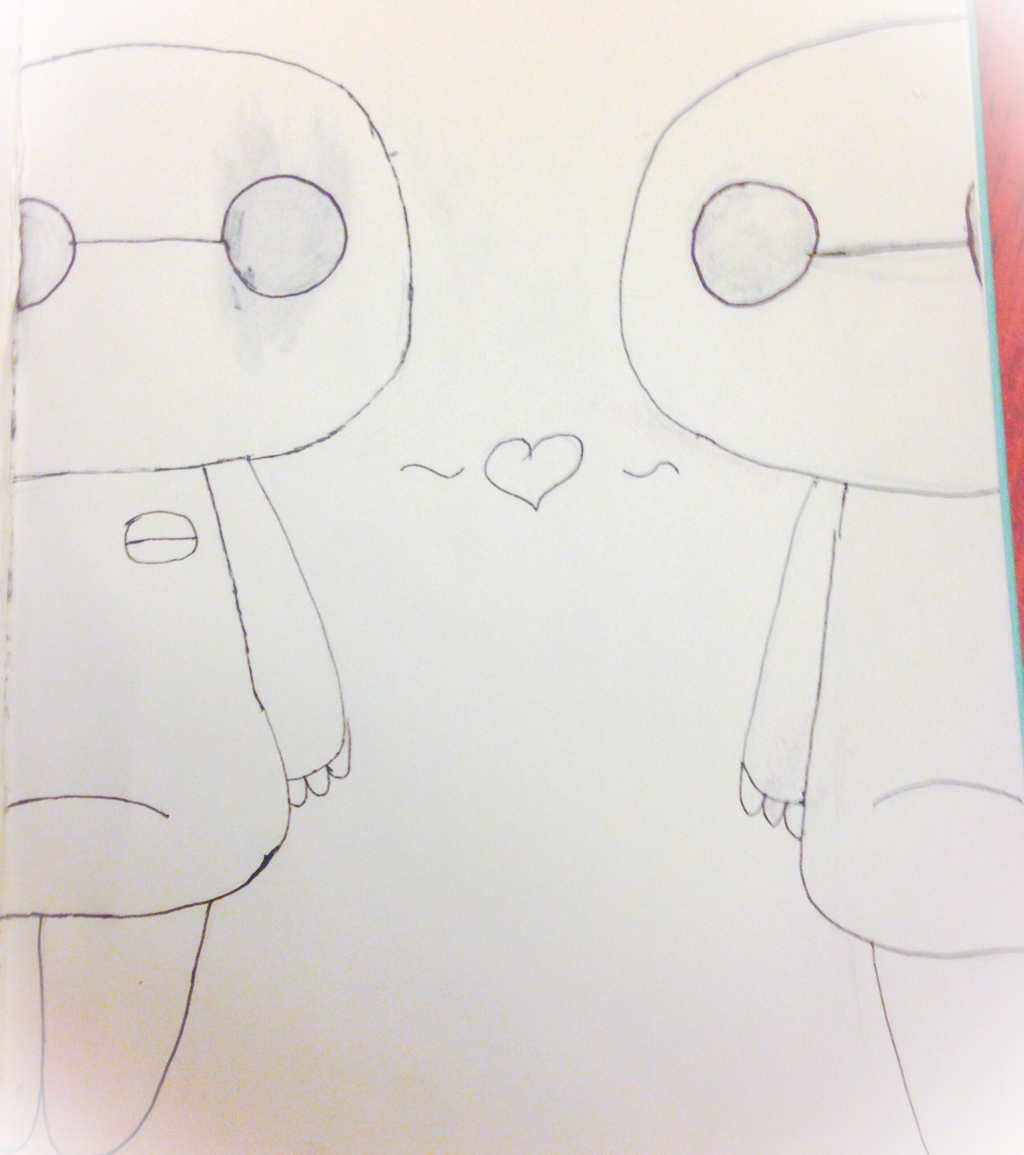 6. Use a rubber to rub out the grey lead lines. 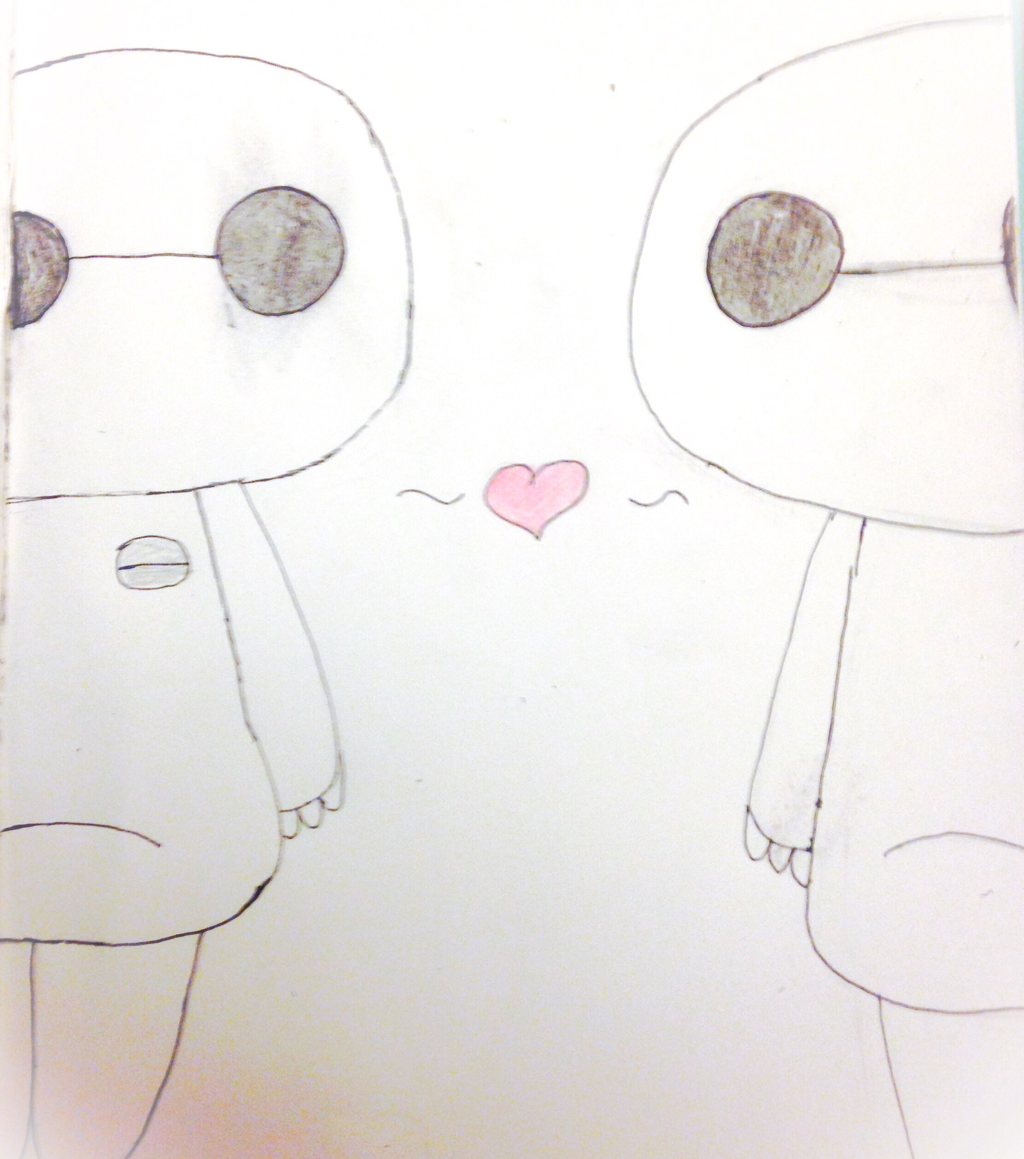 7. Then colour in the drawing however you want. I used watercolours.
 Sorry I haven't posted in a week. My family has gone through some tough stuff lately. For my health school project I have to do a happiness project. One part is a 2 week project, we have to do something that makes us happy. We all know drawing and colouring makes me happy. So for the next 2 weeks I will be doing a drawing everyday. I also decided that I will post for every drawing I do everyday, a step to step instructions on how to draw it. So it will benifit both of us. So from what I said you will get a post daily of step to step drawings or even just the drawing. I will try but I might not have time cause homework.🎨
Hey guys how's your holiday or weekend been mines been good. On Friday I looked for inspo for my blog posts and came across this idea (artists block). I always have trouble with artist block. Btw artists block means when you can't think of something to draw, paint, ext. The real definition off the internet is when you run out of ideas to draw things off, and temporarily loose all motivation to do anything art related. There are a lot of things you can do when you suffer from artist block. Here are my top 5 tips.
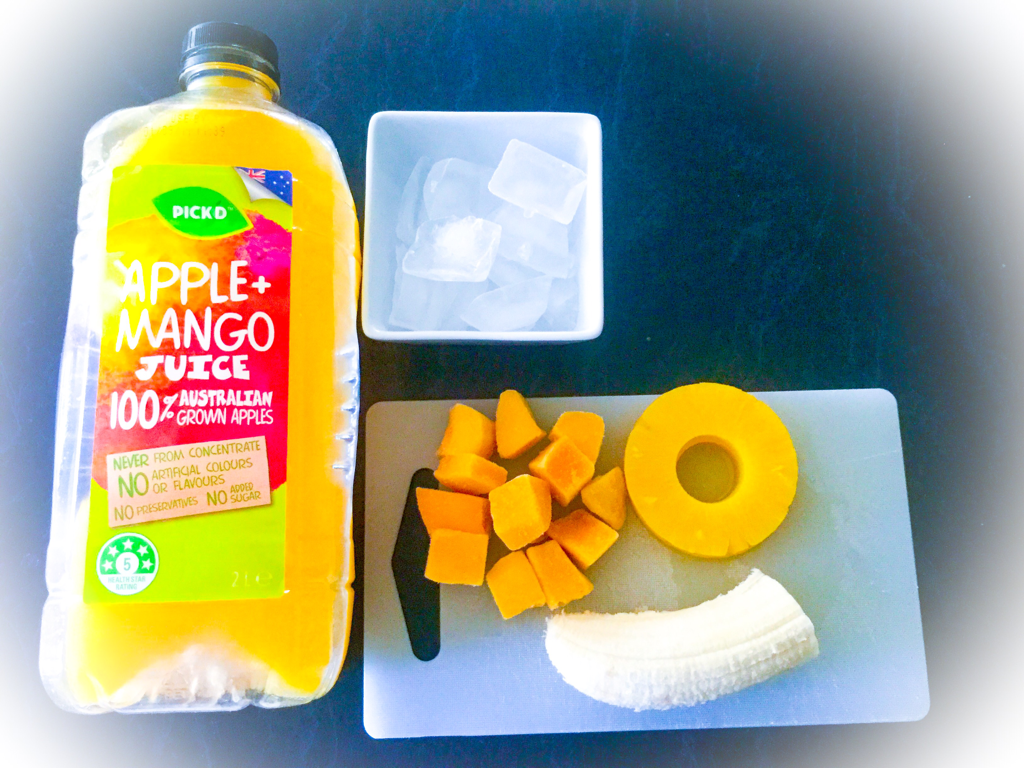
First you can go on Pinterest for inspo. It's a great way to get inspo for anything. I use Pinterest a lot for inspiration on things to draw. I have even made my own Pinterest board. If you need inspo you can check it out (Taypaints) called drawing inspiration. I add new additions to the board regularly. Secondly you can look at picture story book. They are a great way to get inspo. You can either draw things from your favourite books or get ideas for greater ideas from them. As well as picture story books being really good novel books are good too. The descriptive writing can bloom new ideas. Thirdly you can watch movies, personally the best to watch is Disney. I think Disney is good because there are so many cartoon characters all different in their own way. I would recommend to watch Tangled, Aladdin, frozen and lion king.It also can distract you by listening to the fun music. I love to jam to Disney music drawing, on the bus, in the car and doing homework. So to help with artist block listen to Disney music or watch Disney music. Fourthly you could look on the internet. The internet can help you in many ways including helping with artist block. You can either search up photos of drawings for inspo, ideas to draw on blog posts and websites. They are just 3 ways to get inspo off the internet, there are so many pother ways. Lastly you can look at drawing or art books. You can find them in a art store or even a book store which is where I get all mine. The art books can either be step to step drawing books or drawing books about movies and the art/drawings behind it. It's an awesome thing for inspo or instructions on how to draw. I always used to use them to build up my skills and still sometimes use them. These were just 5 things you can do if you are suffering from artist block. Any of these are sure to help you get ideas on what to create. I would like to tell you guys a few things about my posting and days and what I will post on those days. I will post every Sunday and will try to post on Wednesdays too. On Sundays I will post diys or step to step drawings and on Wednesday I post tips and tricks about art and other bits and pieces. I hope to see you guys next Sunday and hopefully Wednesday if I can keep it up with school work. Taylor💘 Hey in the holidays lately I have been trying to eat healthier but filling breakfasts. Did you know that breakfast is the most important meal of the day, I did. Well I have been drinking smoothies which taste great and are filling. Here are 4 smoothie recipes that taste delicious. Berry Smoothie!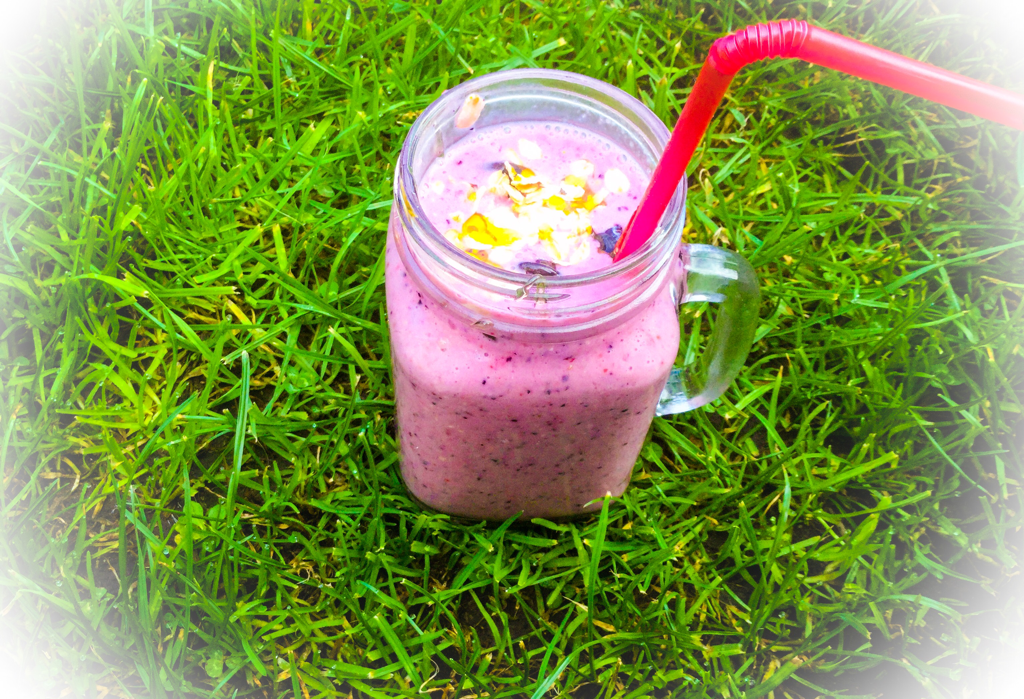 Ingredients:
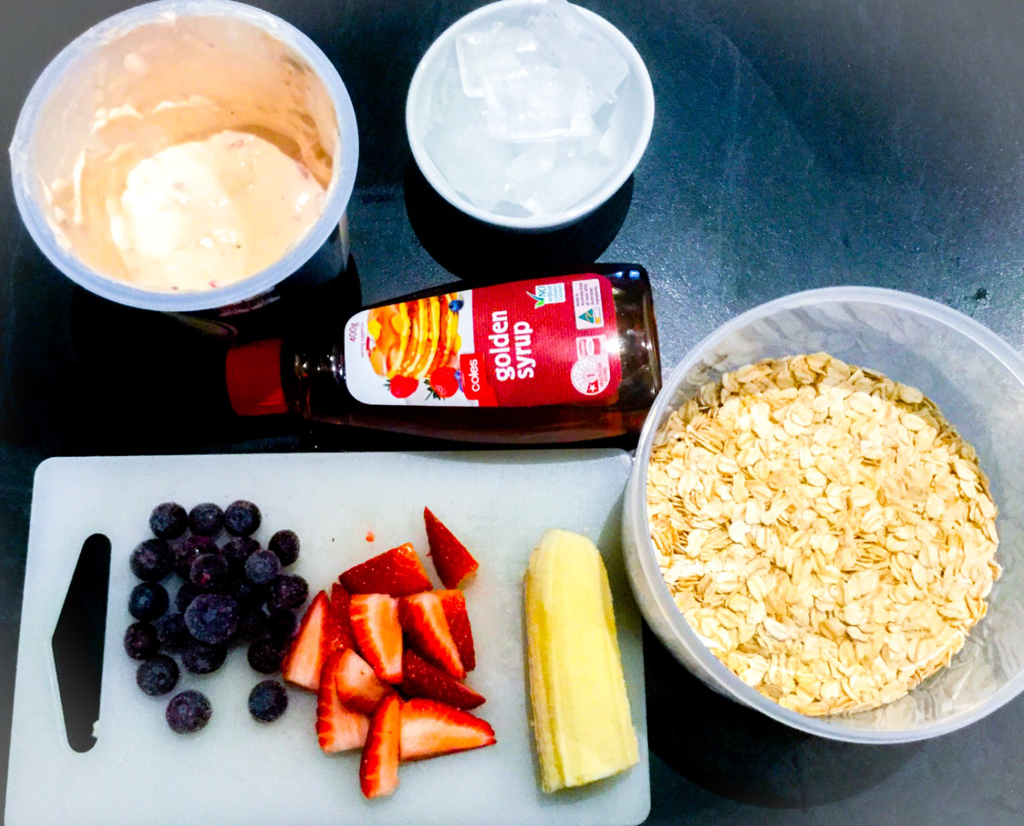 1. First cut up all the fruits and put into the blender. 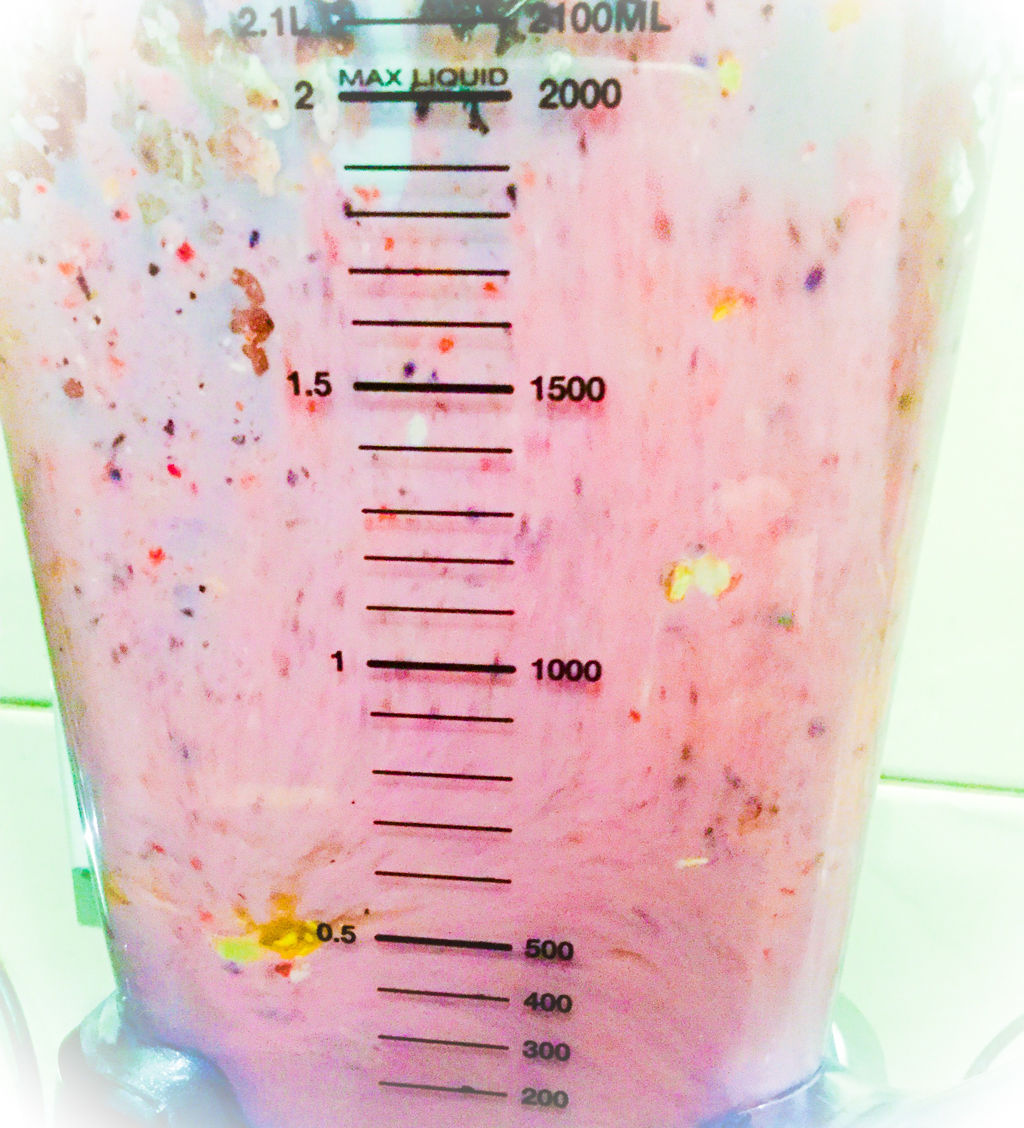 2. the mix in the blender. 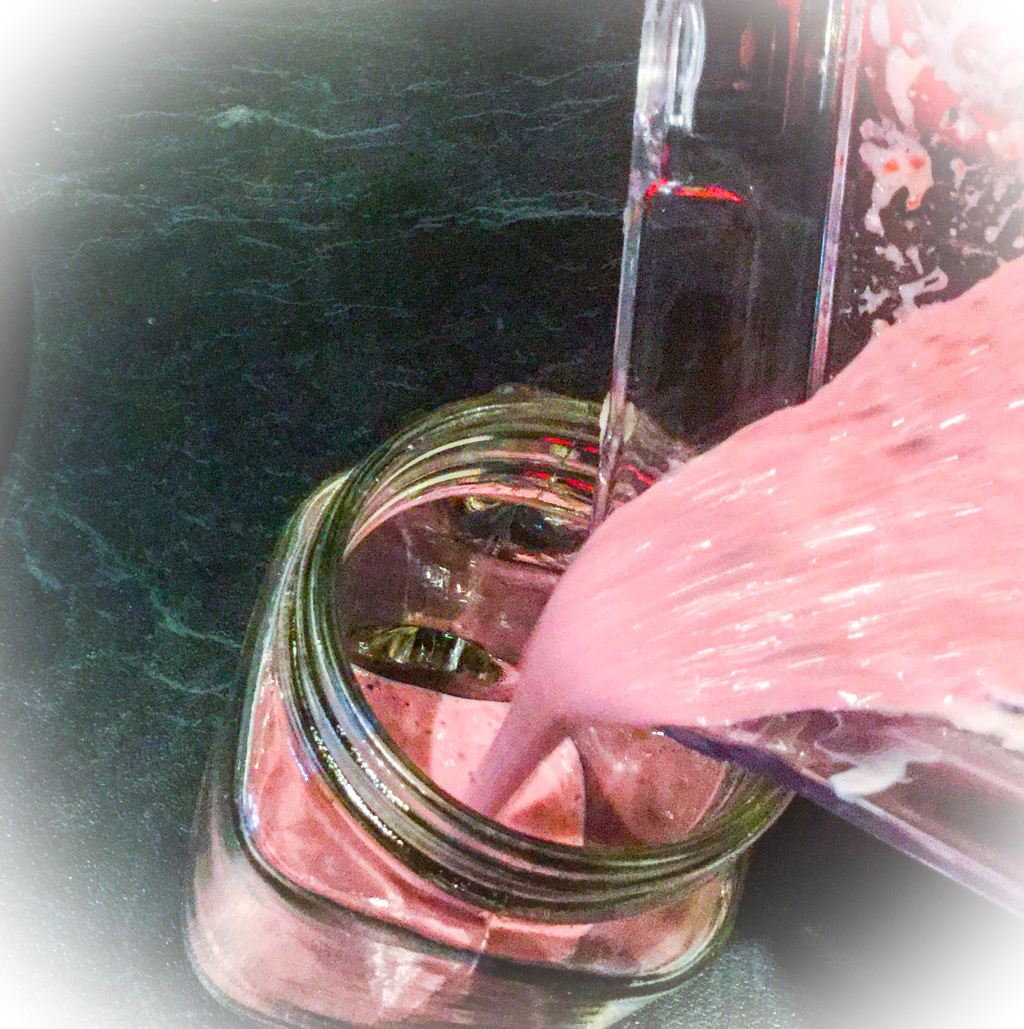 3. Now pour the mixture into the glass. 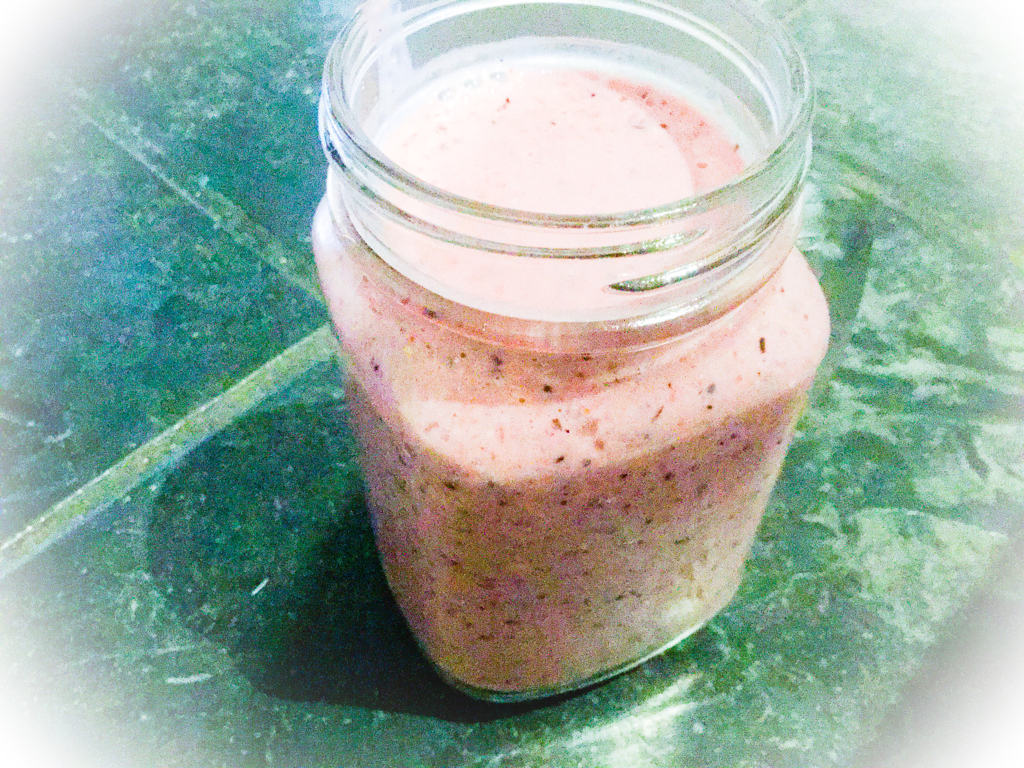 4. And your done to enjoy your berry smoothie. Tropical Smoothie!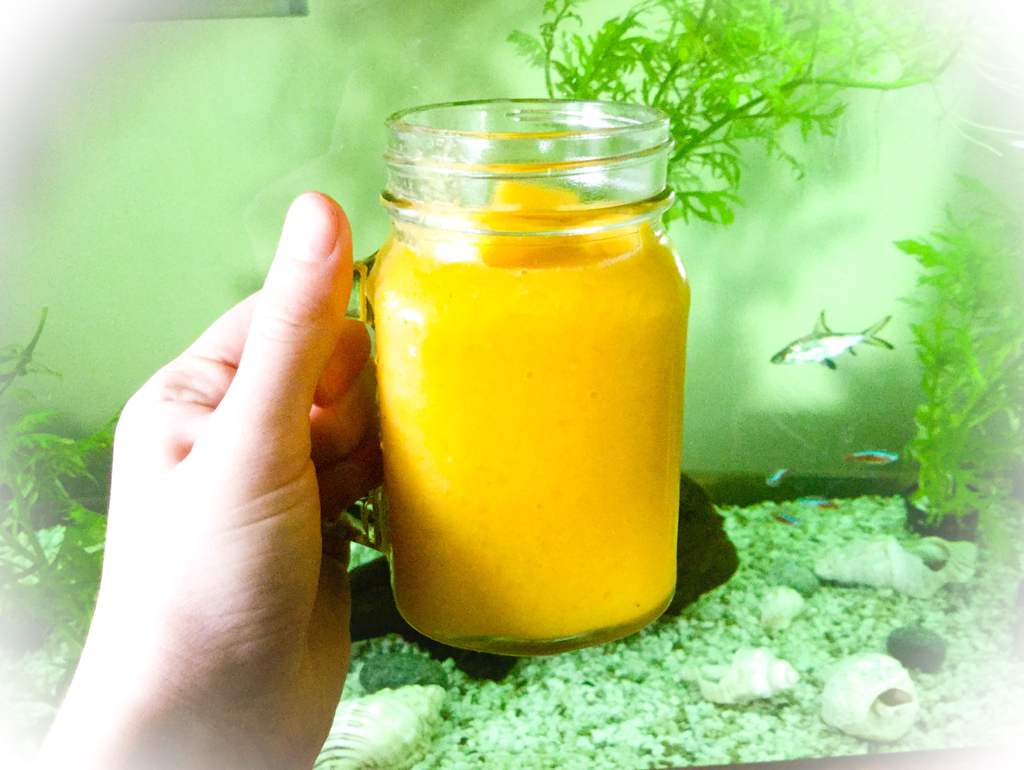 Ingredients:
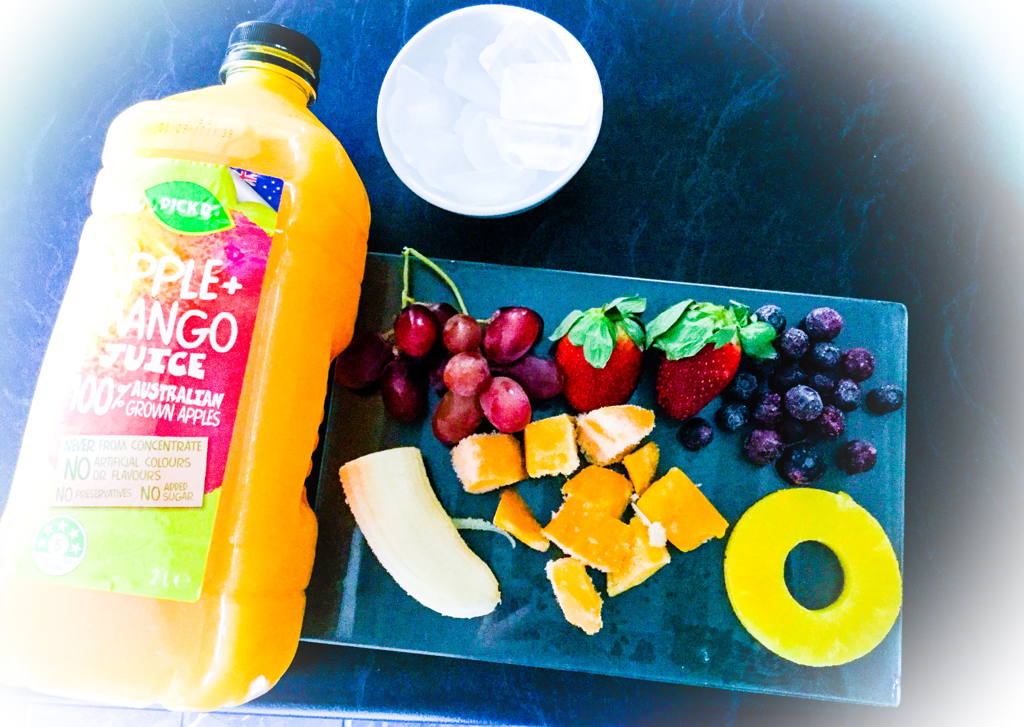
 1. First cut up and prepare all ingredients, then put in the bender. 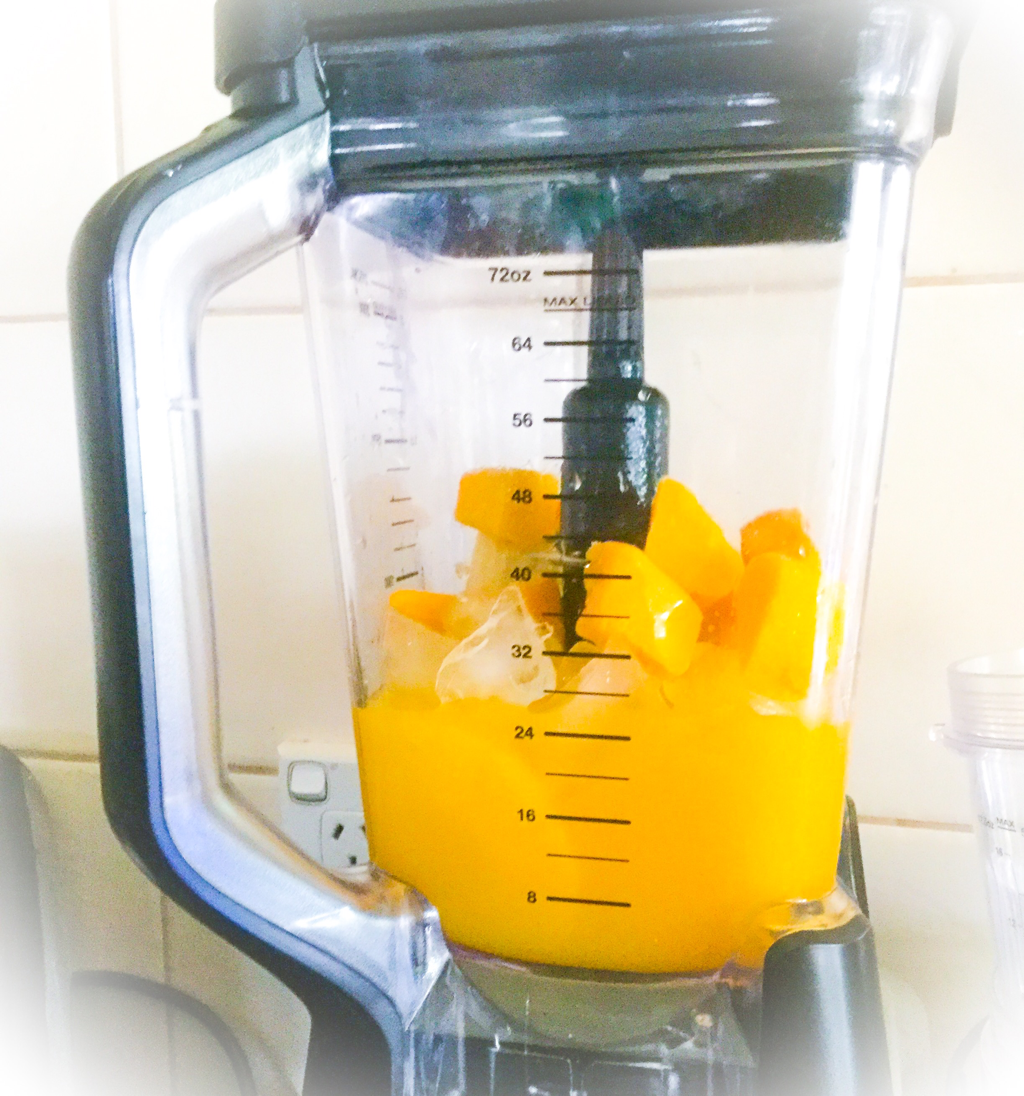 2. When all put in the blender mix well. 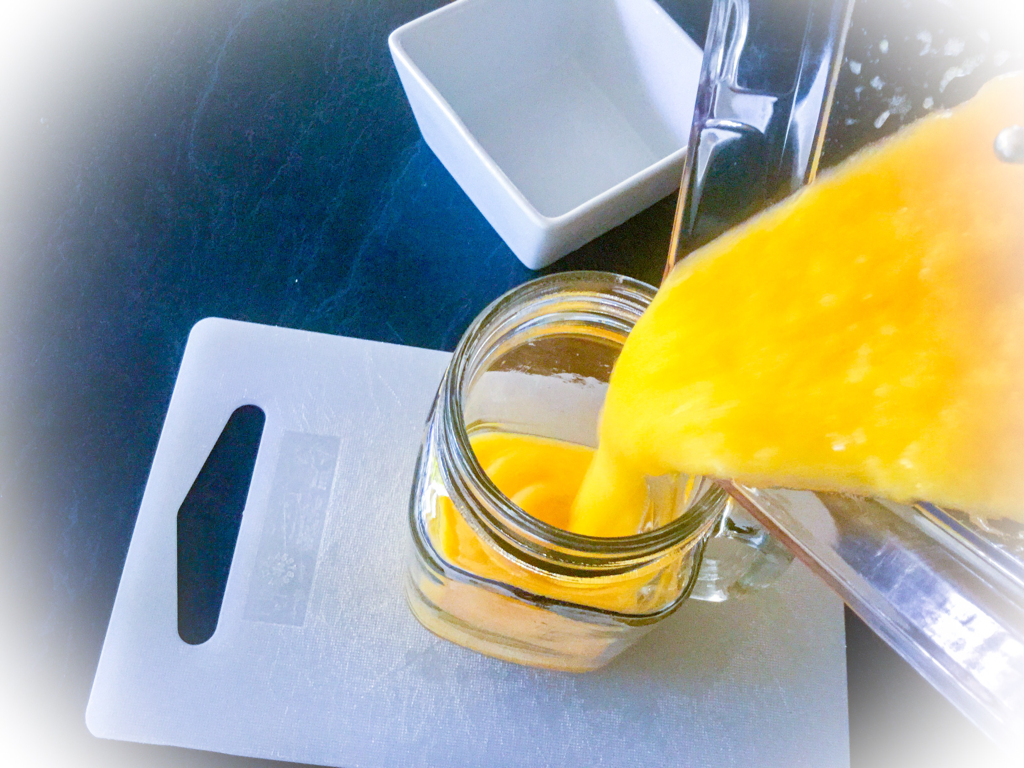 3. Pour the mixture into the glass. 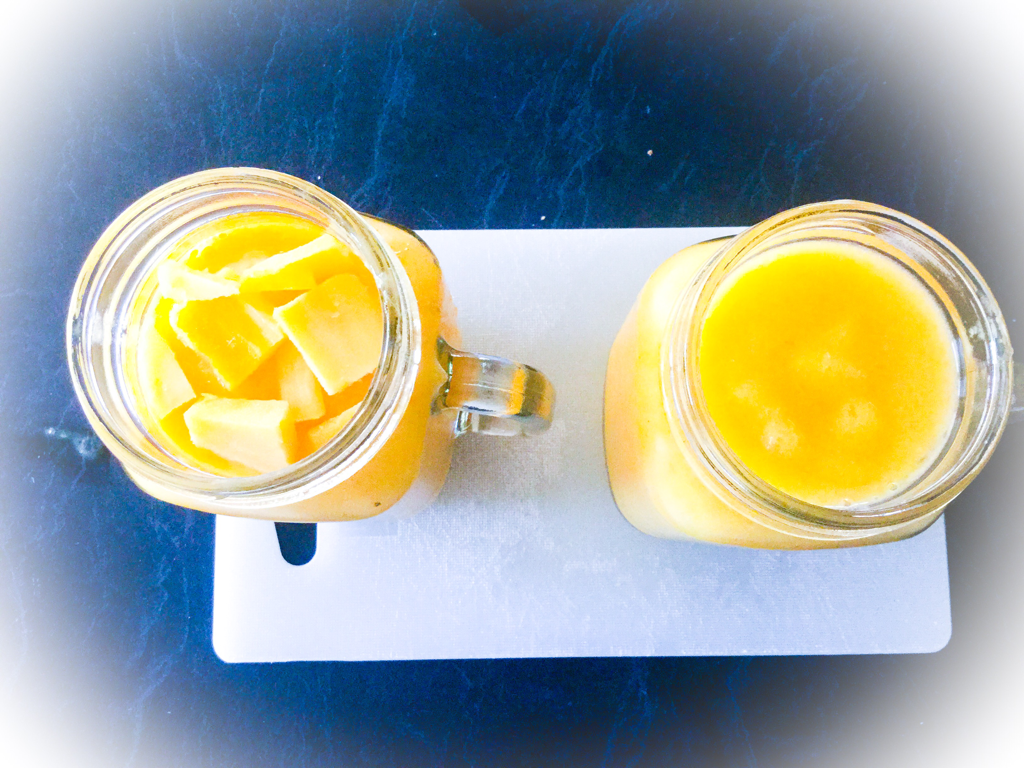 4. If you want ct up some frozen mango to put on top. This mix was for two because my mum wanted some so I just added a bit more of each ingredient. Field Berry Smoothe! Ingredients:
 1. Cut up all ingredients and put in the blender. 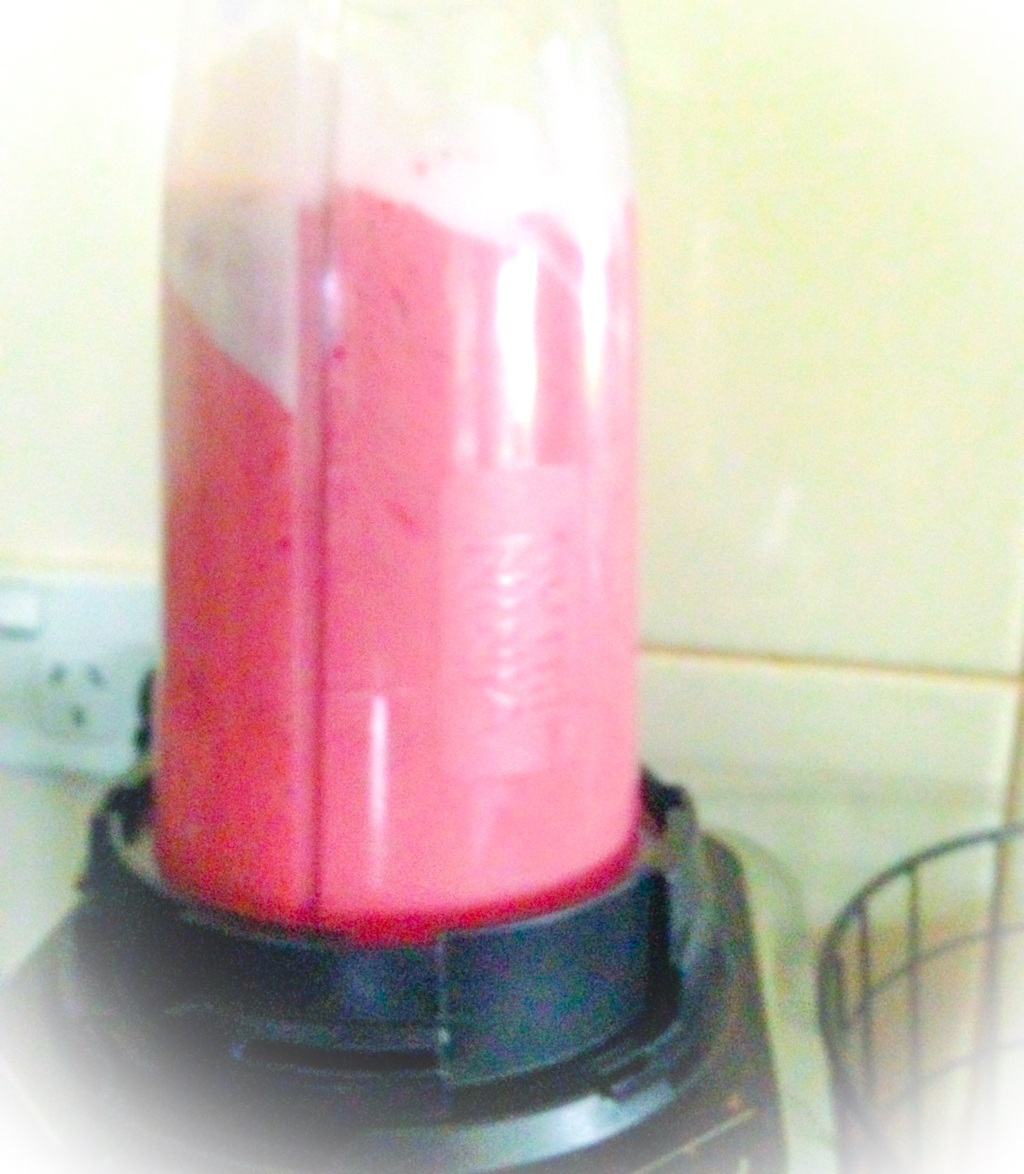 2. Mix all the ingredients till smooth. 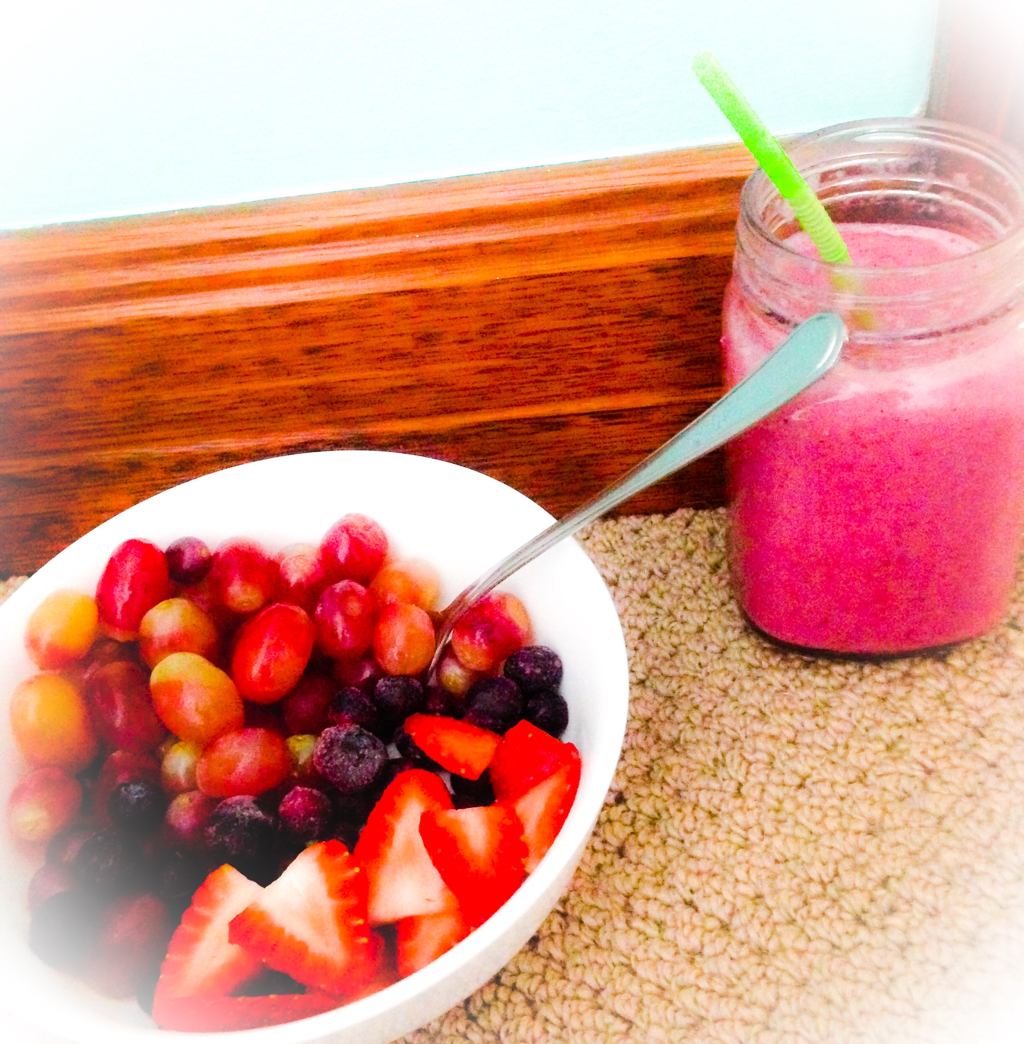 3. Then pour the mixture into the glass and your done enjoy. Fruit Salad Smootie! Ingredients:
 1. Slice all the ingredients and repare to go in the blender. 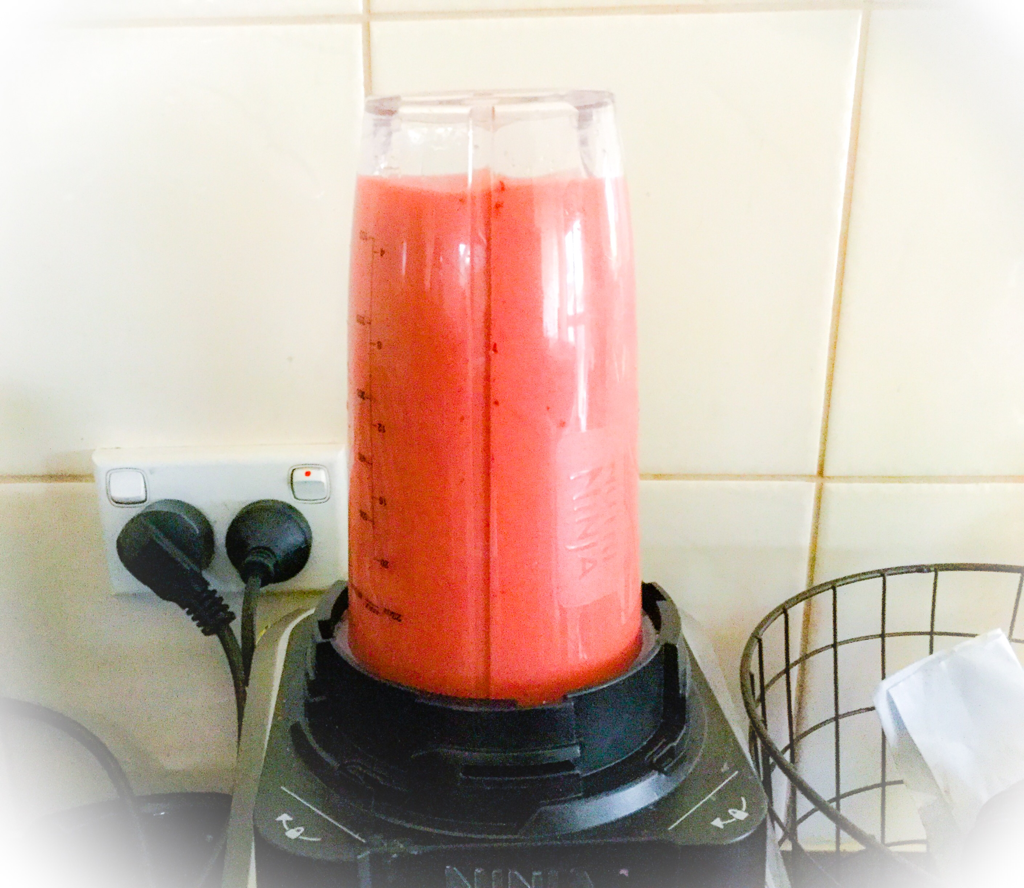 2. Blend all ingredients till smooth. Then pour in the glass 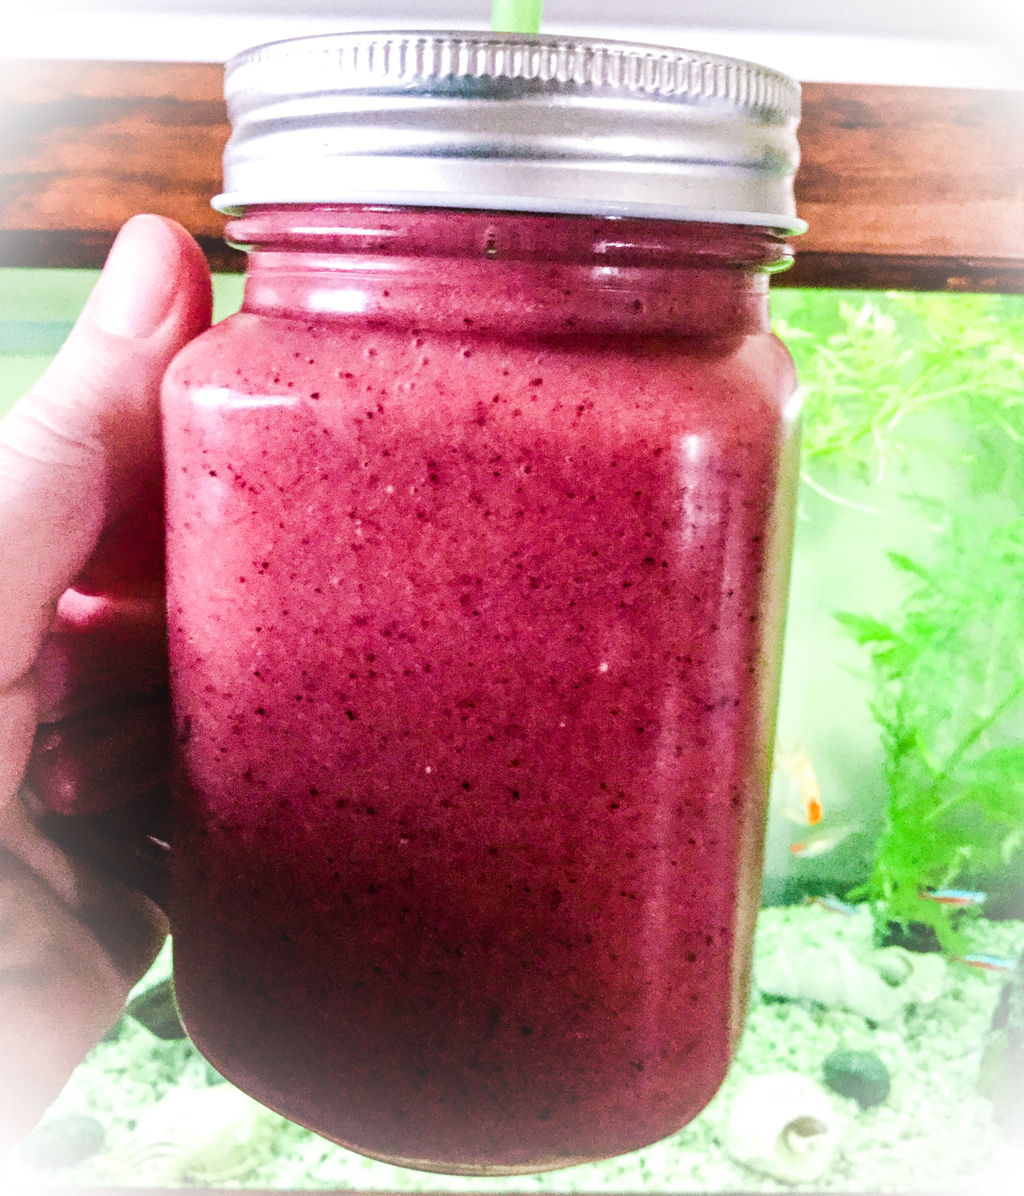 3. Now your done hope you enjoy this very fruity smoothie.
Sorry I didn't post on Sunday my iPad is getting fixed because it has a huge crack in it. Funny story, my phone fell on it a cracked it, but all good my phone is fine. Anyway I had to back it up because apparently they don't fix screens so I have to get a whole NEW iPad. So it has been backing up for almost 24hours and no luck (our wifi sucks). But I was lucky enough to get my mums iPad and use that which is what I'm doing right now. So on Saturday my friend and I watched the Dance Academy movie and loved it. I recommend you guys to watch it! It inspired me to do a few ballet drawings. I know this is not the best drawing, I am sure you guys could do better. But here is a few steps on how to draw this ballet styled drawing. 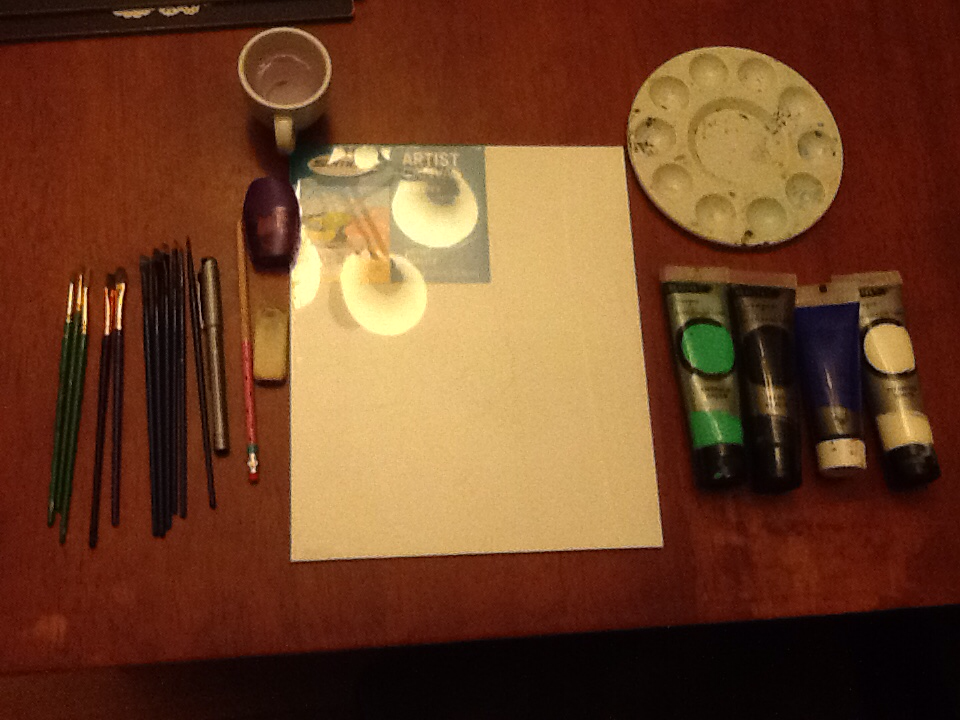 What you will need:
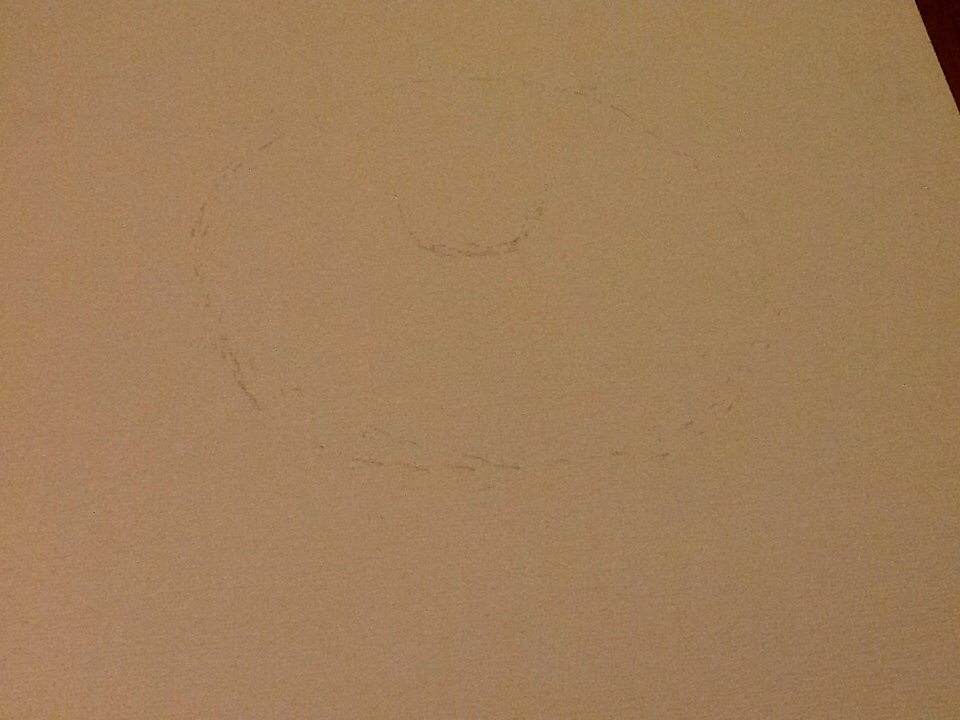 1. First draw a faint large circle for the tutu. Then add a small circle in the middle to plan where the body will go. 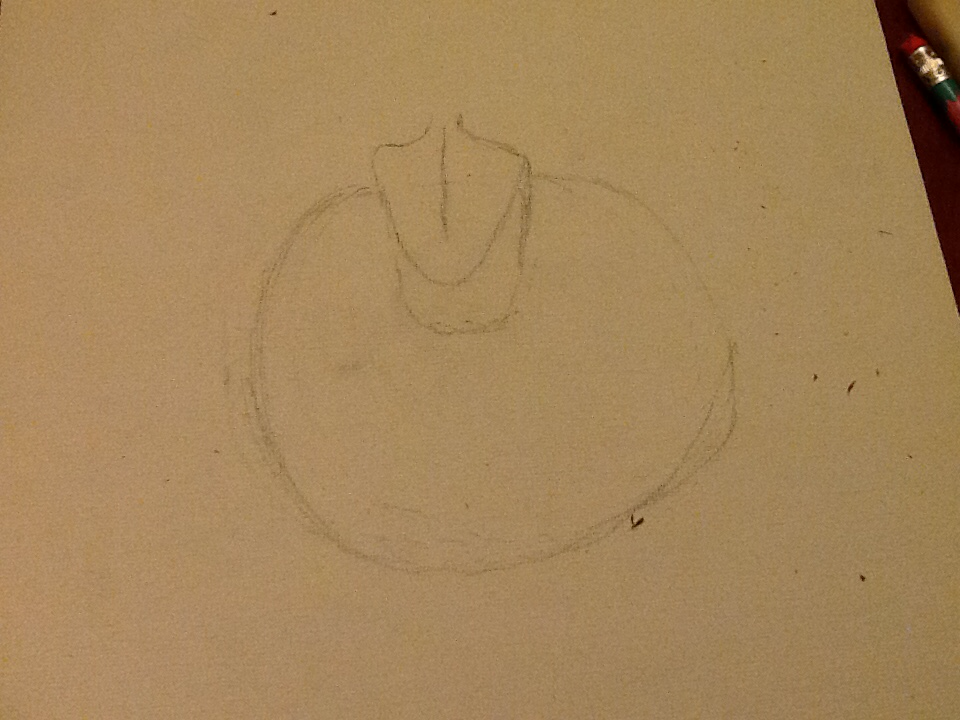 2. Now add a faint sketch of the back body. Two lines to form however long you want the back to be. Then do two bumps on each side to be the shoulders. Lastly connect all together with the neck. 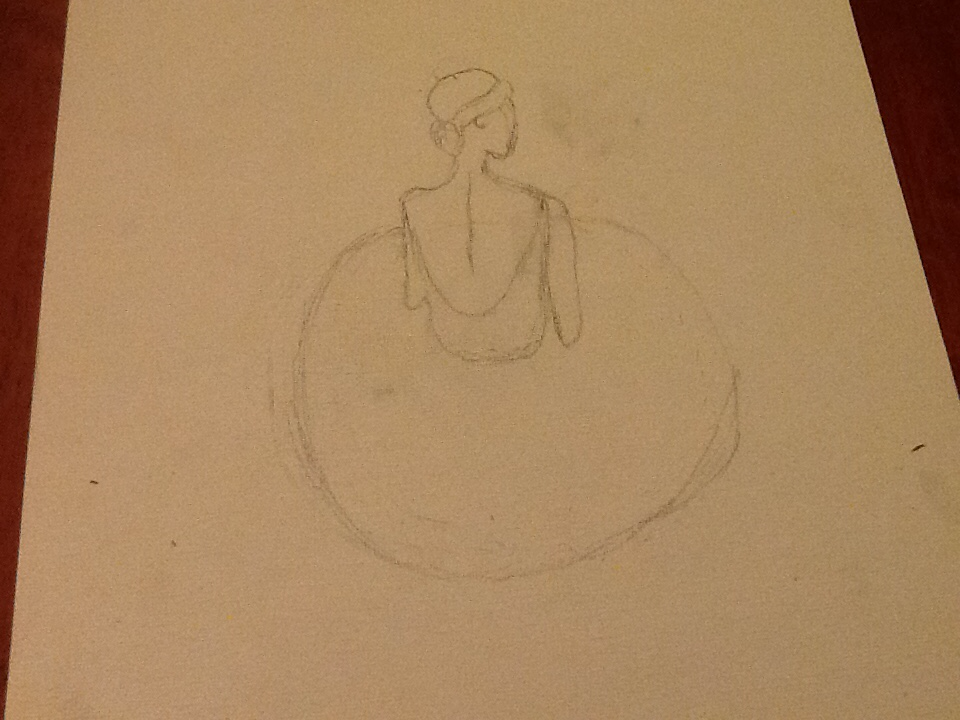 3. Now add a fine sketch of the head. The side view add a circular oval shape. Lastly add some haid however you would like. 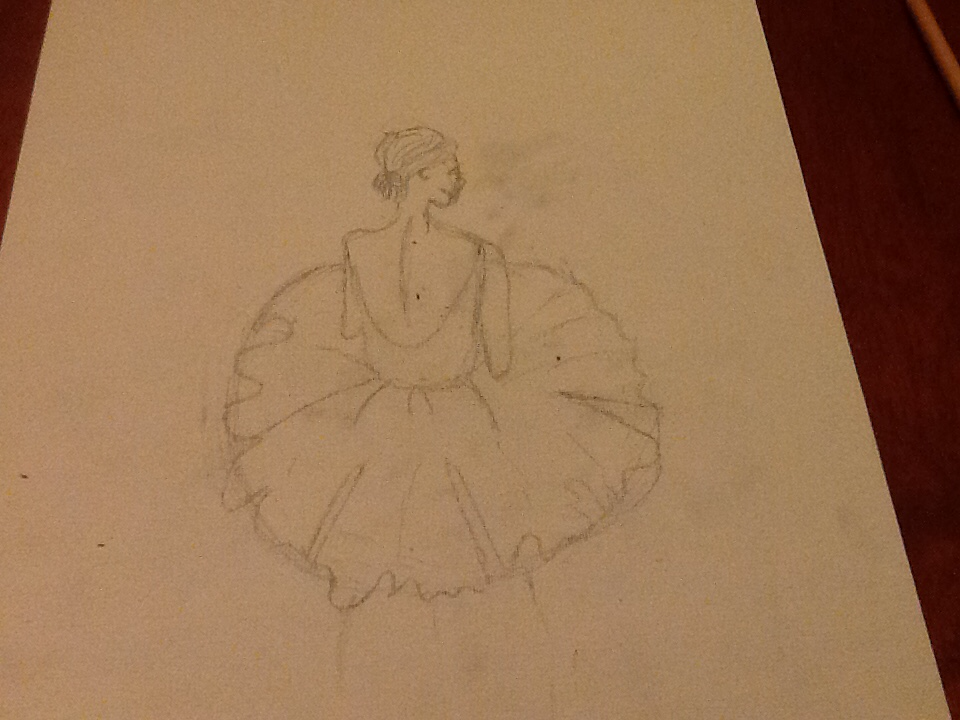 4. Now we are adding more detail to the tutu. Add some random swirls, little and big. Also some cuts and lines to add more definition. 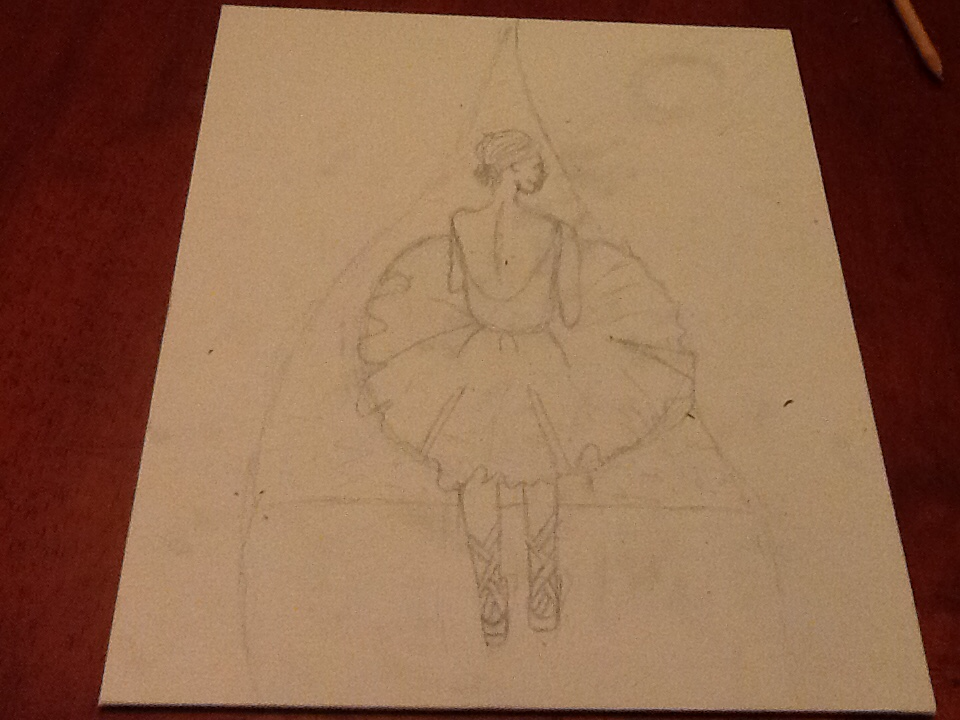 5. Now add the legs. Straight and curved at the ends. Also add the shoes stripes across each other. Also add a straight line for stage and wavy curves on each side for the curtains.  6. Now go over the work with a fine liner. Also rub off spare greylead lines. 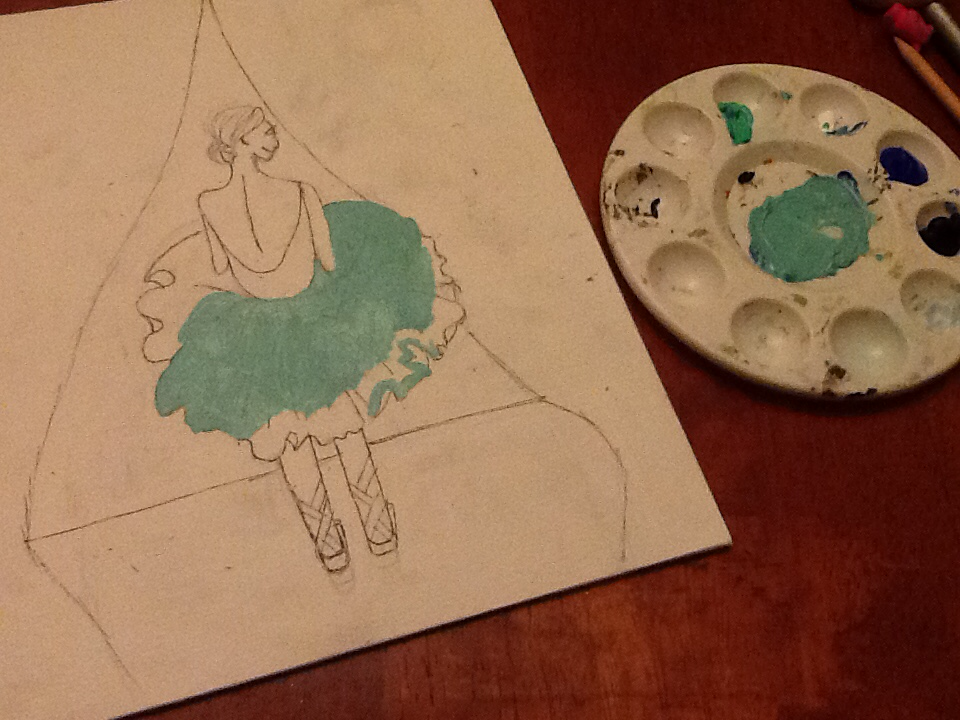 7. Now mix some blue, white and green to make a sort of aqua colour for the tutu and ballet slippers. 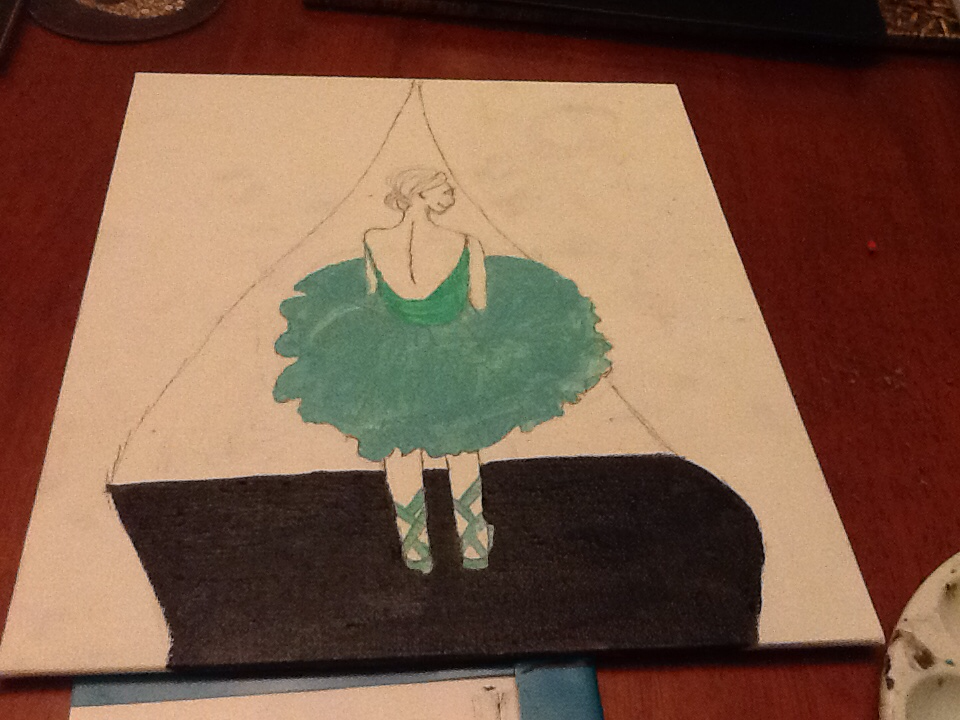 8. Now use black to paint to stage floor and use a mint green paint to colour the singlet. 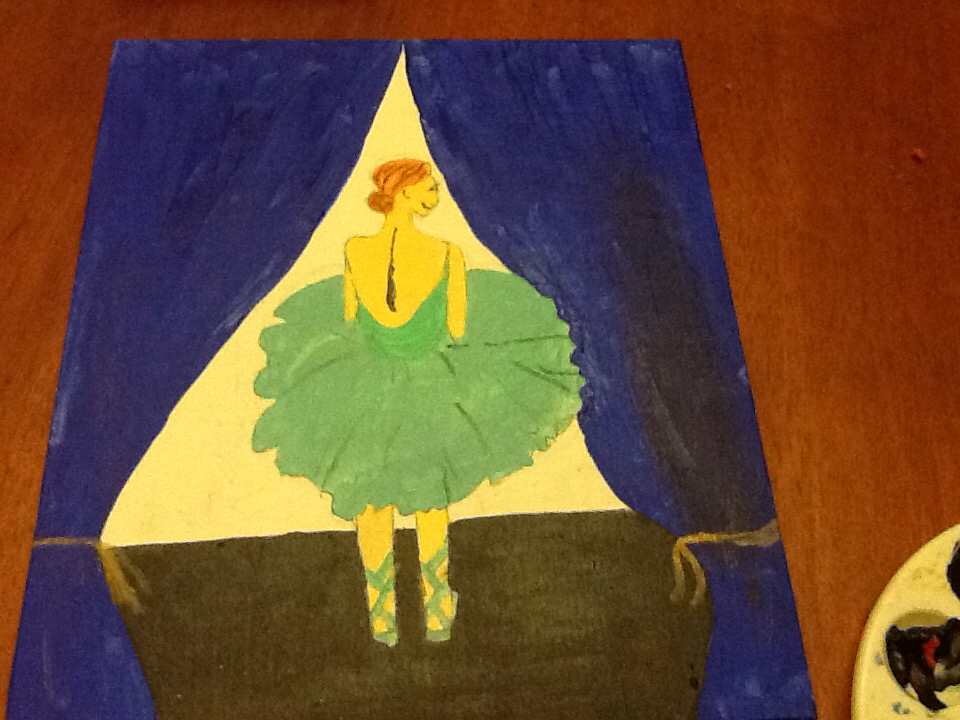 9. Last of all add a royal blue colour for the curtains, flesh tint paint for the skin, black paint for detail, brown for hair and gold for the ropes to hold the curtains.
 1. First let's do the cloud. Do a straight line and have curves on either side. Then do another curve on each side. Last of all add one last curve to connect them all together. 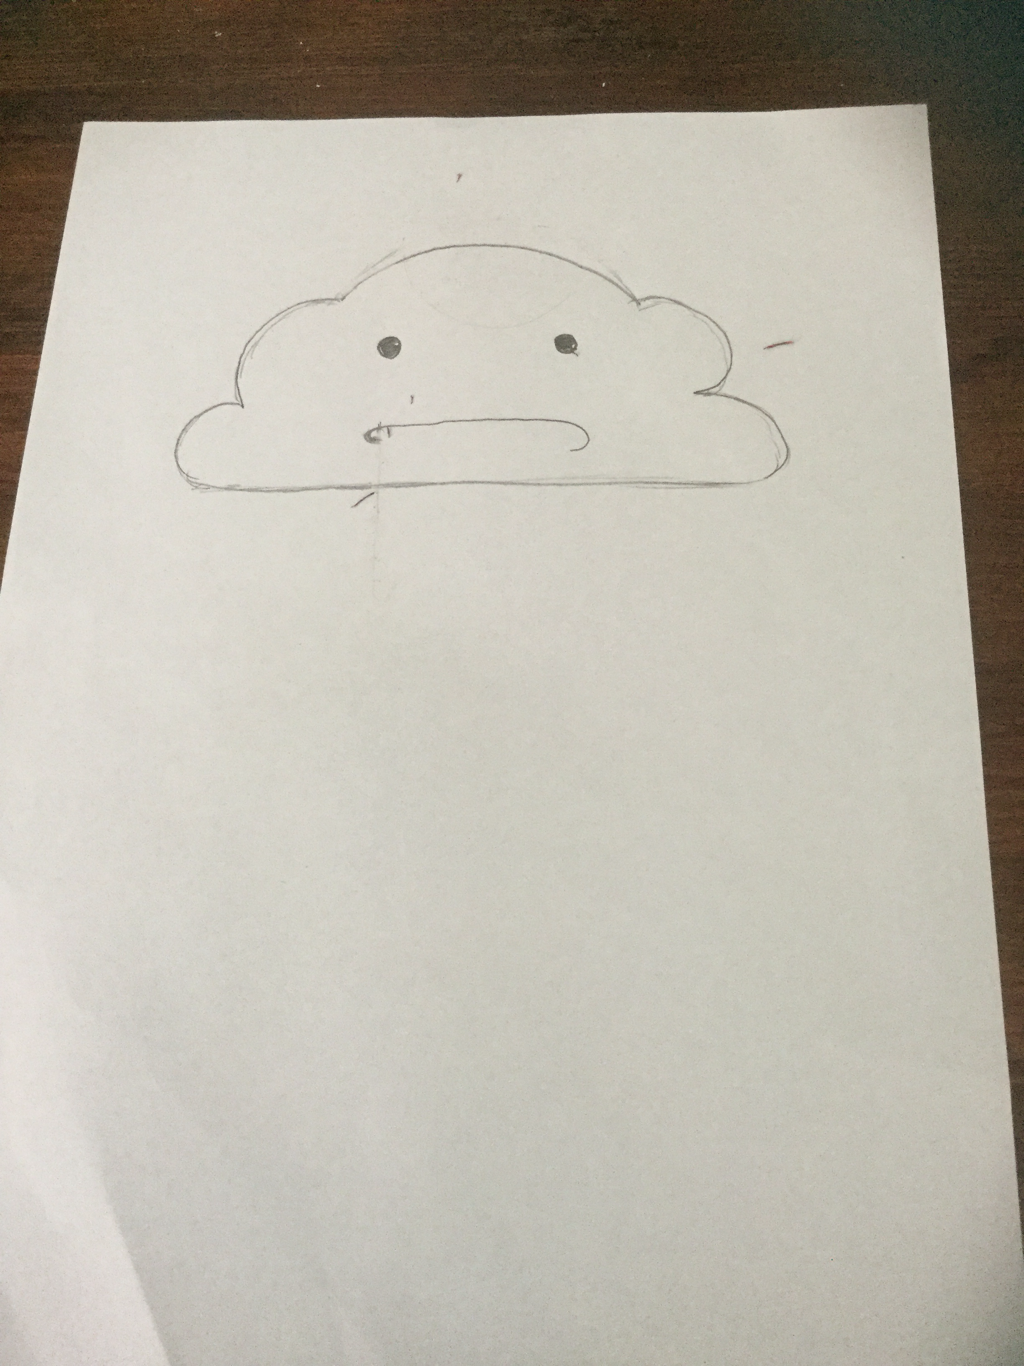 2. Sorry I lost some photoage of this step so I had to redraw. Secondly add a pair of cute eyes and under a straight line. With a curve on each side underneath. 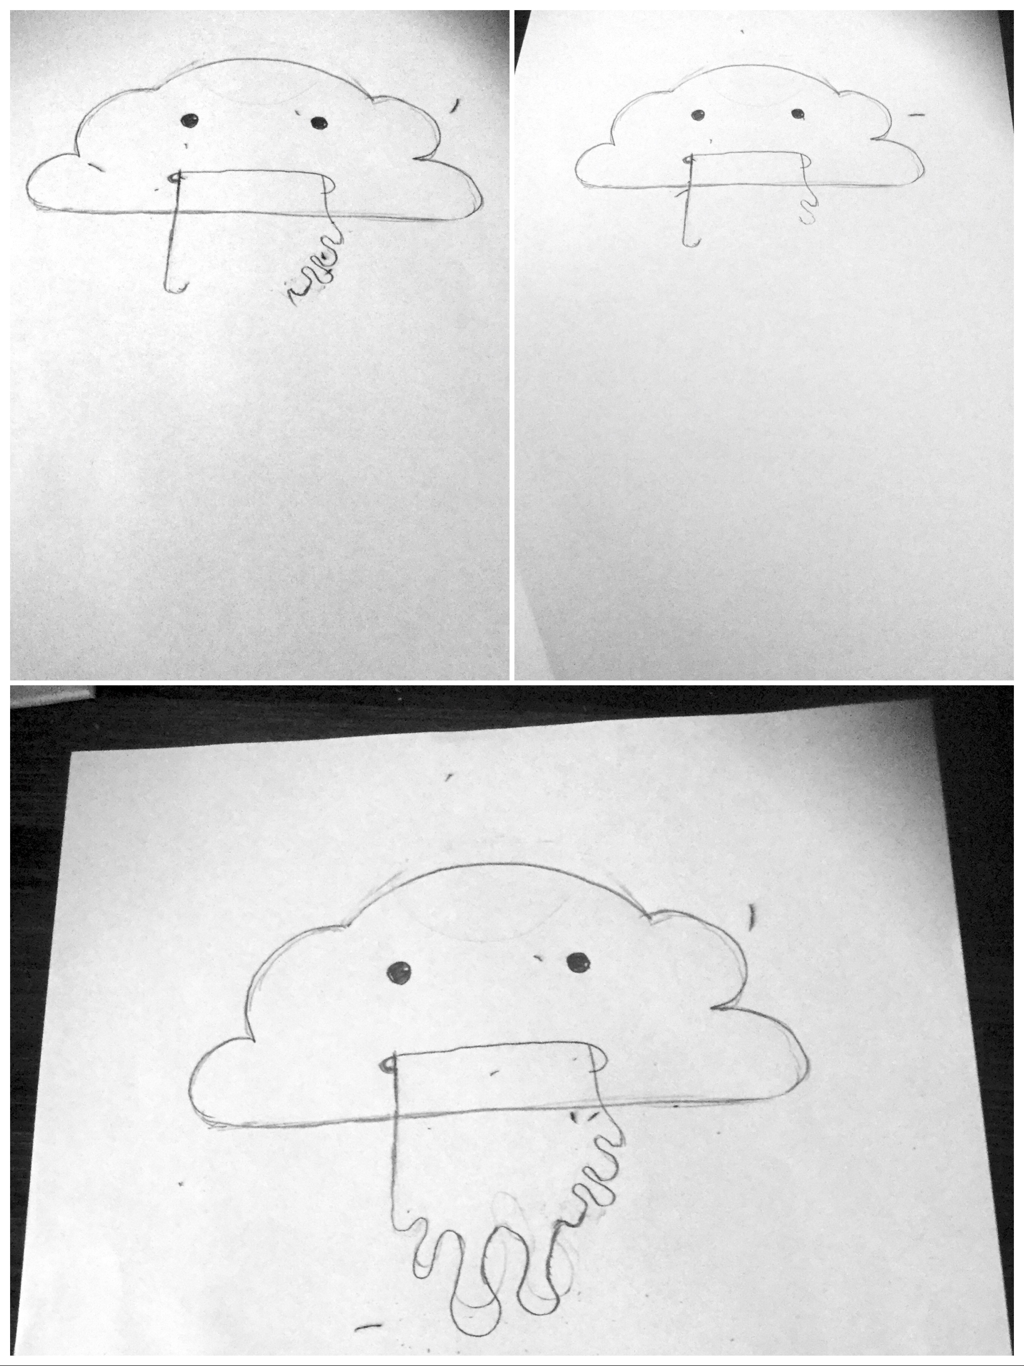 3. Lost the photoage to this step too sorry. Thirdly add random slopes wherever you want. This one isn't as good as the usall one. 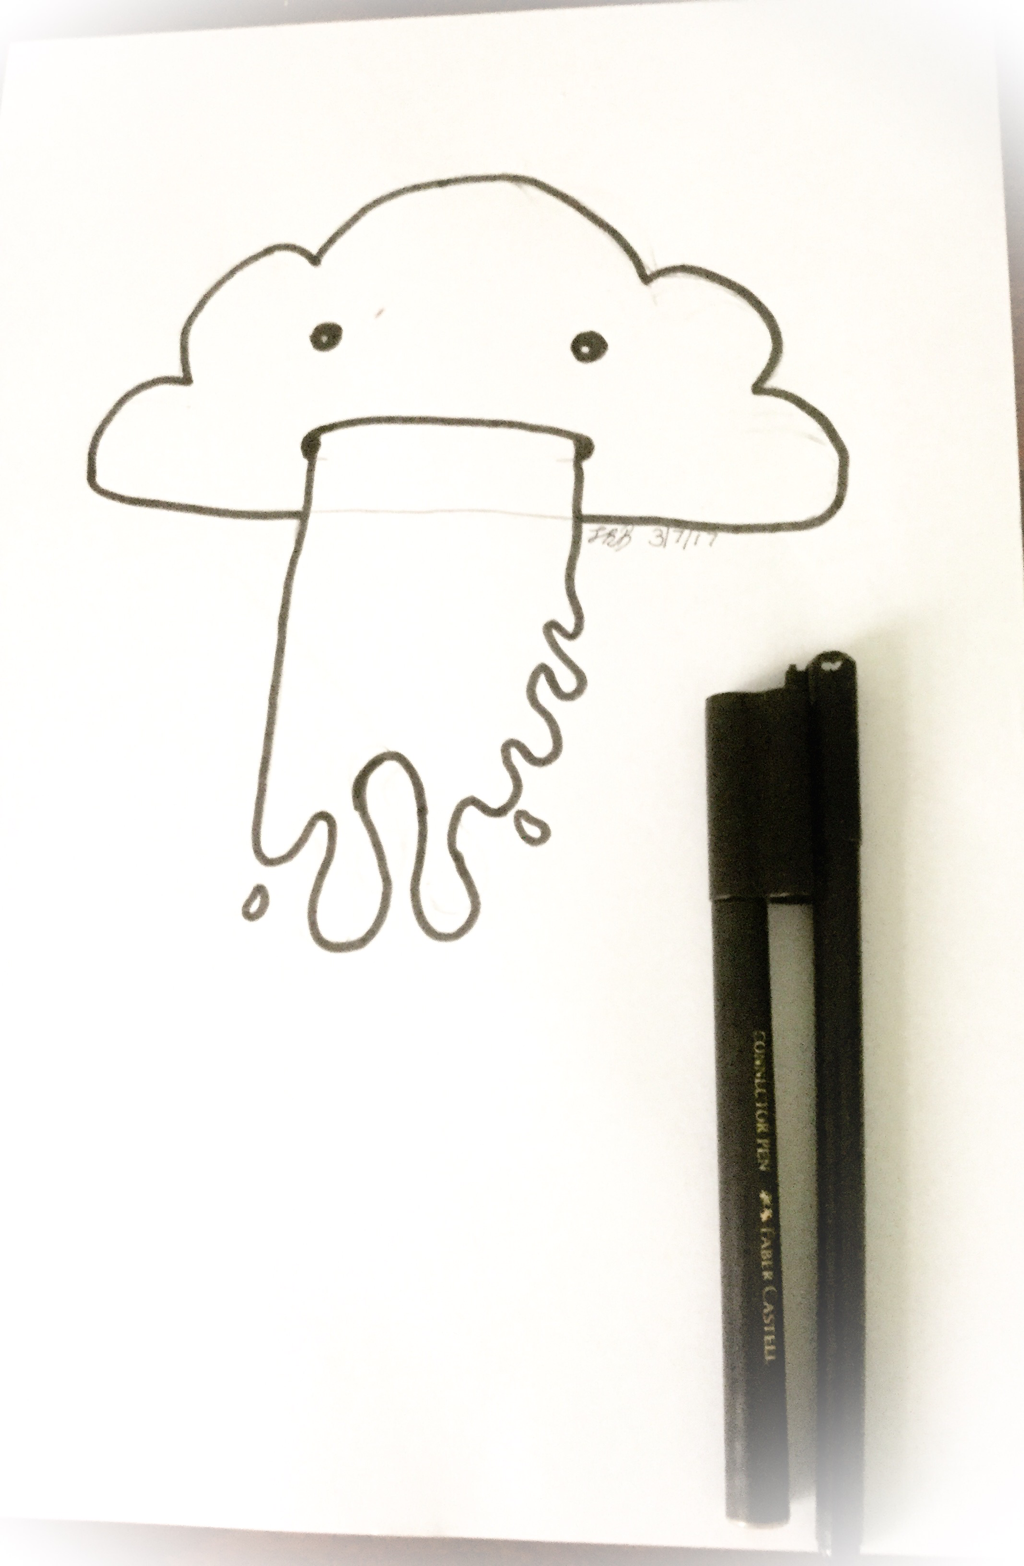 4. Go over with black a texta (best use a thick texta). Remember to always sign your work. 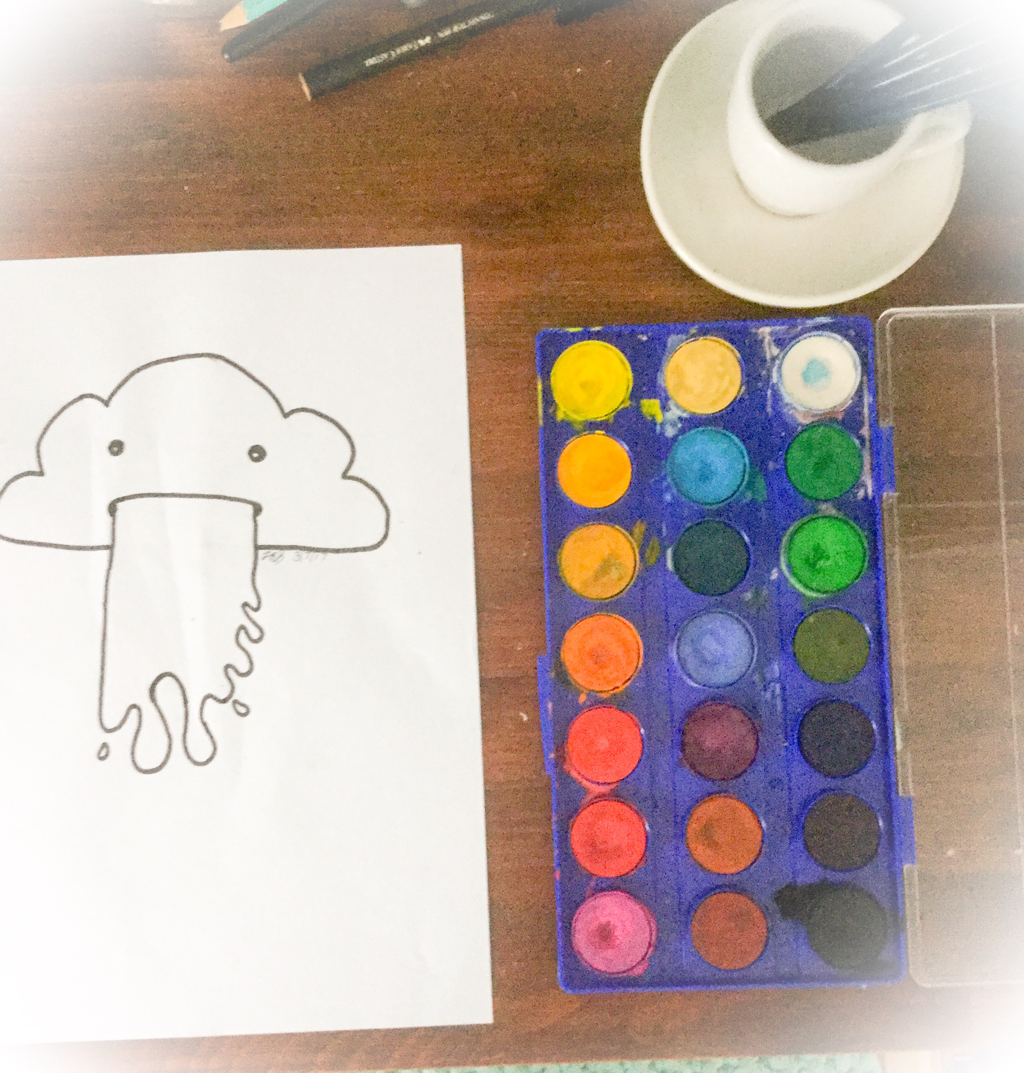 5. Now you can add watercolour if you want. 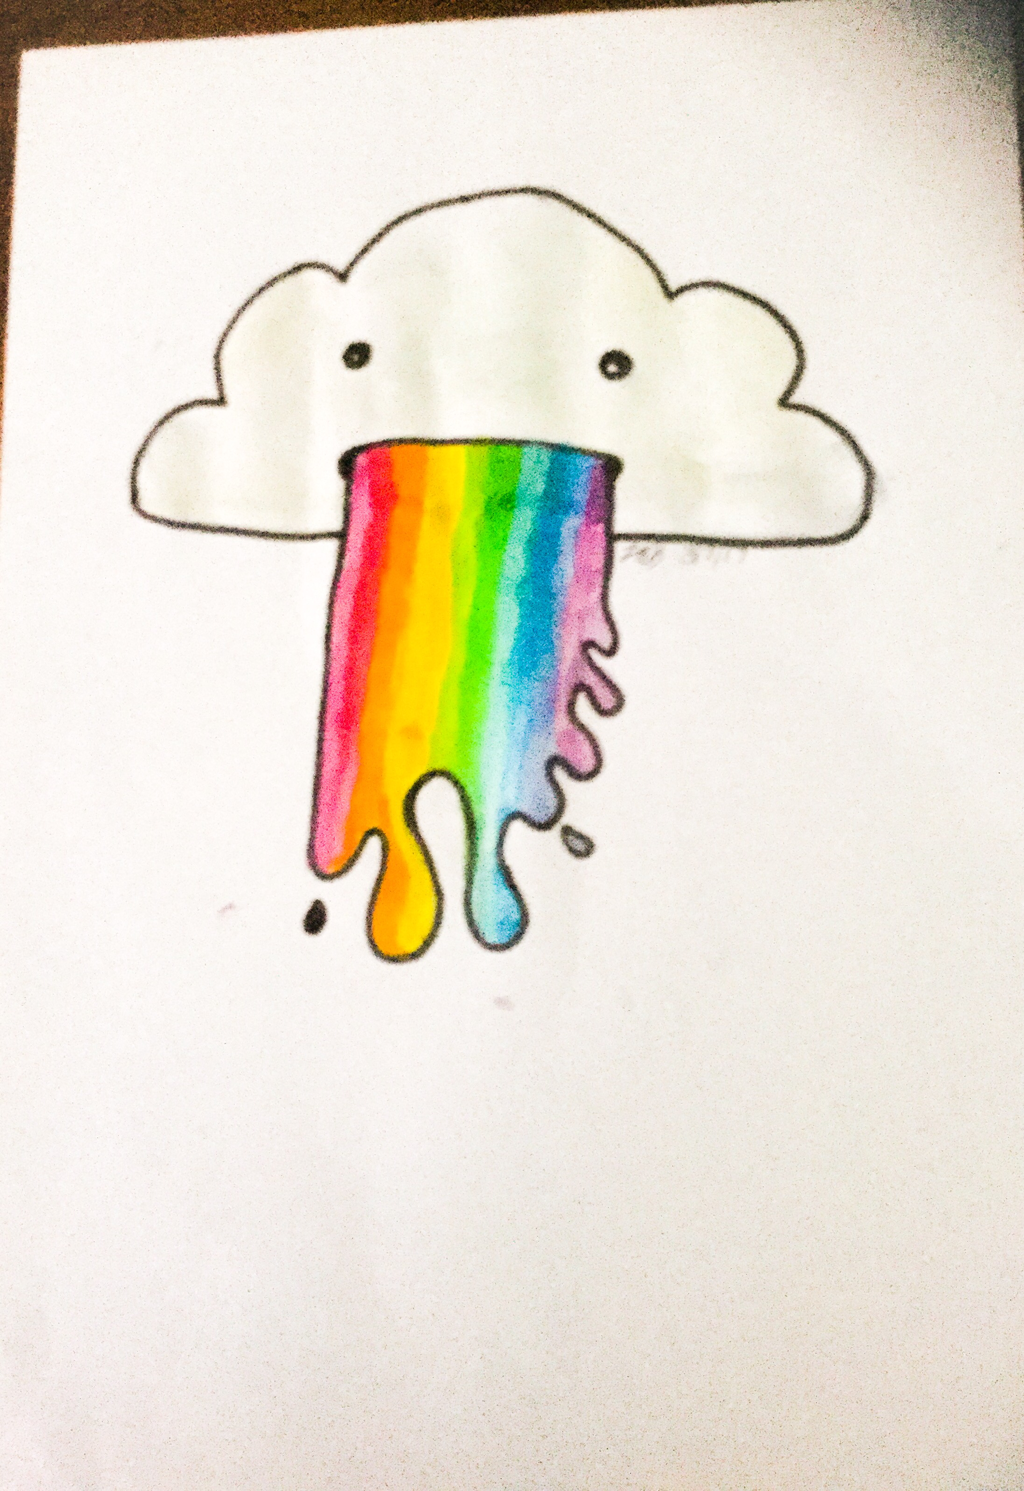 6. Now add colours in the rainbow down the vomit. Also use white to add a cloudy look to the cloud. 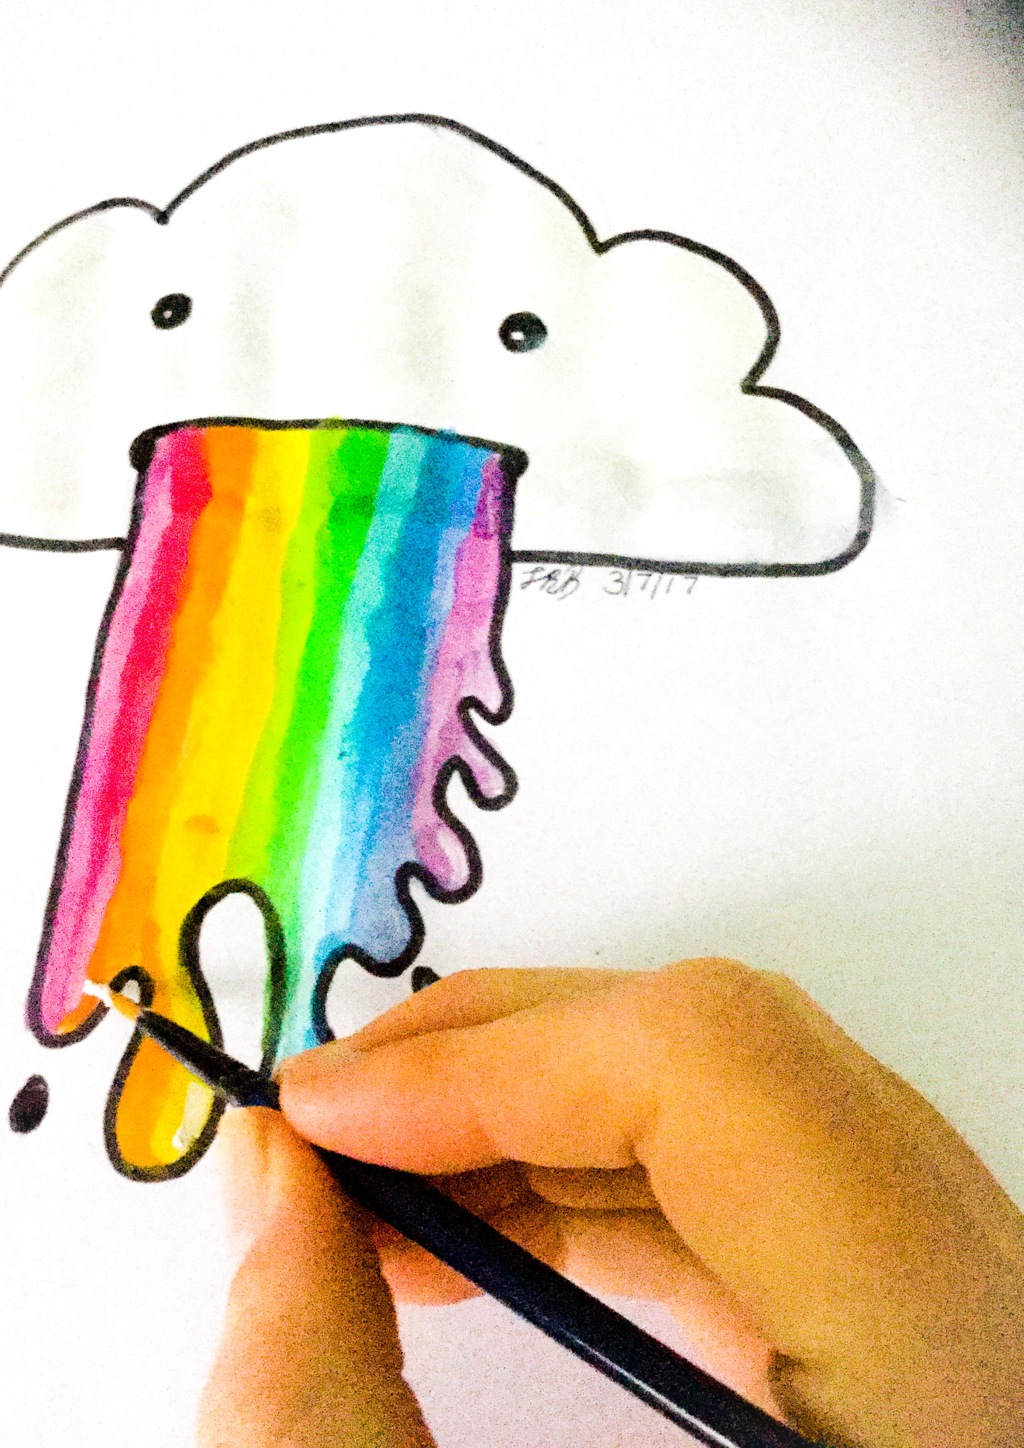 7. This is also optional add some white acrylic paint to add a shiny sparkle to it. 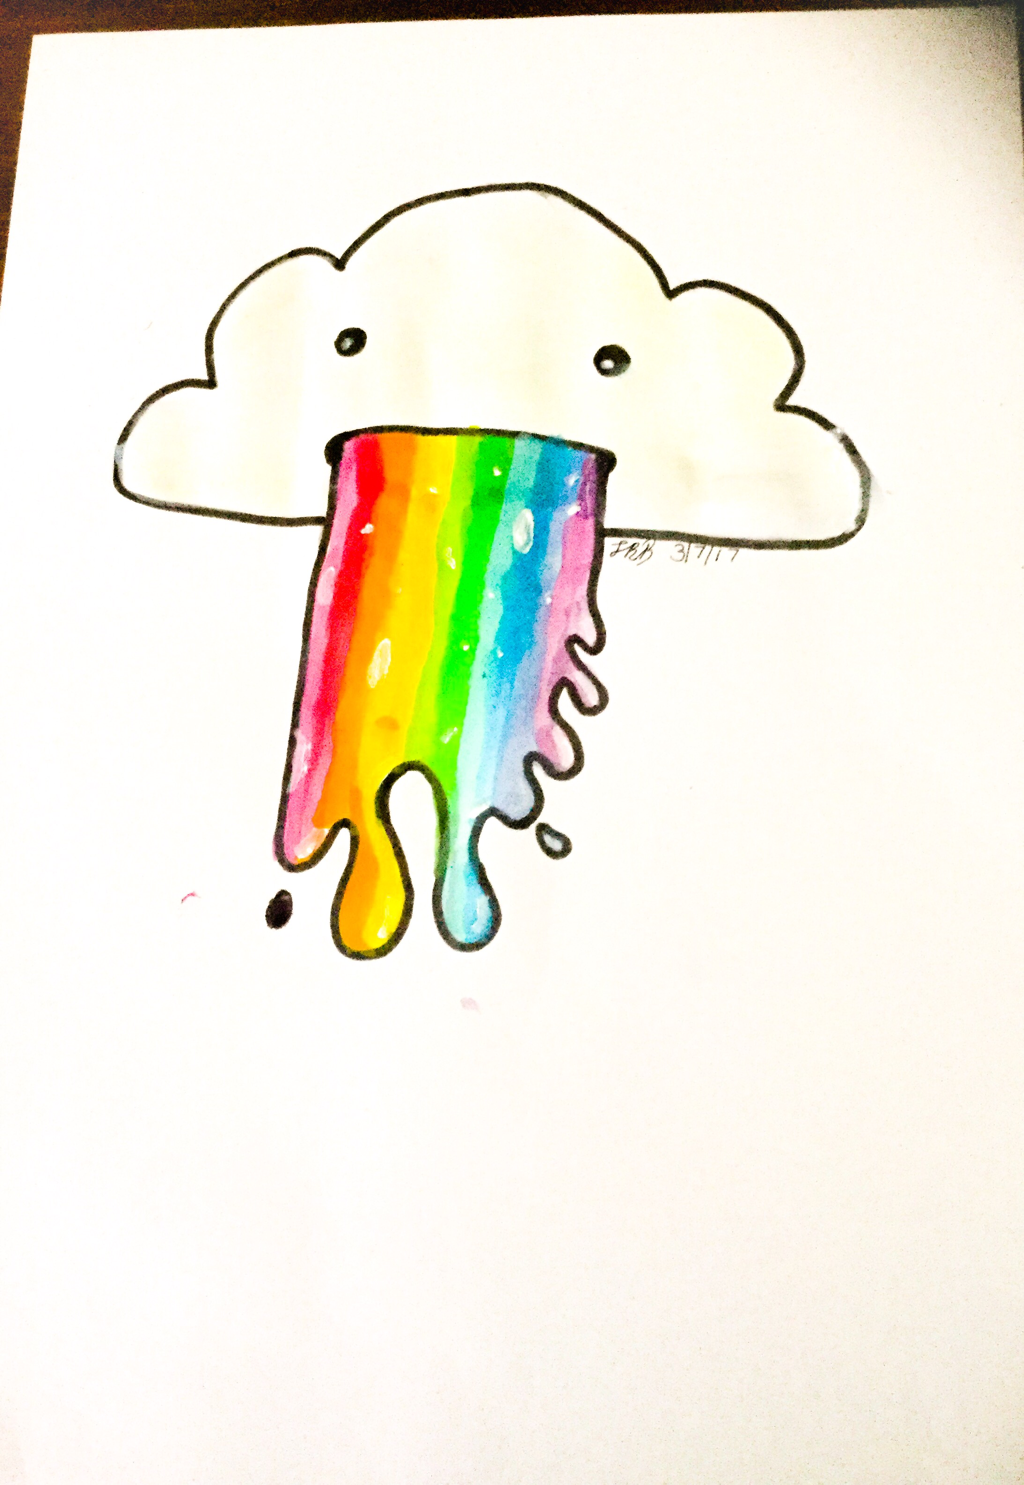 Now you are done hope you enjoyed this drawing and stay tuned for Sunday's post.
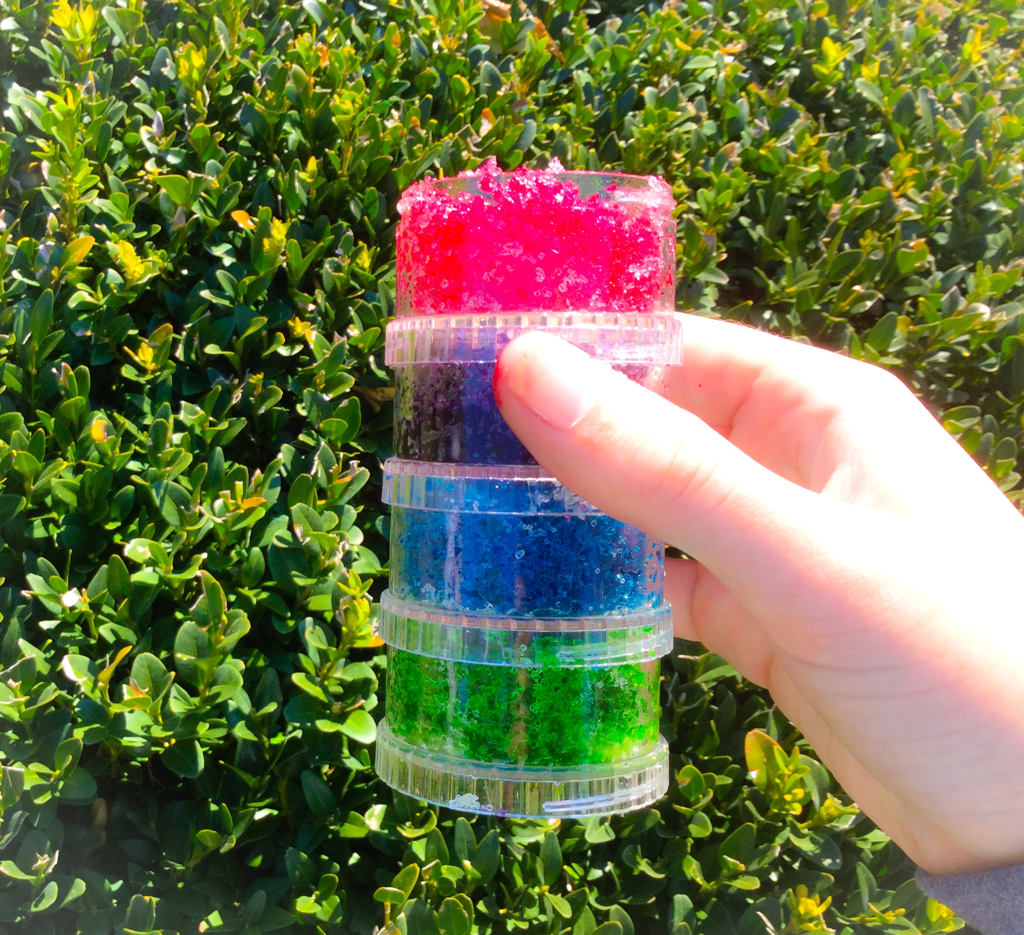 Hey I'm really sorry I haven't posted anything this past 2 weeks or so. I did try and post something which was a time lapse video of me colouring, but I couldn't post the video unfortunately. I might post it on my instagram account (taypaints05) after I have finished editing it. This post is how to make DIY lip scrub. 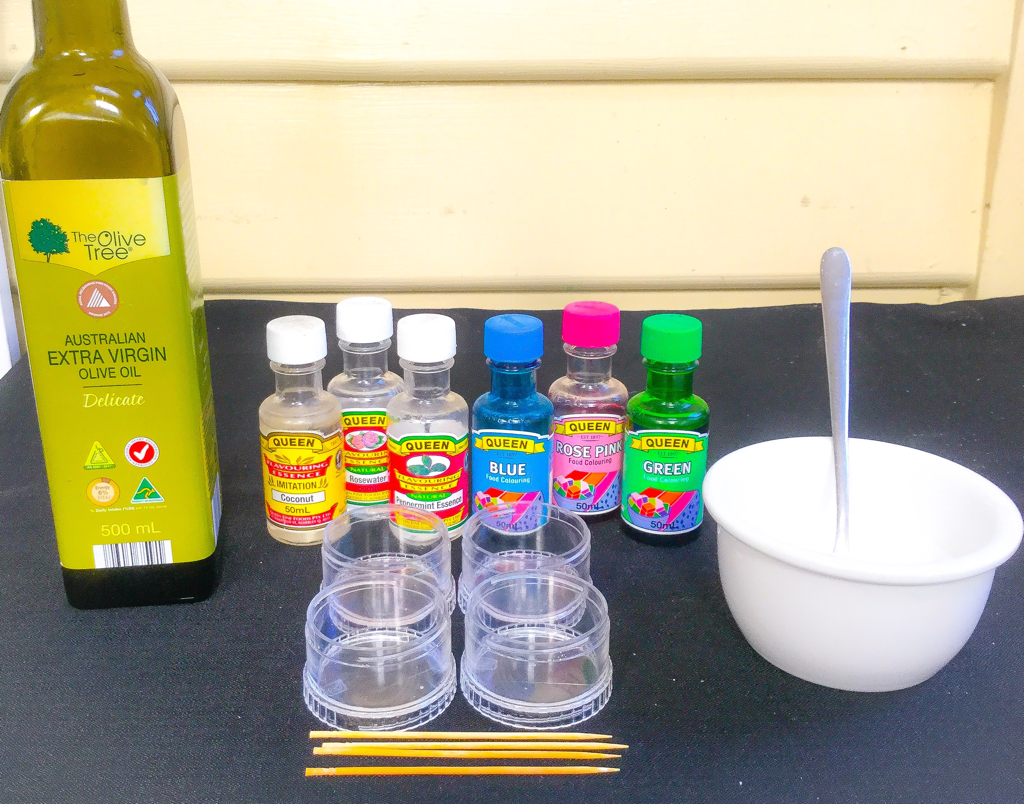 Ingredents:
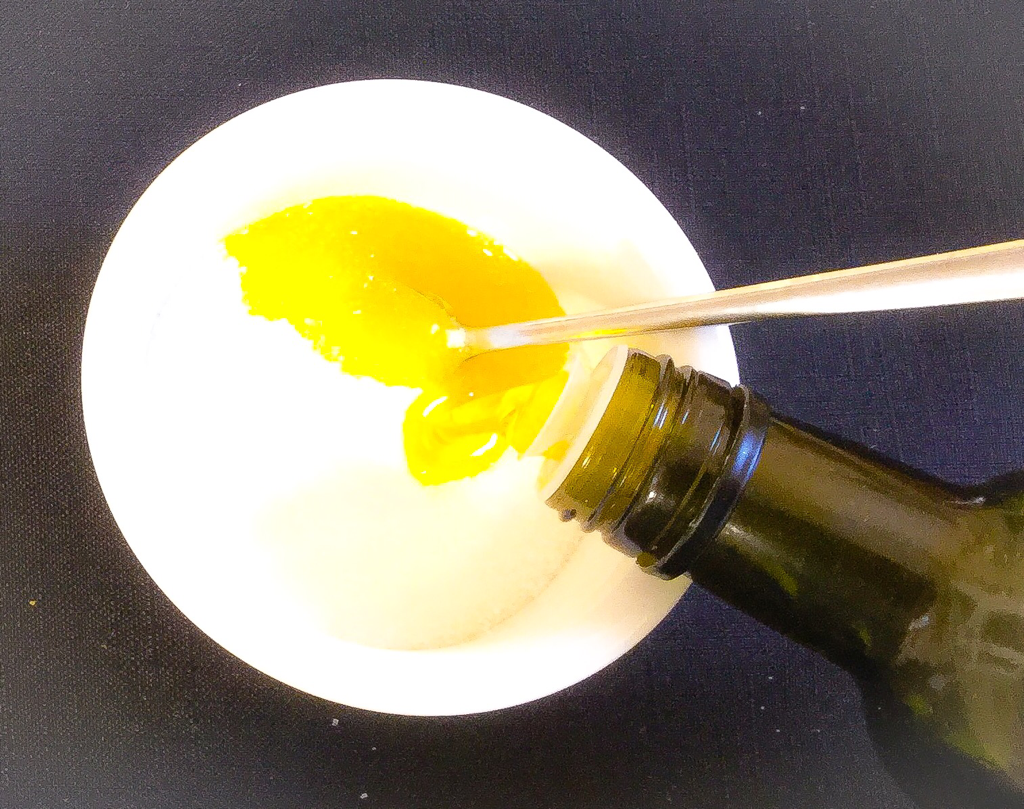 1. Put some sugar into a bowl and some olive oil, mix well and add more sugar if too watery or more oil if still dry. 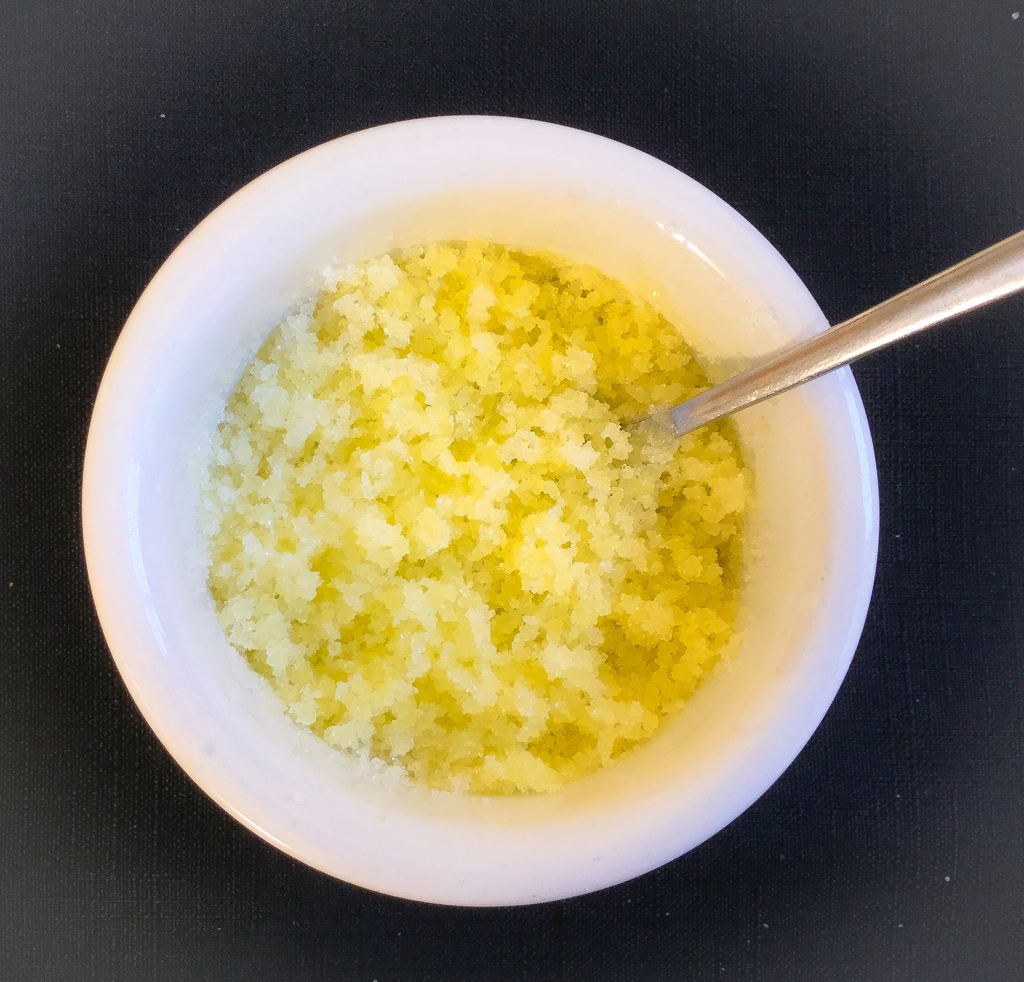 2. This is what it should look like when it is mixed perfectly. 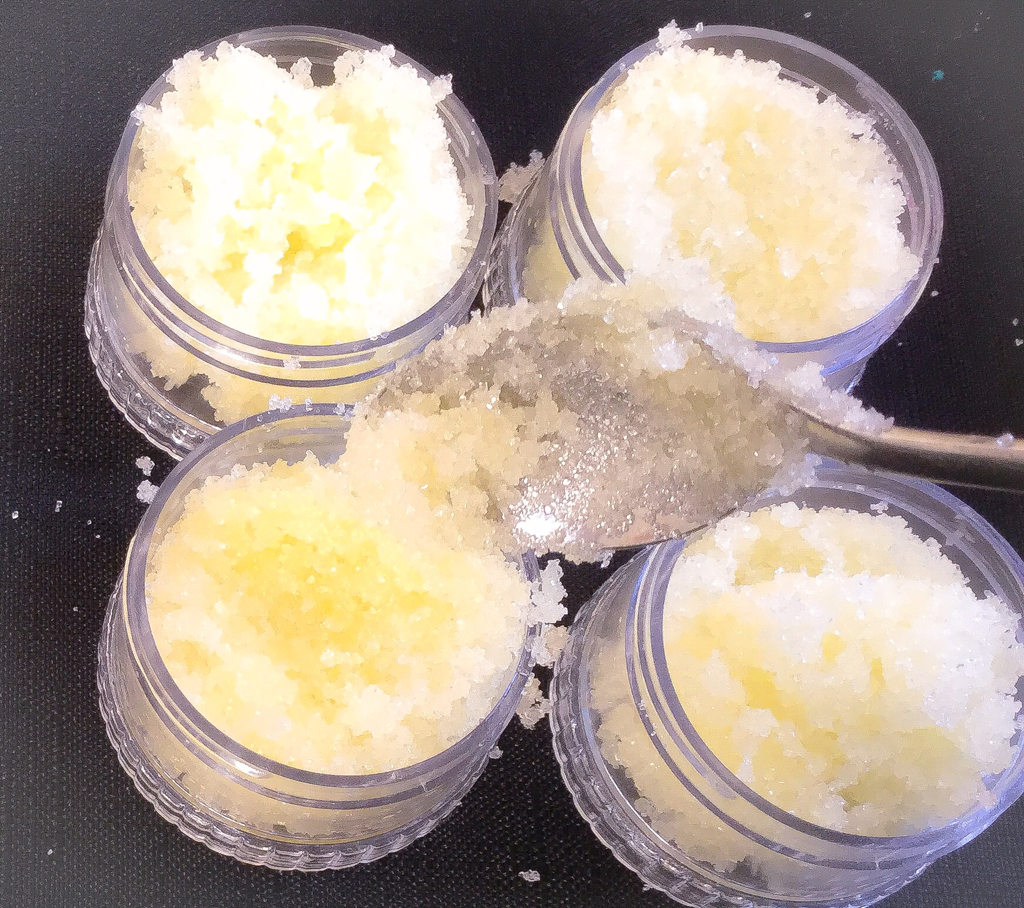 3. Then divide and pour into containers. 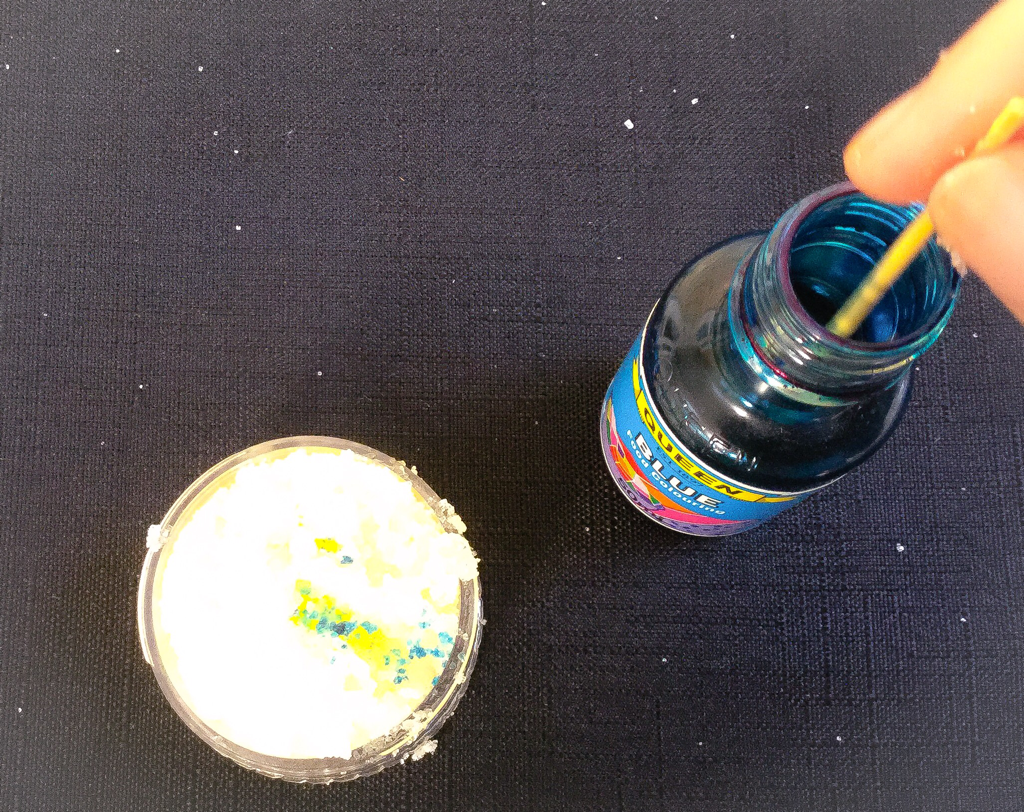 4. Add some food dye into each countainer with a toothpick and make sure you don't add too much or it can stain your lips. 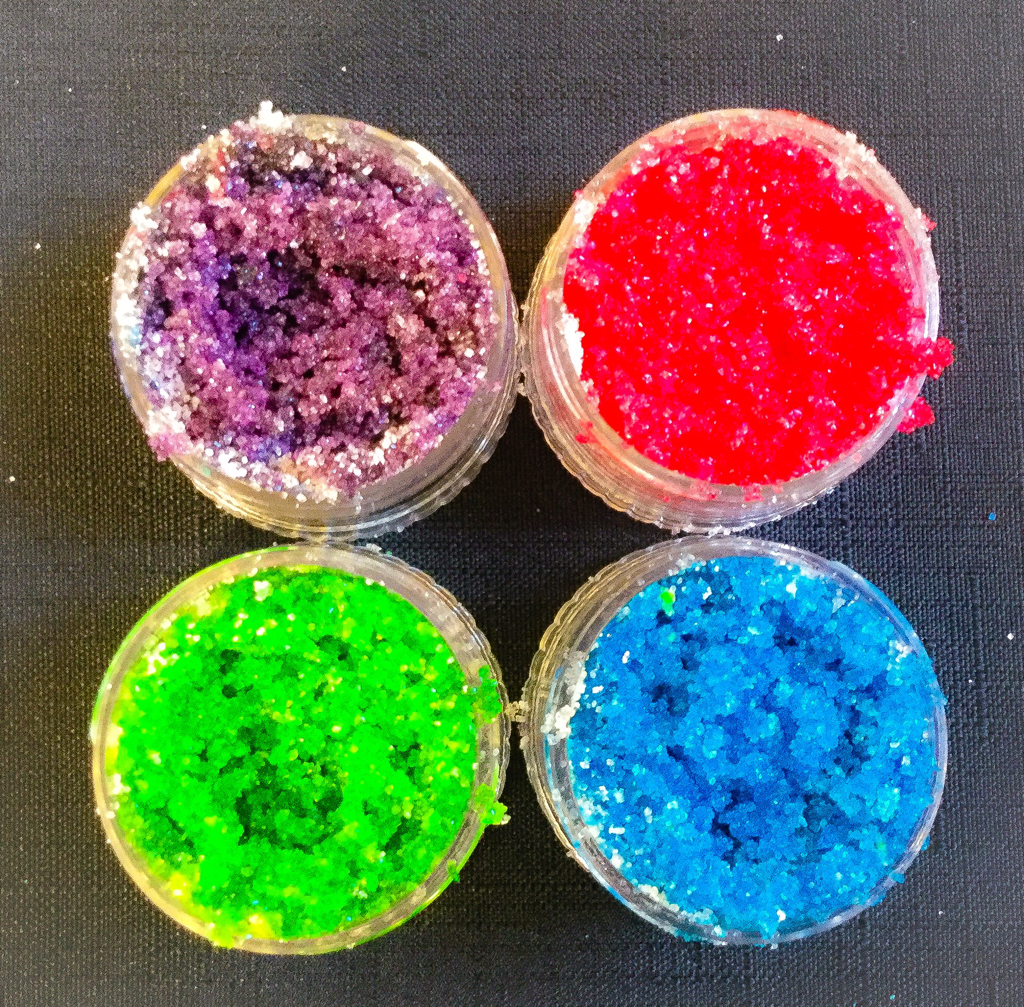 5. This is what it should look like when it's done. 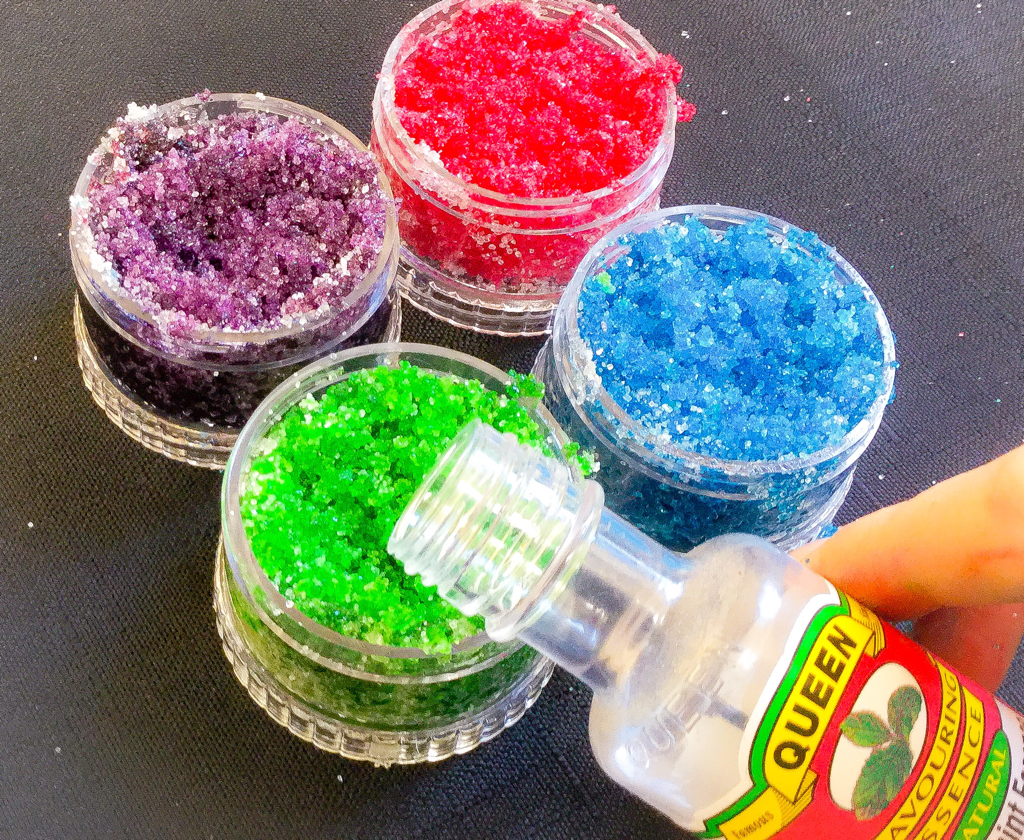 6. Then add food flavouring to each countainer and mix with a toothpick. 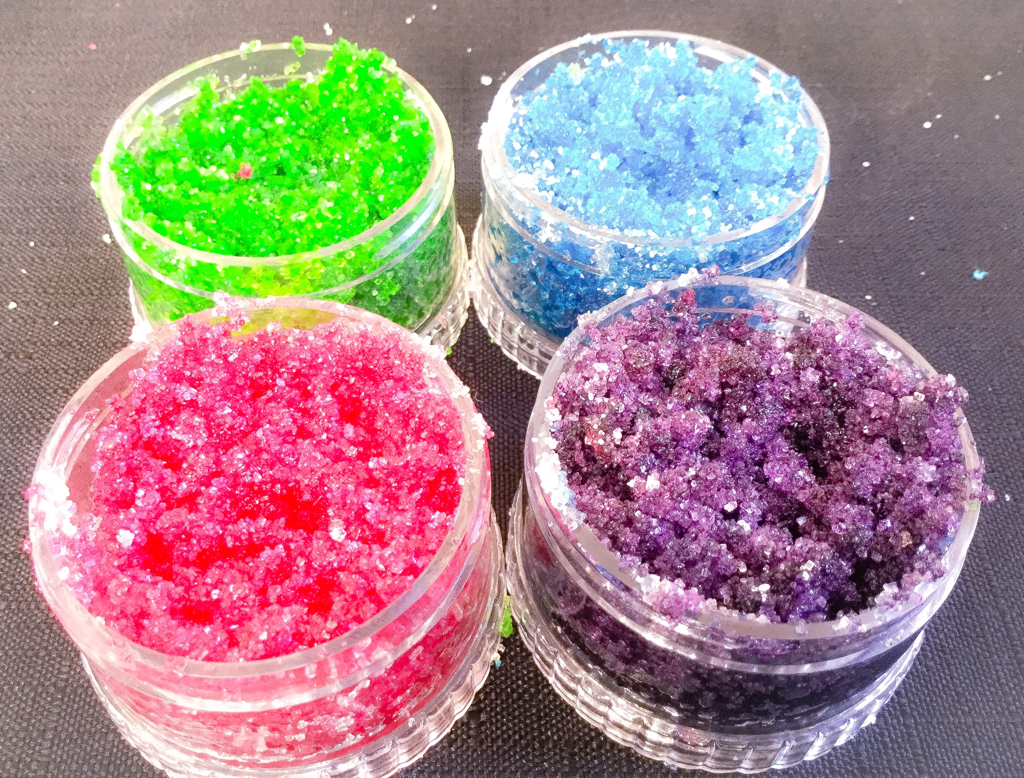 7. This is the finish product. Have fun with your new lip scrub.
Sorry I haven't posted in a while. I have just had so many tests, assignments and school work. Because yes I am still in high school. I am going back on to posting at least once maybe more a week. My submitting days will be Sunday every week. I hope you guys enjoy my blog posts. Please comment so I know what you want me to post and what you like and don't like. It will help me a lot. Be sure to subscribe if you like my website for updates every time I upload.  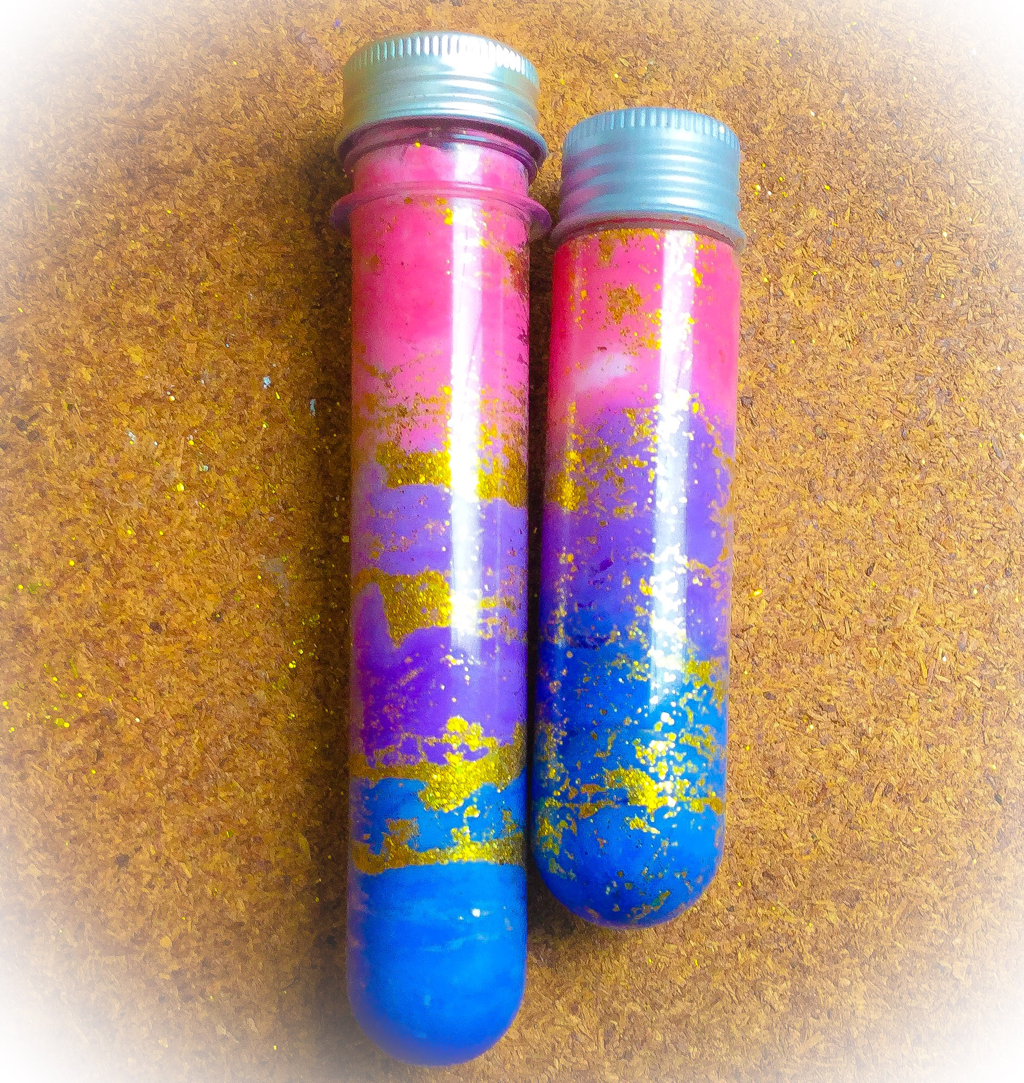 How to ask a galaxy jar step by step. This was found on YouTube and Pinterest this is just how I made it. This was done with one of my close friend. I hope you have fun making it! 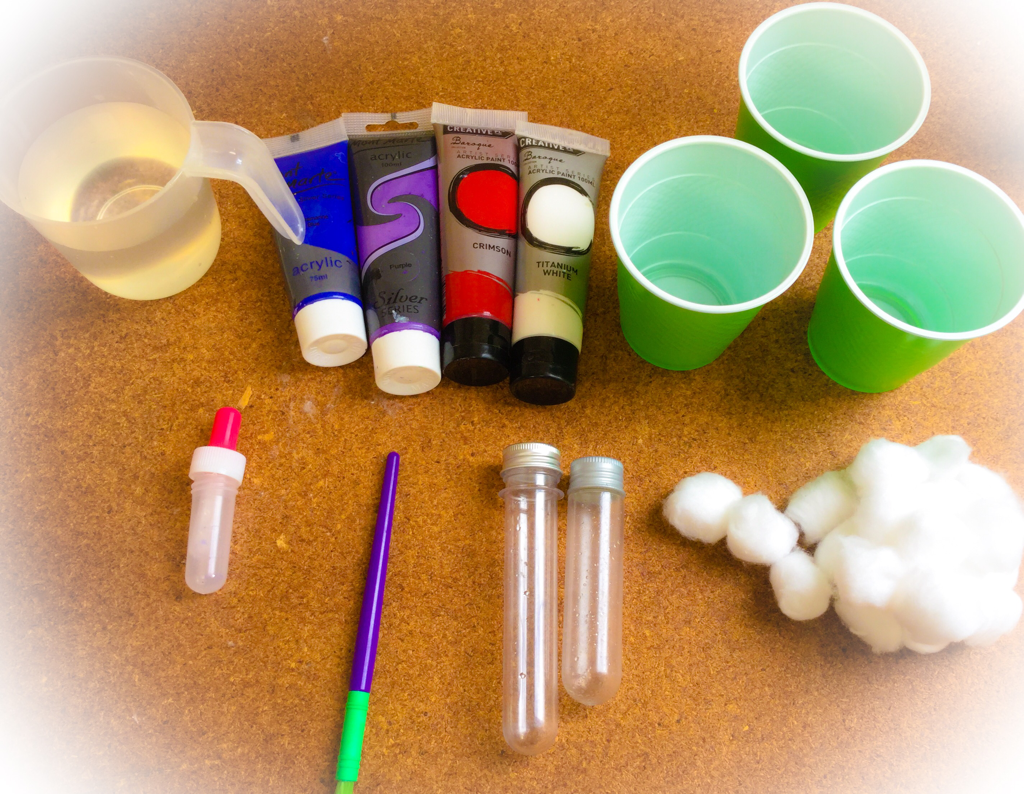 You will need:
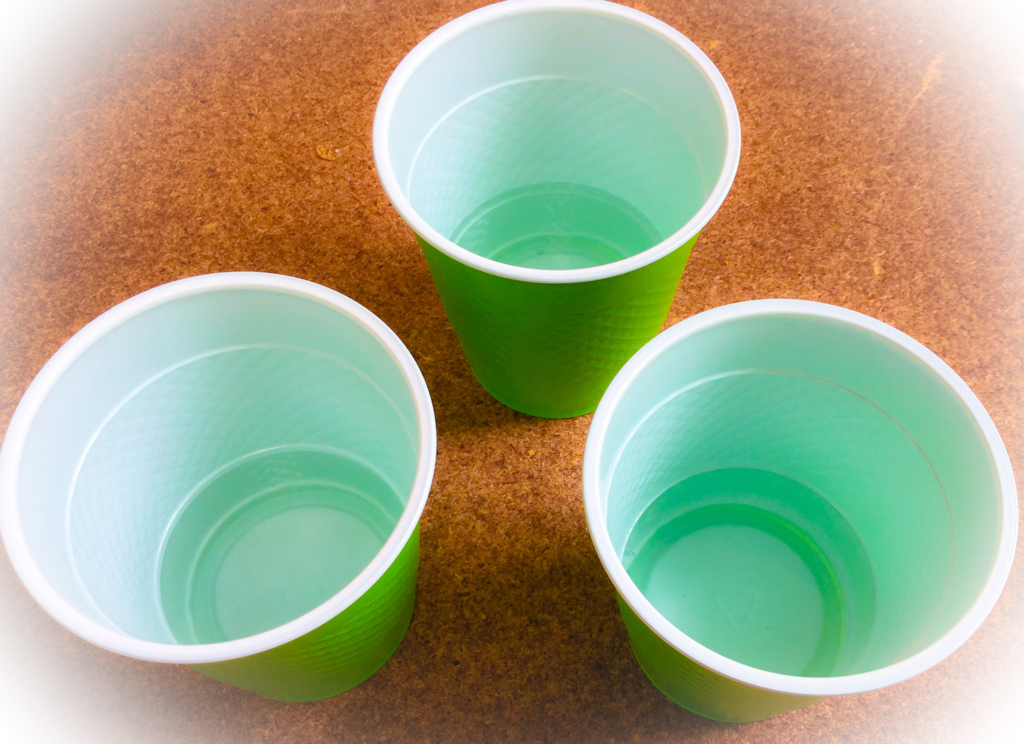 1. Pour water into each of the cups. 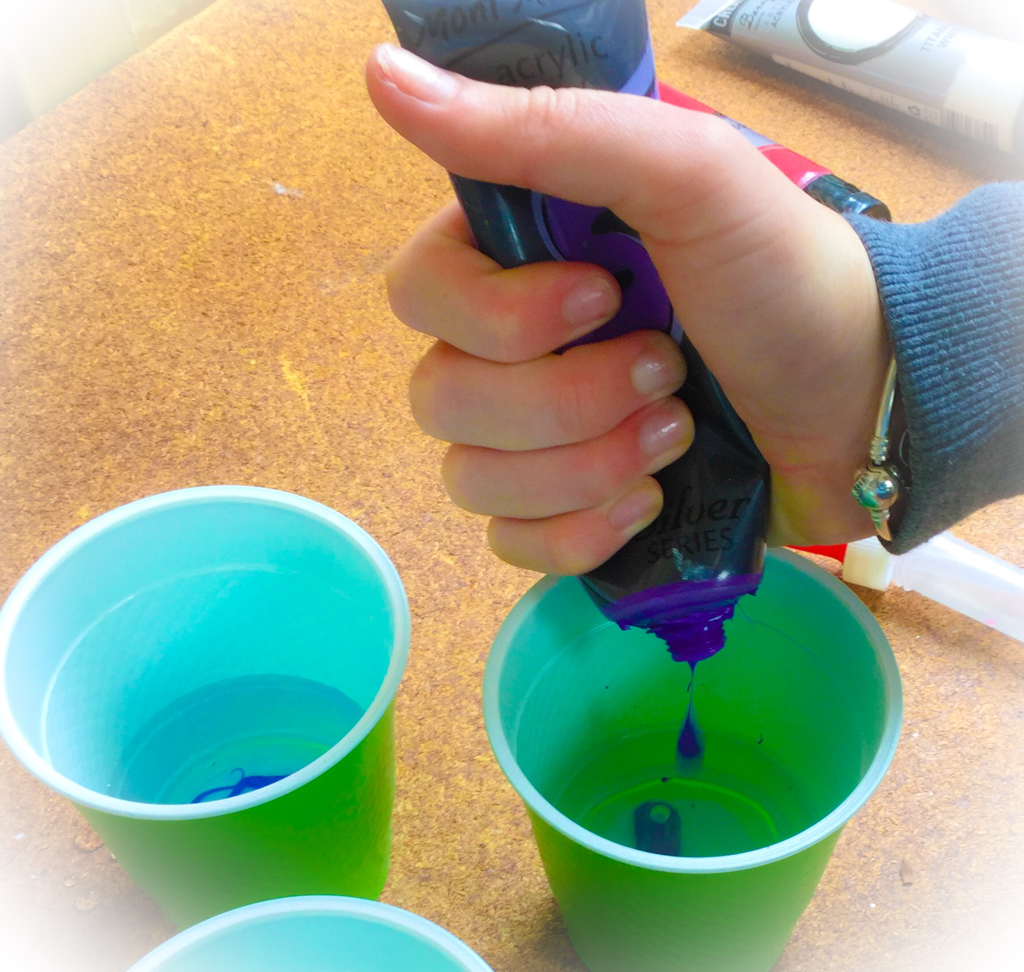 2. Add different coloured paint to each cup. 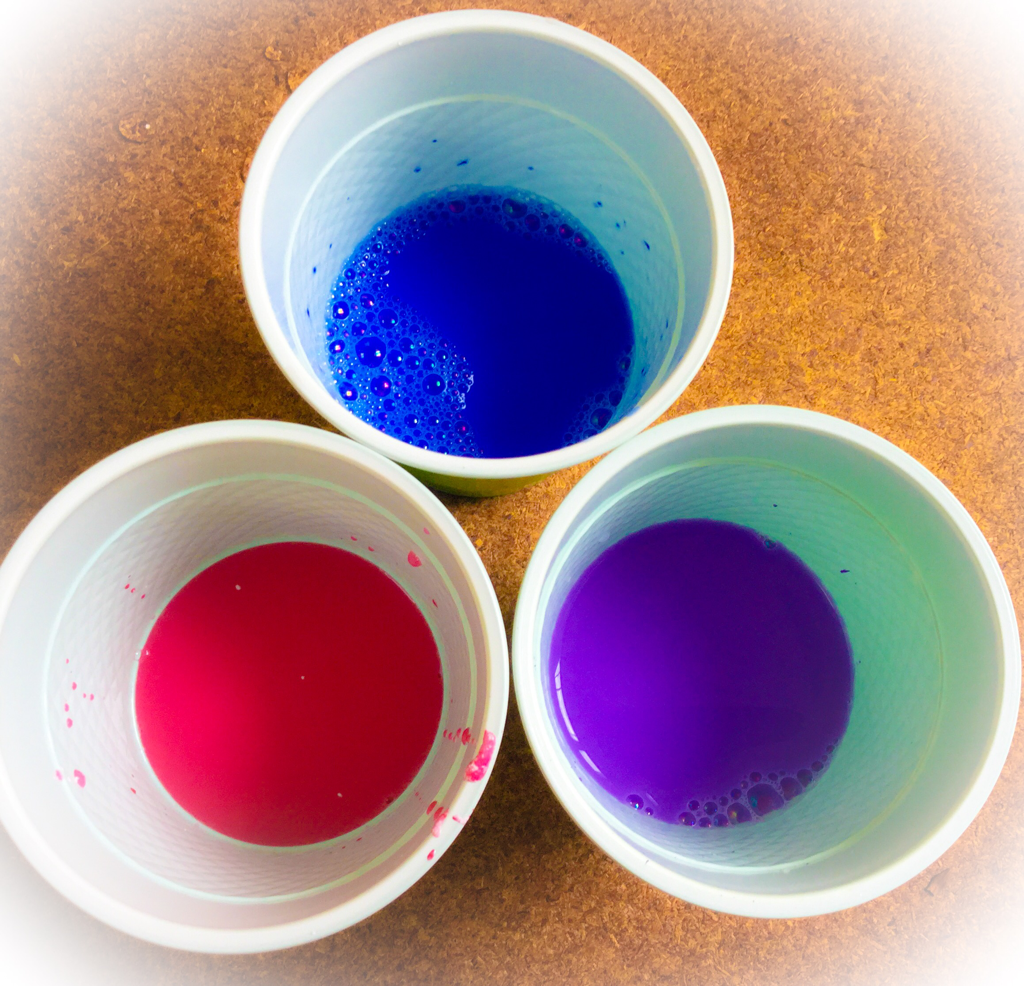 3. Mic well.  4. Seperate the cotton balls to put in your galaxy jar. 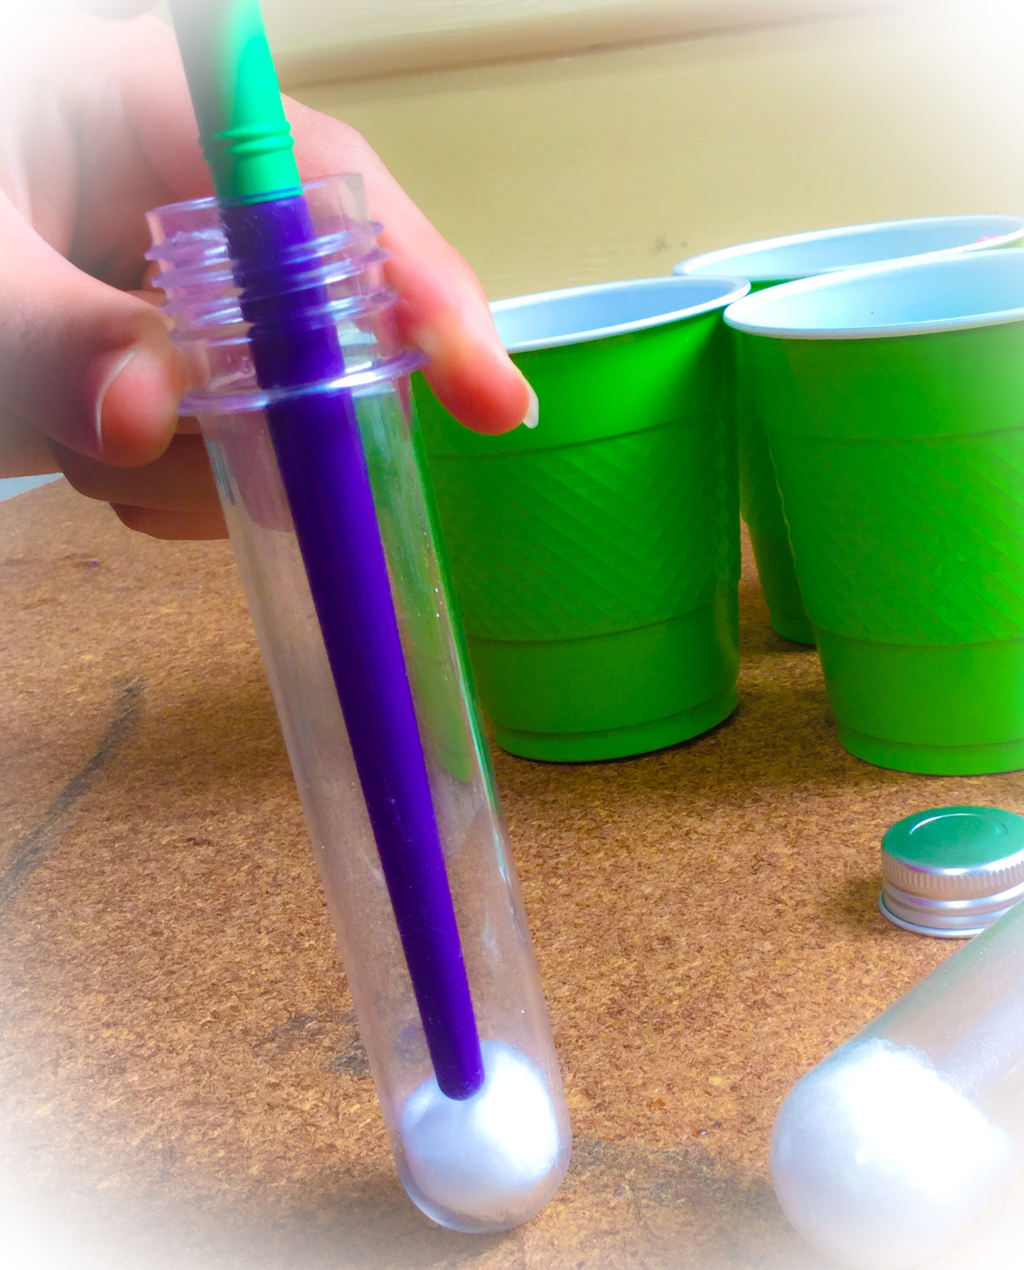 5. Get something like the end of a paint brush to push the cotton balls down. 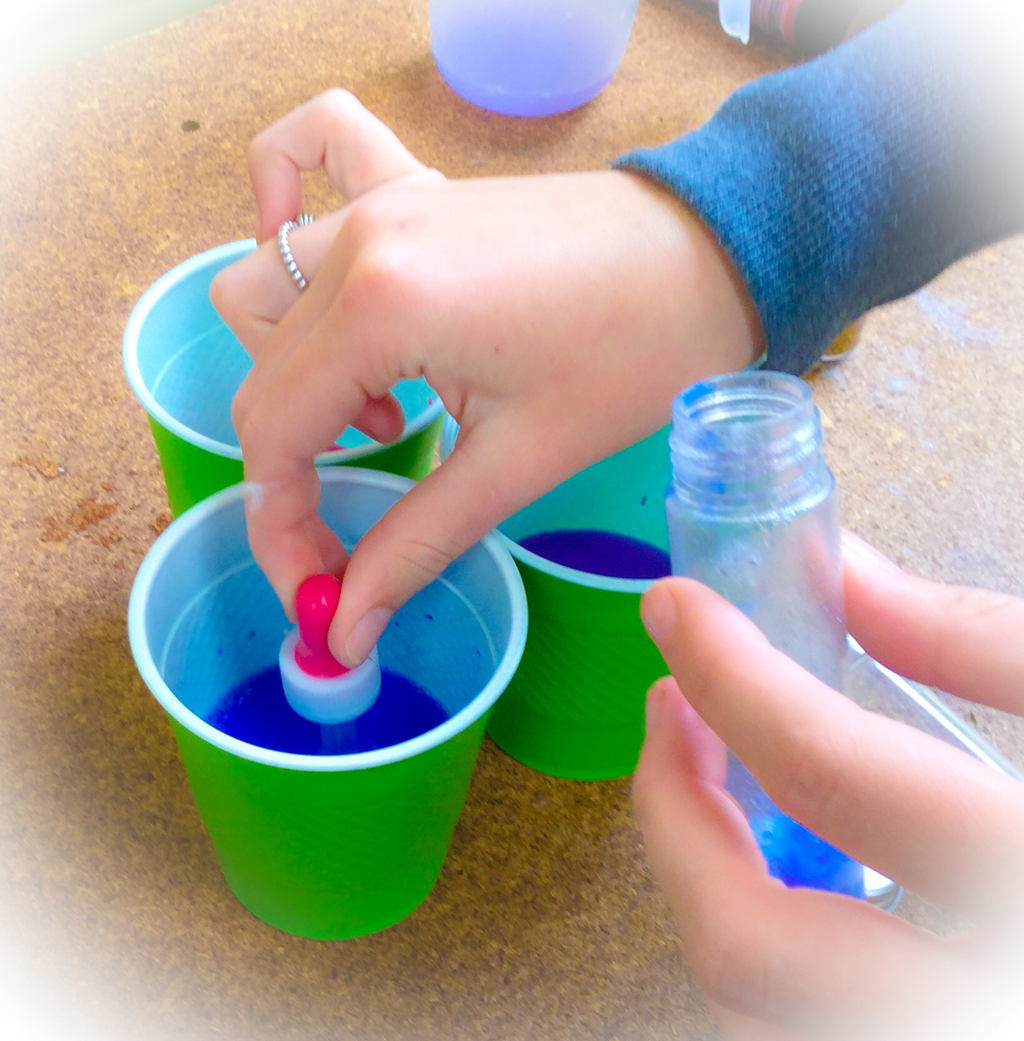 6. Get some of your first colour (blue) and pour into the jar. 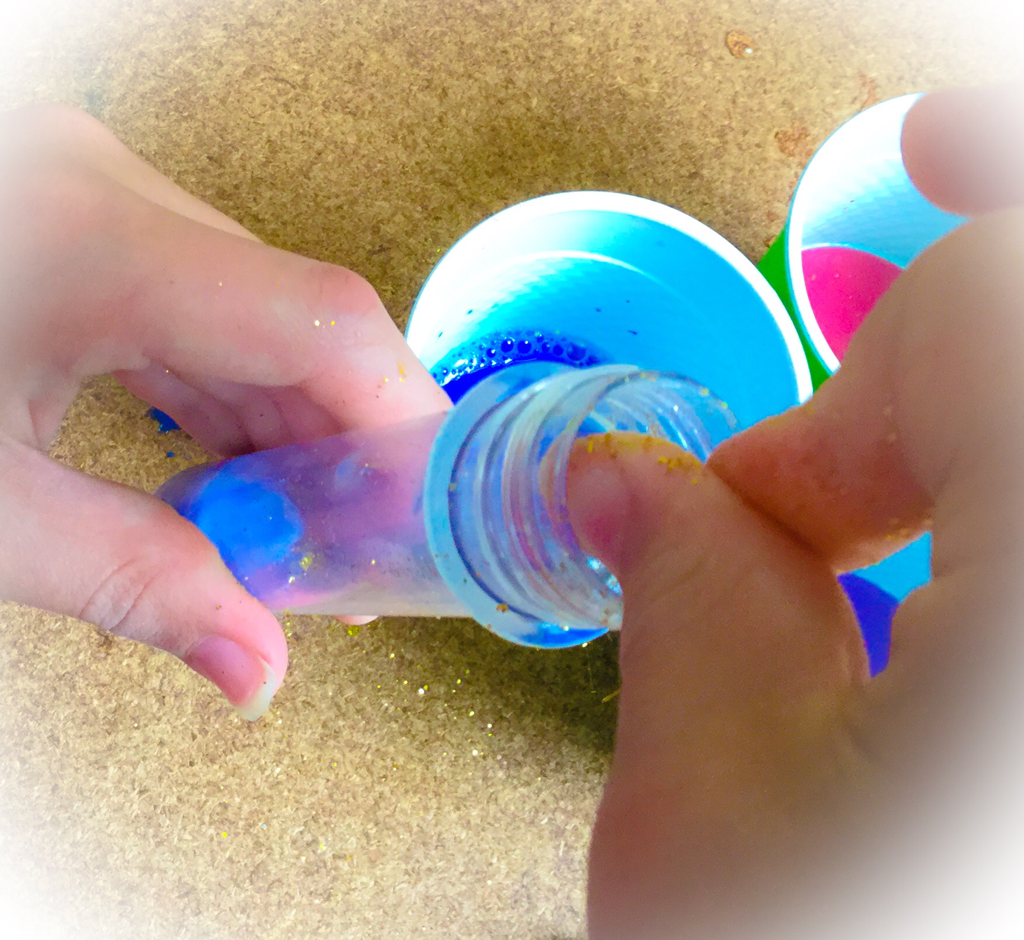 7. When your happy with the look add glitter for the stars. 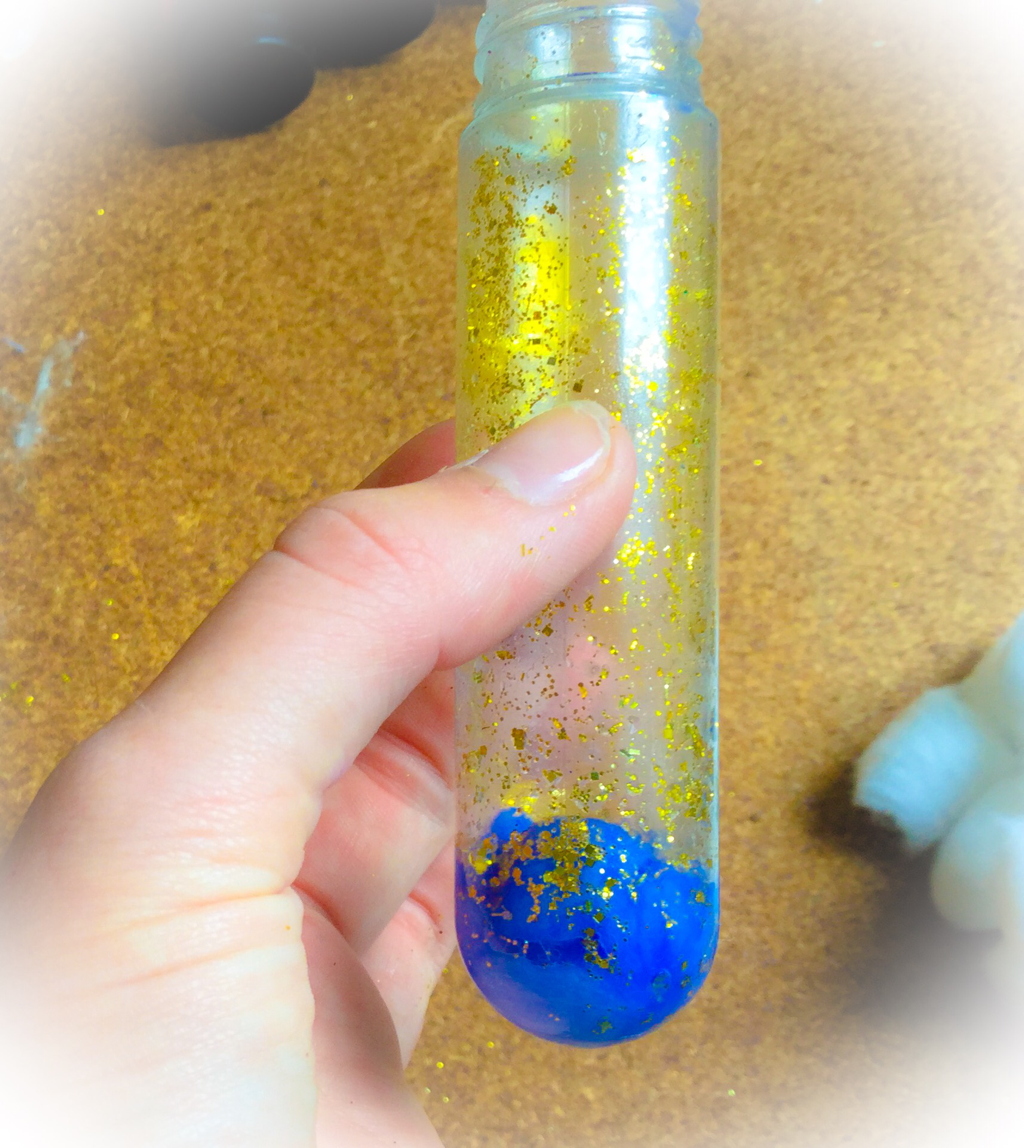 7. It should look like this. 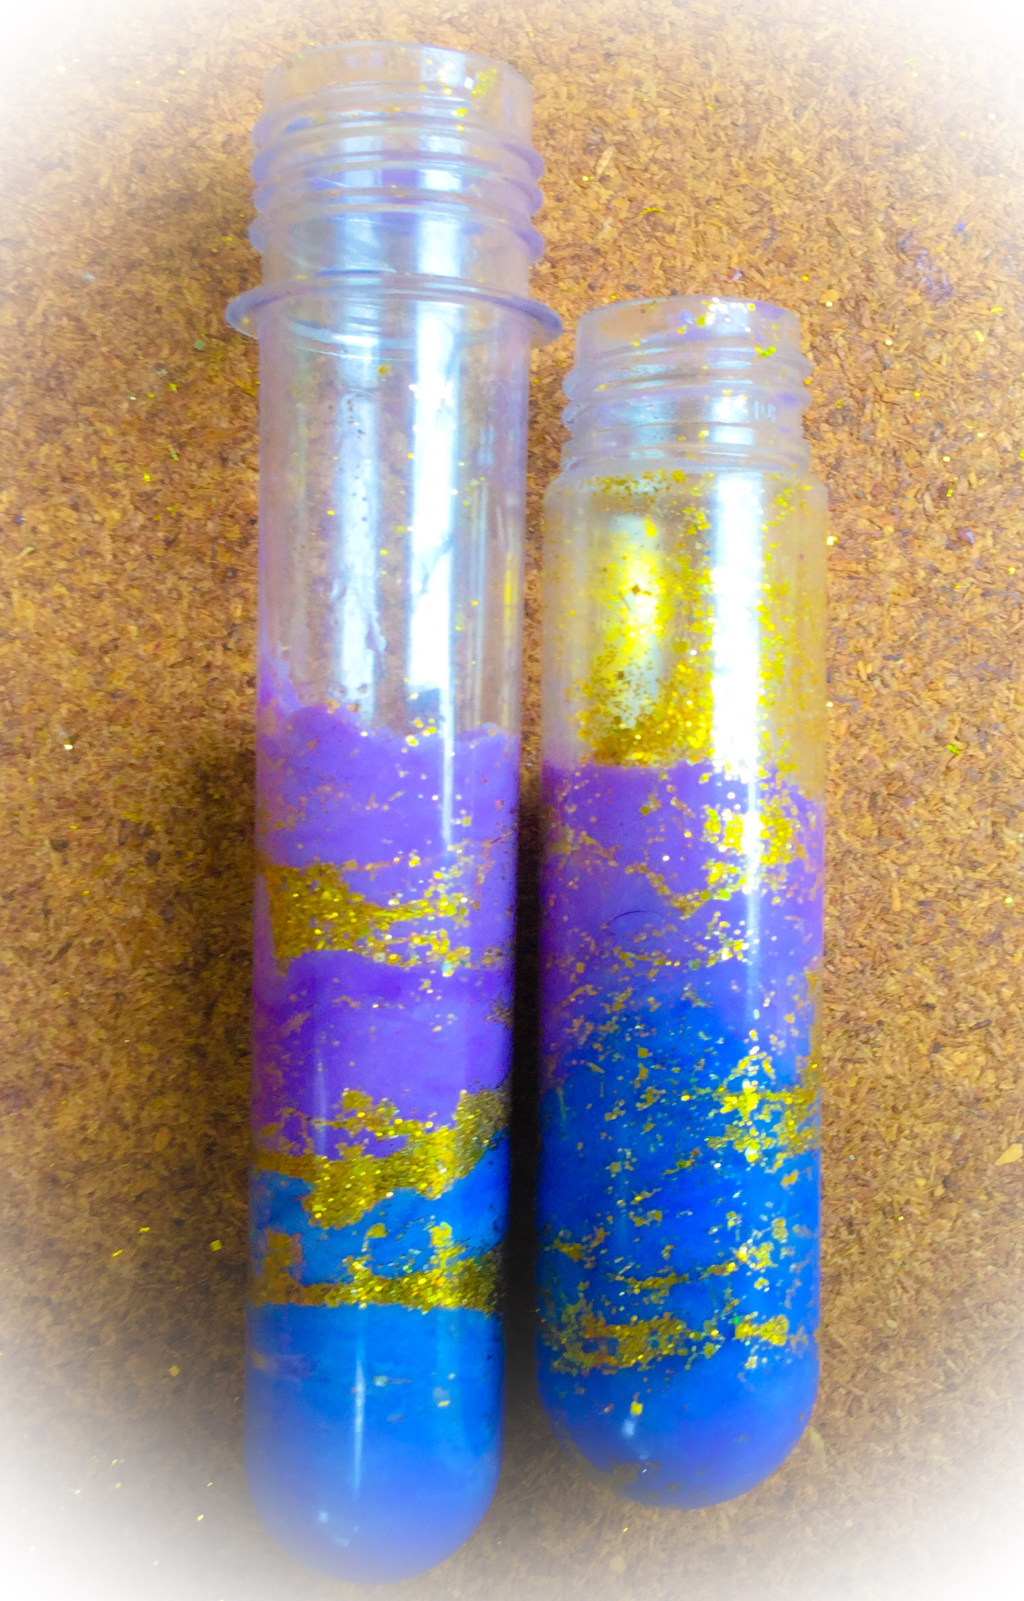 8. Now do the same with your second colour (purple). Don't forget to add more glitter.  10. Then do the same with third (pink) and so on. This is what the finish product will look like.
|